Ford focus 2004 headlight. Headlight Bulb 2019-03-30
2004 Ford Focus Headlight Bulb

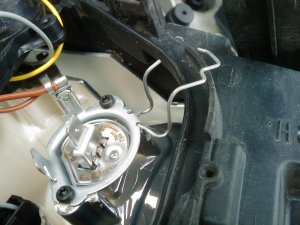
Look though the front of the headlight assembly to familiarize yourself with the bulb location. Use your mirror to locate the depressions where the bulb tabs go. Fitting was even easier - Put bulb in place, clip the retaining clip in place, plug in and replace cover. Note: Even though the 2005-07 models share the same basic body style, the headlight units were changed to incorporate the turn signal within it, so I am not sure if these instructions will work. After establishing the aiming screen, paint or tape a reference line 6 on the floor 7. Use the hand mirror to look at the back of the bulb assembly.
2004 Ford Focus Headlight Bulb

The back of the bulb has a three-prong plug. You need to remove the grey plug from the switch. Flicked the headlight cover off using the screwdriver for a bit of leverage. Step 3 With the use of a mirror locate the spring-clip that holds in the bulb. Have another look with the mirror to get an idea where the clamp is seated at the top of the bulb housing. Adjust the vertical tapes 2 on the screen in order to match the vertical centerline of each low beam lamp. It took me around 15 mins.
Headlight Bulb

The clamp holds the bulb itself in place. A small mirror and a flashlight make this job simple. To do this you need a 10 millimetre socket with an extension, a ratchet drive and a Torx bit and driver. If this helped you, let me know. Place the new bulb in the headlamp making sure that it seats properly and re-clip the spring clip to hold it in place. Refitting is a reversal of the above steps. Re … verse process to install new bulb.
2004 Ford Focus Headlight Bulb

Less than 5 minutes for both bulbs. Press the tab on the back end of the switch to release it. Just done the bulb on the drivers side of my 55 plate focus. If it has to go inward you would loosen the outside screws if it has to go the other way tighten it. Once I figured it out, it took me about ten minutes to do it correctly.
How do you change the headlight bulb in a 2004 ford focus

On the front of the van in the gap between the trim. At the top, it has a one-inch extension with a wire loop at the top. Removing the headlight cover is the best method. The important tip about not touching the 'new' bulb when installing is why some people say the lamps don't last long. This is done by unscrewing the 10 millimetre screws, one at each end, using the socket and extension then using your fingers to release the clip at each end which holds the grill in place. For those who want to waste time but save a buck, aim your headlights at a wall from 25 feet away, find the adjusting screws near each headlight, and turn each screw until you achieve what you're looking for.
2004 Ford Focus Dim Headlights: 2 Complaints

Reach up inside to back off the bolt. The bulb should now be free to be pulled back out of the tube, though still connected to the wiring. Note which way the bulb fits into the headlamp. At the back of the headlamp unit, push down the clip holding the plastic weathershield in place and remove the weathershield by pulling it outwards and down so that the lugs at the top come out of their holes. As simple as it sounds, the owner's manual is the best place to start for bulb replacement instructions and illustrations. Next remove the front grill the one with the Ford badge on it. You can then see what you are doing and its dead easy then! You'll have to lie on your back to do this.
How do you change the headlight bulb in a 2004 ford focus

Ensure the vehicle has � tank of fuel or less. Re-fitting the headlamp is a reverse of the removal procedure, once you have located the lamp back into the car body I'd fit and tighten the screw inside the wing first, before tightening the two top screws. If you get any dirt, hand oils, grease or other contaminants on these extremely hot bulbs you will shorten the life span considerably. The screen should be visible to the technician adjusting the headlamps. Make sure the dust boot is sealed - without it, moisture can get inside the headlamp and obscure the light. Park the vehicle with the headlamps directly over the reference line 6.
How do you Adjust headlight beam on Ford Focus 2004
Remember to not touch the bulb itself, and follow any new bulb's directions for cleaning if you accidently do touch it. Once you identify what you need to do by looking in the mirror or take a pic with a phone camera you have to work by feel. Now you can easily reach everything as well as see what you are doing. All that is left is to put the new switch in. Monday I am taking this very expensive to fix car to the dealer.
How do you change the headlight bulb in a 2004 ford focus

Start it onto the edge at one spot, and work it around until it's fully seated. Once you identify what you need to do by looking in the mirror or take a pic with a phone camera you have to work by feel. To get to the screws you will have to take the side turn signals off with a star-driver and 3 star screws. See sources and related … links below for replacement bulb information and full light bulb part numbers list. Pull to remove the plug from the bulb assembly.