C1155 ford. C1155 Ford Kuga DTC Code 2019-01-27
Ford abs codes c1155

Just pulled the wheel off to check size of existing nut, which is 1. Ford Expedition Engine Specifications: Engine Type : Multi-Cylinder Engine Cylinder Type : Opposed Cylinder Engine Engine Air Intake Process : Supercharged Engine Your Ford Expedition engine control system detects a problem, the computer stores the diagnostic trouble code C1155 in its memory. I did read that spinning the wheel with the meter on it, should show a change, so I'll try that. The solution is here : Ford Explorer C1155 Possible Solution : The crankshaft sensor signals the fuel injection computer or the ignition control when the cylinders are firing. As a result, oxygen sensors are likely to report fuel mixture problems. I bet that's where the problem is.
C1155 Ford Auto Trouble Code With All Car Models

C1155 code resolves the synchroniser pin is released using hydraulic pressure which is controlled by a dedicated solenoid. Light is coming on intermittently again. Now don't ask yourself; What should you do with C1155 code? Car and truck exhaust contains toxic gases such, so if the inside of your car as if you were standing behind your car, get out and get it fixed. Last time I drove it, the light was on from startup to shutdown, with several errands in between. Thanks for the input Polizi.
C1155 Ford Auto Trouble Code With All Car Models

While not car-threatening, it's good to take care of this right away to improve gas mileage. It is a form of stability control. Since I'm flippin' broke, I'd prefer to verify that assembly is really needed, first. If you have any questions, contact us at and we'd be glad to help. Whew, that is really in rough shape.
C1155 Engine Code Meaning
At least I have company: He usually puts his ball in a bucket, but this will do instead: Hah, our furry son. Holding my breath and crossing my fingers. If the plug wires are out of sequence, the explosion occurs at the wrong time. Still won't be easy, but that's got to be the way to do it without hurting the half shaft. I think I figured out how to get that nut off.
C1155 Ford Auto Trouble Code With All Car Models
Not an absurd offer, because it was available for that price on Ebay in February this year. It's flippin' buried behind the caliper, which I wasn't inclined to pull apart just on a hunch. Ford Kuga Engine Specifications: Engine Type : Multi-Cylinder Engine Cylinder Type : In-Line Engine Engine Air Intake Process : Supercharged Engine Your Ford Kuga engine control system detects a problem, the computer stores the diagnostic trouble code C1155 in its memory. Might Be Fixed It was raining yesterday, with no room in the garage, so I couldn't have at it till this morning. This causes the ignition coil to provide a spark and the injector to inject fuel into each cylinder at the right time. Elite Explorer members see practically no ads, can add their own profile photo, upload photo attachments in all forums, and Media Gallery, create more private Conversations, and more. As a result, the engine stutters or backfires, if it runs at all.
C1155 Ford
Followed the cable to the connector next to the battery. When I stuck my hand there and wiggled it, it would set the light on. As a result, the engine stutters or backfires, if it runs at all. I'm tempted to let it slide, but I figure if we're going to do it at all, might as well be now. Had no slop in it that could be detected, but groaned when turning.
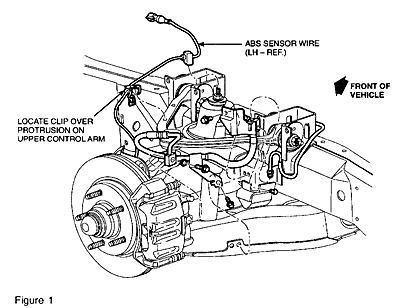
Ford F150 front ABS Speed sensor replacement C1155

Do not use a self-powered test light because it cannot measure resistance any resistance will lower circuit voltage. It's been driven daily at least three miles in each direction since cleaning the connection. Some car manufacturers then close the vent solenoid but leave the purge solenoid open. That's the carbon monoxide talking, friends. The connectors look clean to me with no oxidation at all. This will turn the check engine light off and then you will know if the check engine light returns, you've got further diagnostics to complete.
C1155 Engine Code Meaning

Same boat I'm in, but mine only comes on in the rain. I figured I could change out the cable to it, if it was just a broken wire or something. But, how do you get this damn nut off? So, some folks have said Autozone may be able to scan this. If you've already made it to the store, you might as well just replace it. Refer again to the wiring diagram to find the ground path, and then check it with your ohmmeter. And, I'm just doing the left side for now.