Bootable usb stick mac. macos 2019-03-13
How to Create a Bootable Install USB Drive of Mac OS X 10.10 Yosemite « Mac Tips :: Gadget Hacks

Any help would be greatly appreciated! Carry on from Step 8. I was never able to write a Mac installer image to my Flash Drive and have it bootable, unless I did it on a Mac. I should also point out that as soon as the installation file has finished downloading, it will immediately open up and attempt to start the installation process on your computer. Again, the installer will launch when the download is complete; close the window when this happens. When everything has finished, Etcher will declare the process a success. I don't have any time machine backups.
How to Boot a Mac from USB Drive (with Pictures)
Read more of my posts on my blog at. However, the answer provided isn't helpful in my case I'm afraid. Although this method involves more steps, it's easier for many Mac users because the majority of the process uses familiar tools. Only a couple things left to copy over. The Hardest Way: Do Everything Manually If you don't want to use DiskMaker X or Terminal commands, this is another option for you. Let us know your experience in the comments! Also, transfer any existing critical files off the stick, because when Sierra jumps on there, everything else is going to get nuked.
How to Boot a Mac from USB Drive (with Pictures)
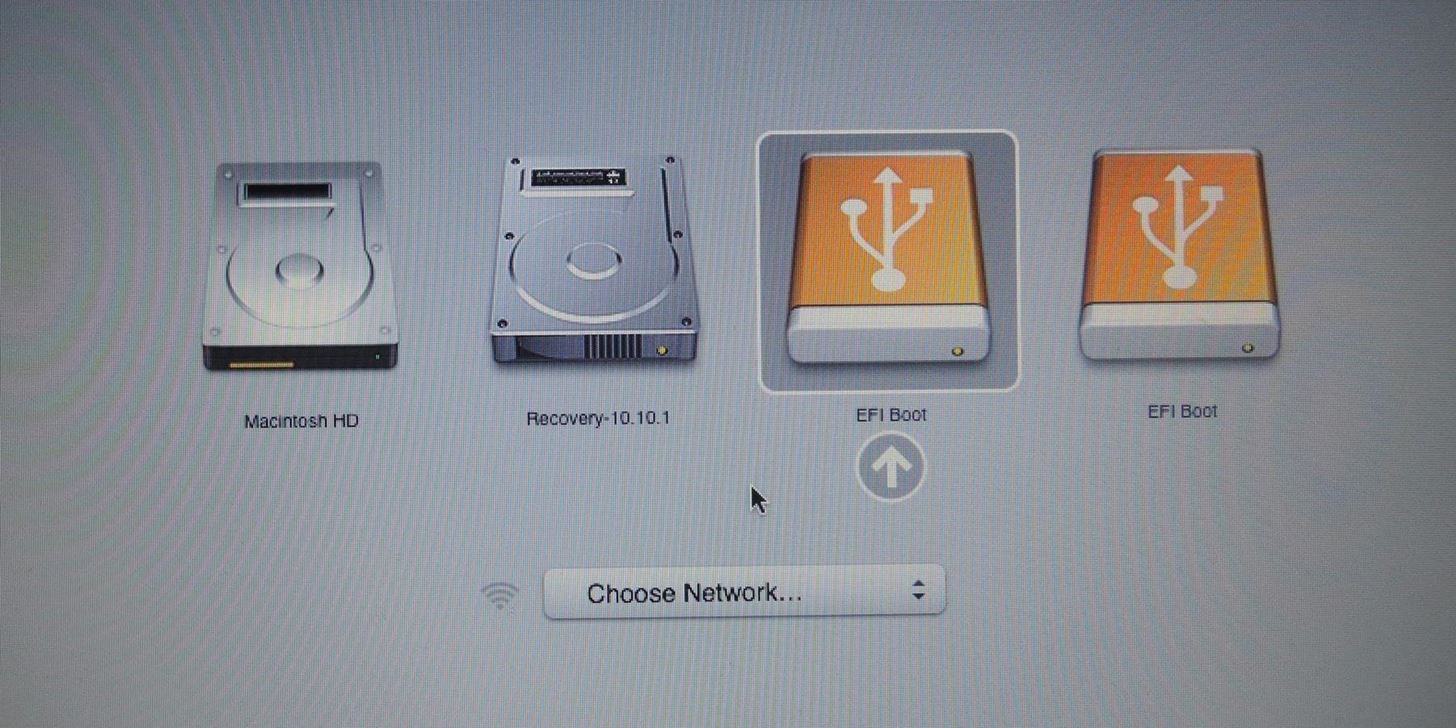
Step 5: Move the Packages Folder Over to Your Drive Go ahead and open the System folder. There are two ways to do this: one with third party software, and another with the Terminal. Following I am able to to copy the image to the usb stick using dd. Not say you didn't get an older version to work, however, just to keep others from wasting their time. If you boot holding the option key down, the startup disk selection screen should appear.
How to Boot from a USB Stick on MacOS

That is the only thing hanging up my adventure. See for download links 3. And we're almost done now. And unlike many other sites, here there is not a paywall or anything blocking readers from accessing the site. The is the last version of the installer with which we verified this manual method using the Finder, Disk Utility, and Terminal. But this only solves part of the problem. Yes Mac fanboys, your computer too.
How to Create a Bootable USB Installer for macOS High Sierra
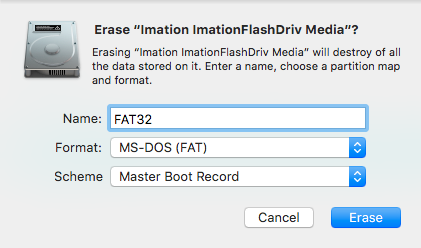
You will therefore get a box where you have to confirm you want the file. Just a little thing, make sure to have formatted the disk before proceeding, I would recommend to make a partition that takes the whole disk in mac Journaled format, then if you want you will be able to encrypt the disk the installer will ask you to do that later , instead, if the disk was encrypted before, you will have to insert the encryption key of the disk to continue the installation process. This is done via the command. So, if you haven't yet used the installer you downloaded, don't. If it crashes anyways, you may be looking at a hardware problem.
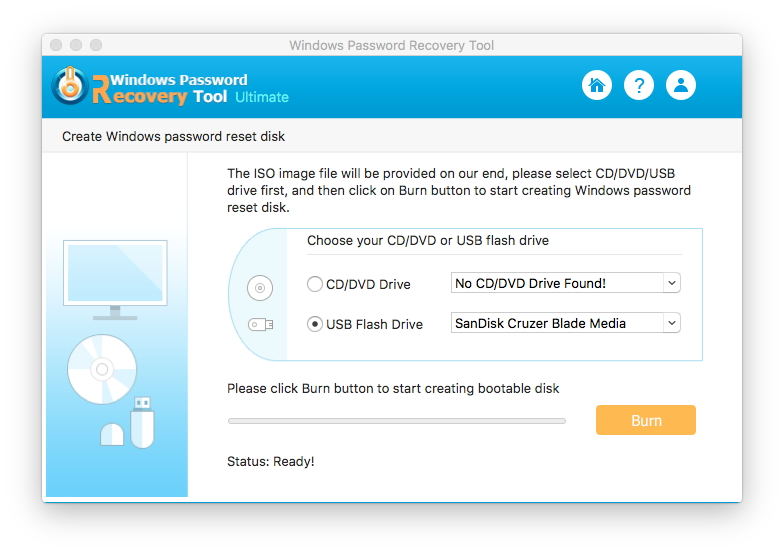
How to create a bootable Windows 10 USB on Mac

The solution to this problem is simple. Explain why you think the link you provided will answer the question. This will allow you to select which drive you boot from. Of course, the speed is dependent on the device you're copying to. Now sit back and wait.
boot

No need for lengthy process of hiding. This is because the hdiutil program automatically adds the dmg file extension. Selecting this will lead you to the standard Ubuntu boot menu. This is useful when attempting to install an operating system e. Once you have the right partition table and partition format then you can proceed with and it should be fine.
How to Make a Windows 10 Bootcamp USB Stick
Kevin --- Connect With Me --- Website: Twitter: Facebook: Google+:. Press Enter to launch the app. Look for your flash drive's name, letter, or size in gigabytes to identify it. The entire process can take a while around 20-30 minutes. Watch our step-by-step video for the details. After you get it in there, just hit the Enter key. Traditional flash drives only fit one way, so don't force the drive if it doesn't fit.
boot
Just eject the new drive and use it. If you see the mac logo with a stop icon over it, it means that you downloaded a too new version that is not supported from your mac, else it will start. See on how to provide a quality answer. It's a lot more complicated, but gets the job done. We told you it was easy! After your Finder reloads, the hidden files you once saw before should now be gone.
boot
Great tutorial and thanks for your hard work and for your generosity! Cover image via Related Woah! The installer will load when the process is done; simply close the window, then head to your Applications folder to confirm the installer is there. Step 6: In the Terminal window type sudo followed by a space. Open up Disk Utility and do the following. I'm wary of going too high since this laptop is so old and I'm pretty new to doing my own upgrades. If you're not sure if you're going to like Yosemite over Mavericks, I would suggest and installing Yosemite there, that way if anything goes wrong, your Mavericks installation will still be untouched. If you boot holding Command-R and you have a WiFi connection, it can actually boot into recovery mode without a recovery partition on a drive or even without a working drive. This is a paid software, but it gives you a 15-day trial, which is more than enough time.