Adobe premiere pro cc 2015 proxy editing. Speed Up 4K Video Edits Using Proxies in Adobe Premiere Pro 2019-02-05
Proxy Editing On Adobe Premiere Pro CC : VideoEditing
Think Minority Report or Sin City, not the nightly news. I don't need to do anything else, I can toggle straight back into Premiere Pro and I can carry on working. His comfortable approach and calm demeanor are typical when you find yourself as a student taking one of his courses. Type of Tutorial: Not Set Frank Rohmer is currently a professional video producer and editor located in Southern California. If you want to post a job, we expect you to quote some sort of pay - hourly, daily, weekly etc. While it takes a bit more time up front down sampling your high resolution files, it can be worth it in the long run as your editing process will be far smoother without the constant stop and go of your computer trying to keep up.
Transcode MP4 to Premiere Pro CC 2015.3 for editing
And I'm going to add a proxy heading. You know, just making things cool. You can add additional rename actions by clicking the plus + sign. When moving an ingest preset to a new computer, the metadata and rename presets must be moved also. Build live videos Production by editing their scripts and images. If you prefer to use the Reconnect Full Resolution Media dialog or keep Full Res Offline, you may click Offline All or Cancel. Adobe released the onto the world in late June and I was smack-dab in the middle of a project.
Premiere Pro CC 2015

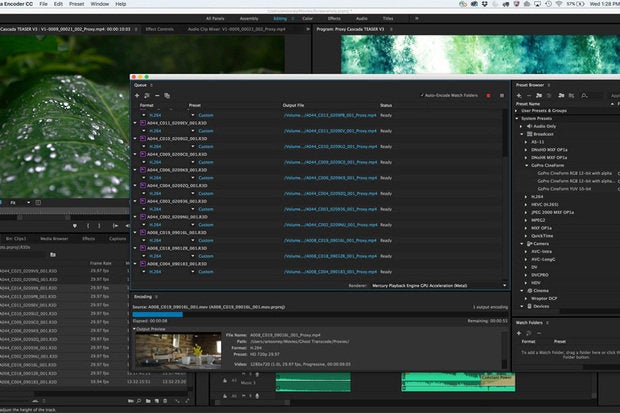
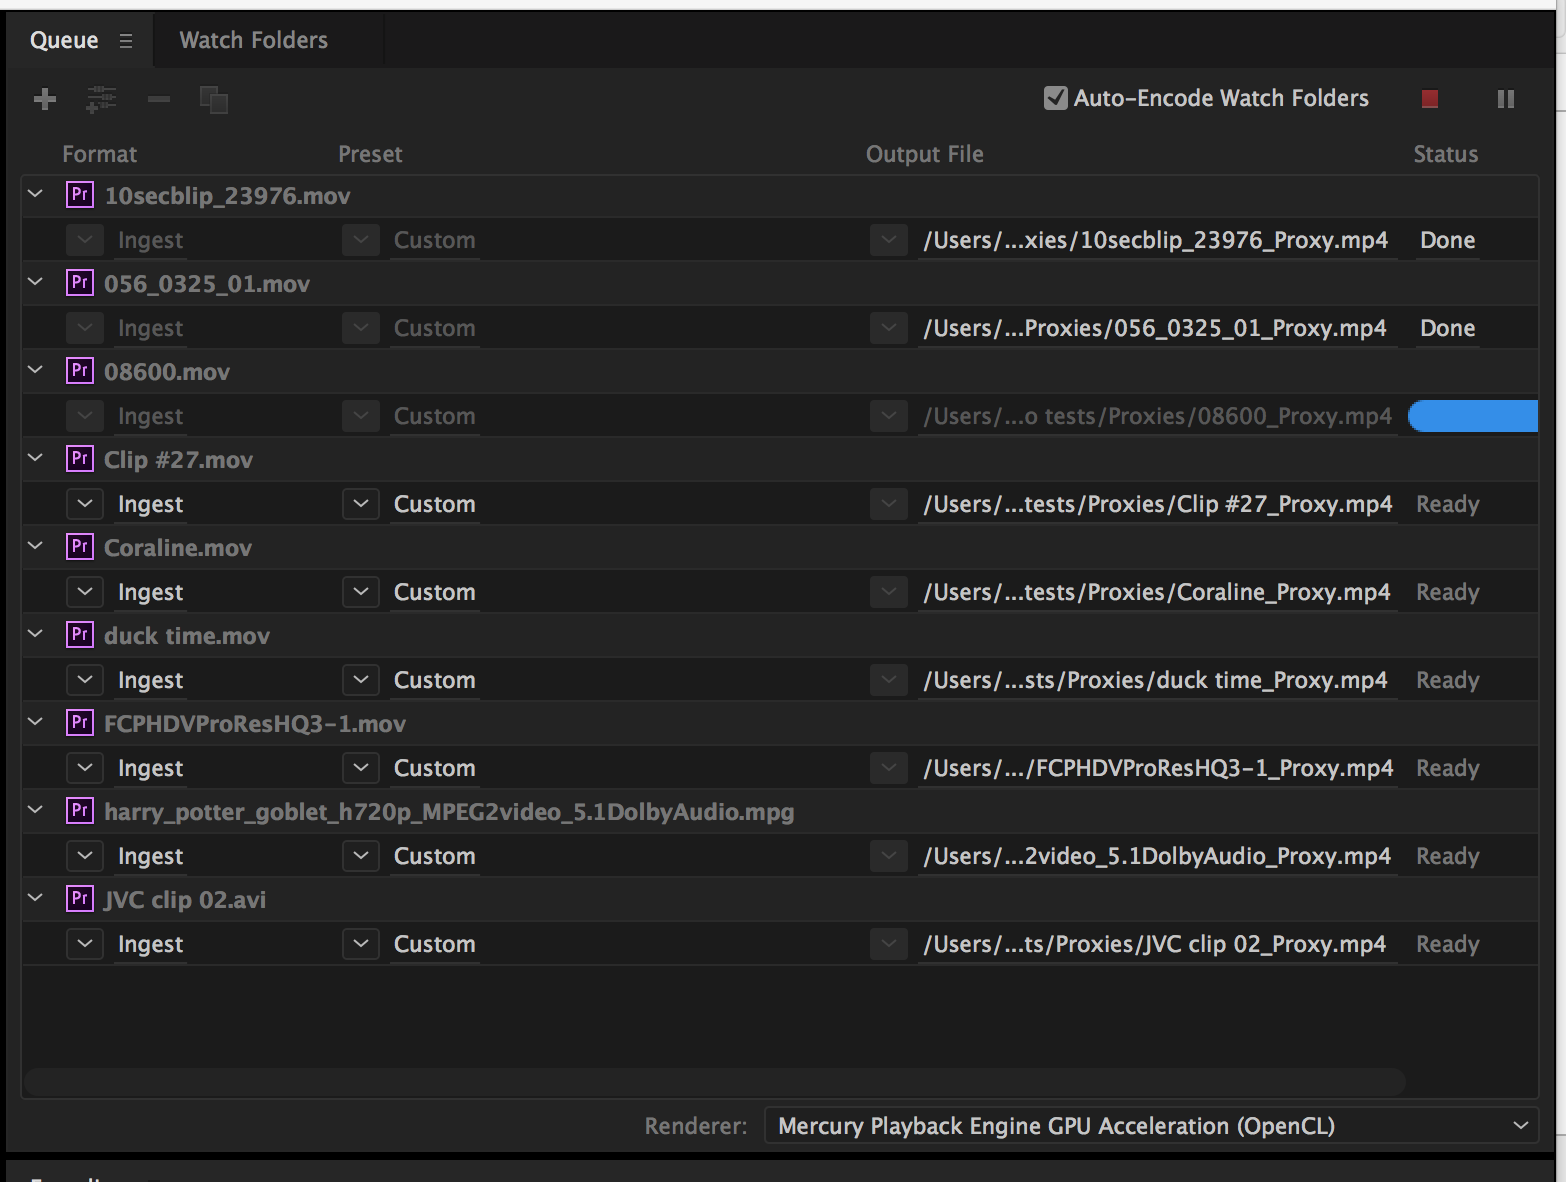
Also be aware that you can send files to your Creative Cloud cloud. Save your proxies in a separate folder from your original clips. Step 7: Go to the Project Panel. When proxy editing is turned on the Toggle Proxies button turns blue. These options are useful if you create proxy media outside of the Create Proxies workflow for example, media created via third party software, hardware, or a combination of both or you want to reattach Proxy or Full Res media to Offline clips. If you want to create proxies after the fact that is still possible via a right+click on master clips with the new Proxy sub-menu. Before I go any further, I'm going to just go full screen here, I am pressing the Grave key there to go full screen with my Project panel.
Adobe Premiere Pro CC 2015 Free Download
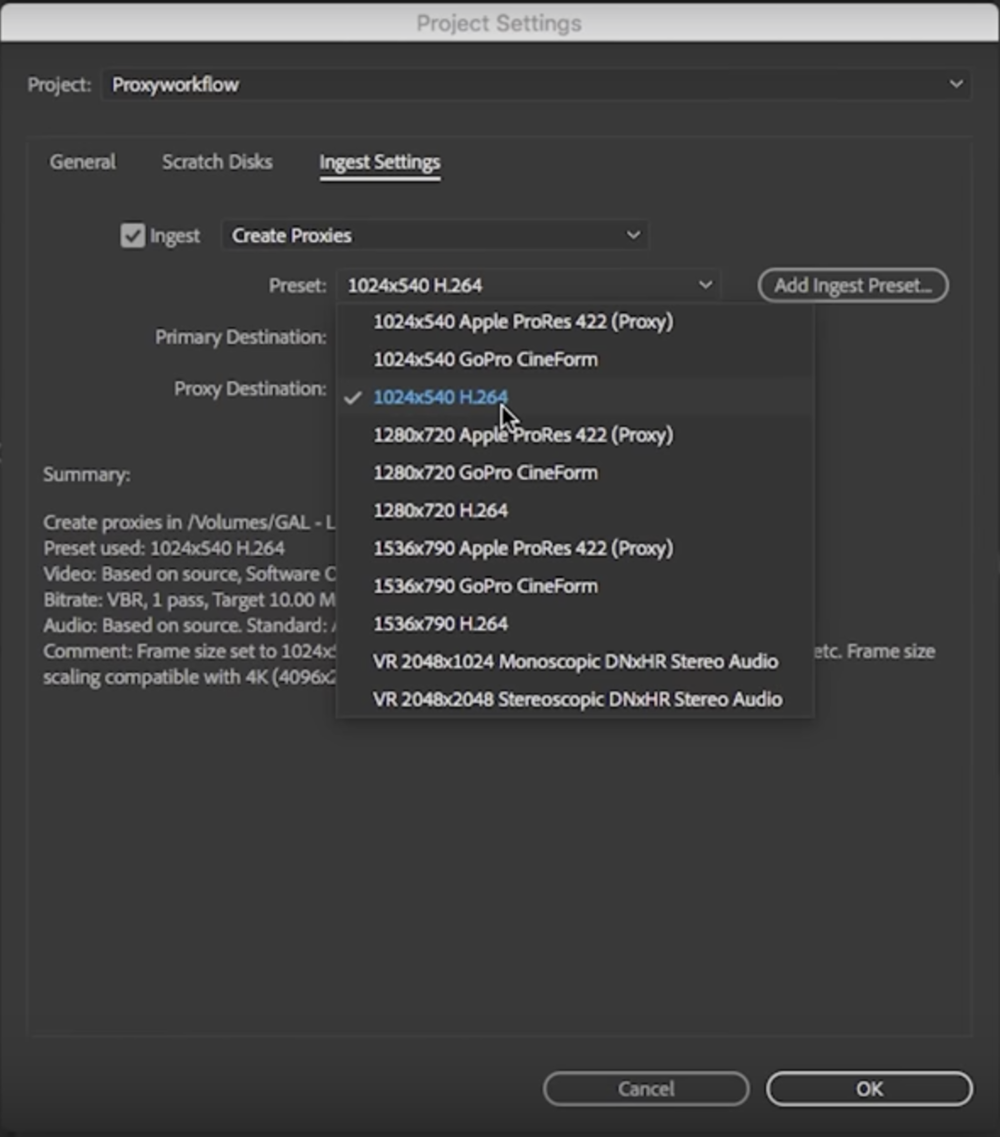
It must be in your Documents folder where Adobe folder is located. At the same, time editors want to work on lighter weight devices, which tend to have less processing power. And switching between viewing the proxy versions of your media or seeing the original quality media is as simple as clicking this button. Choose Create Proxis from the project panel context menu to open the Create Proxies dialog. Select any preferred transition effect and drag and drop to your clip.
Buy Adobe Premiere Pro
You open Premiere Pro, import the files, and within seconds your computer takes a crap as it struggles to render the data intensive footage. You can choose to close the bin it can be opened again by a mere double click on the folder so chill! If you close and then reopen the Project, the Link Media dialog box launches. And also you'll find that a lower powered system will have an easier time playing it back. The Proxy Status column is a new addition to the bin metadata columns. How to Apply Transitions to Your Video Clips You might remember transitions from or from a cool movie wherein when a frame changes from one form to another it appears to fade in or fade out.
What's Coming Next in Adobe Premiere Pro CC and Media Encoder CC

Adobe has added two new features to help your talking-head videos shine. While having an up to date computer recommended and recommended is important, there are ways to further improve playback and overlay speed of your workflow using proxies, lower resolution substitutes, to speed up your workflow. That was a lot of relinking of both proxies and original media and it worked every time. If either the frame size or the frame rate is not marked as Match Source, then the preset is categorized as a Proxy preset for generating proxies. Just open YouTube and see for yourself. Double click on the panel. How many amazing videos are out there? You'll notice that we've got the option to add and ingest preset.
What's Coming Next in Adobe Premiere Pro CC and Media Encoder CC
And the entire collection of beautiful SpeedLooks linear looks help give your media instant personality. This can handle both the copy and organization of media as well as the creation of proxy files. It is a video production and editing software that comes in handy when you are aiming to create your very own movie. And having done that, I'm going to go back to my media browser. Mark In and Mark Out One of the most basic things to do in a video is to get only a portion of it for your movie. If the File Metadata and File Rename presets are not moved to the new computer, the ingest preset does not function correctly.
Adobe Premiere Pro CC 2015 Free Download
If your workflow requires a transcode, you can easily set Premiere Pro or Media Encoder to handle that step for you too. First of all, at the top of the list we've got the option to Copy. While this functionality has existed to some degree in earlier versions, the procedure has been streamlined across the board and is now easier than ever. The simplest one or the default one that you might use a lot is what is hidden behind the Ctrl + D button. All ingest operations are paused during playing back.
Speed Up 4K Video Edits Using Proxies in Adobe Premiere Pro

Depending on what one might want out of such a workflow the world has …. If you decide you want to change the Full Res or Proxy of a clip, you can choose either option again and attach a different clip. In simple terms, offline editing is the use of proxy footage i. In my mind this is exactly what proxy mode should do: letting you easily take much smaller and lower-bandwidth files away from the big originals and edit. For times when the media you need to work with is heavier than your system can manage — for example, when you want to work on a lightweight portable device — you can now , automatically associating them with the native full-resolution media.
How to Use Adobe Premiere Pro CC 2015
But the longer save time for this project project was very noticeable. Notice that little extra space in between your title and your first video? And new Premiere Rush is included in your subscription, so you can capture footage and start editing anywhere, on any device. Step 2: Select the format you wish to see the video in. You can access looks from your Libraries panel, which pulls from your online Creative Cloud account, but they do not show up as options in your Effects panel or even the Lumetri Color panel. If your workflow requires a transcode, you can easily set Premiere Pro or Adobe Media Encoder to handle that step for you too. With these options enabled, Adobe Media Encoder performs additional services in the background while you continue to edit in Premiere Pro. You can also assign shortcuts for each option in the Keyboard Shortcuts dialog box.