Mk4 bumper light removal. How to: Change Mk4 Headlight Bulbs 2019-01-25
Front bumper and headlight removal

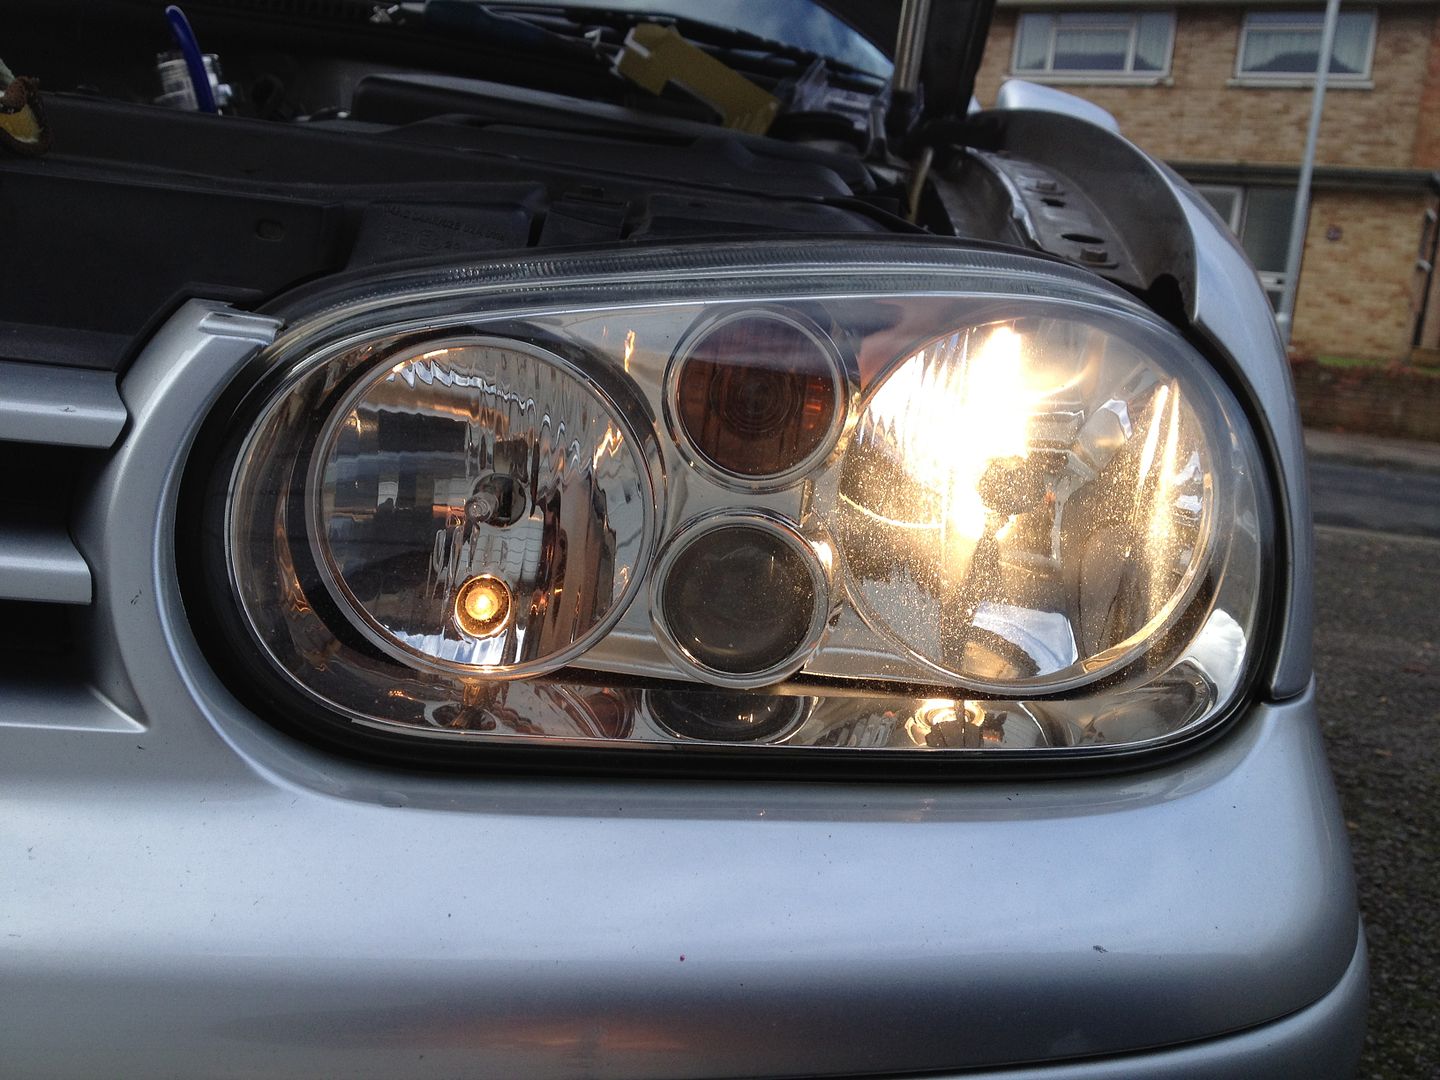
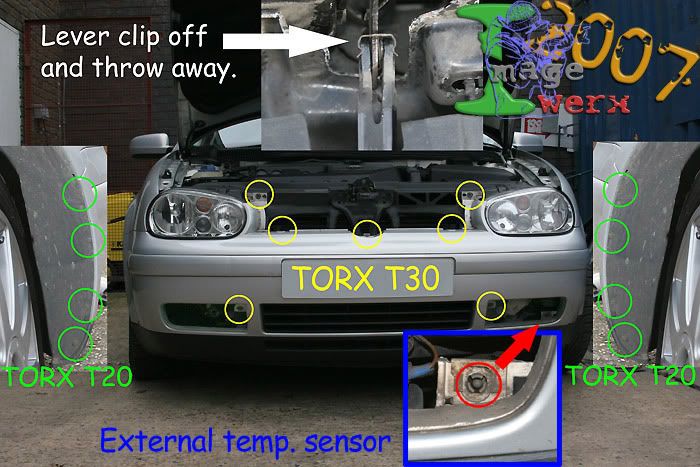
I'll take the headlight and xenon unit with me just to be sure. If you notice, with the flash of the camera, the lower part of my lights reflect back red, so my car is road legal. Push down on the area below the tabs as you pull out on the cover. It should take only about 30mins. If its the post 02 car then remove the torx screws inside the wheelarch 2each side, remove screw from bottom edge of bumper near to wheel arch each side, remove 2 plastic nuts from lower bumper near spare wheel well, remove rear light clusters then remove the screws behind them, unclip ends of bumper from bodywork and pull rearwards.
How do you remove Mk4 headlights?

If I had to do it again I would try to get something in between the slot and the tab and with it pry both down on the slot and up on the tab at the same time. Honestly I think there is a lot more danger in breaking your tool than the plastic grille. Keep in mind that you'll need to remove the front grille beforehand. Just take your time and you'll be fine. Unplug the license plate plug near the driver's side tail light.
How to: Change Mk4 Headlight Bulbs
Do the same to the other side. The 3rd 8mm bolt for the driver's side taillight may be here, remove bolt, being careful not to drop it inside the car. The bumper sort of slides out. Firstly find a safe place your going to put the bumper when removed ie not just laid on the concrete and where your paints protected from scratches!!!! As a precaution I would work on it when warm outside near room temperature and do pay attention to the notes I have about the rightmost tab it does not pop out -- it slides out after you have the other tabs removed. Once the mounting bracket was off it was time to work on the lower grille.
Audi A4 Mk4 B8 DIY Guides
Oh except the headlamp washers which you will need to deal with first Cheers guys, The bumper came off easily. I managed to easily do it with the battery in place, but if you find that you need some more room, just whip it out. They have two tabs that hold them in place, as seen below. Thanks all for those points, I will let you know what I do, with photos etc so you can see the difference as it will make a big one when I do it! This is for a rear fog light not equipped on us models, and you must add a to use the rear fog light. Then turn the wheels all the way left and remove the 4 screws on the other side.
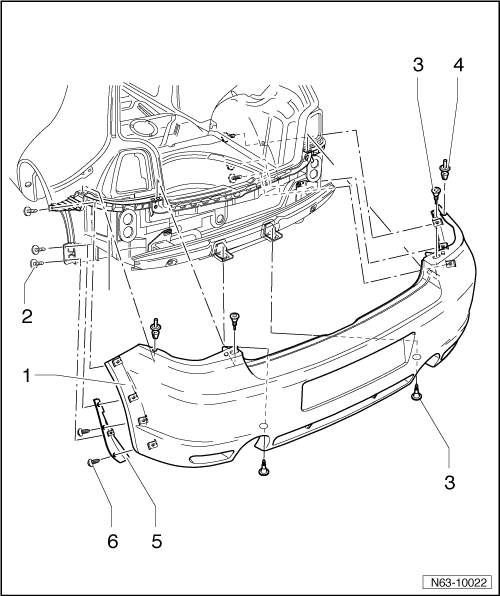
Volkswagen Golf GTI Mk IV Rear Bumper Removal (1999

Please see our article on removing your rear taillights. The actual headlamp just won't come apart though, I've seperated headlights before and it's not that hard but these seem held in place by something? So I would just need to unclip the top, angle it out and the lift the whole grille off the bumper. Press where the 2 red circles are and pull. The plastic around it just melted so unsure how the oven method would work. I do not have a good set of plastic trim removal tools yet so I had to make do with what I had. The last step in removing the fog was to unclip the wiring from the fog light itself.
Ford Mondeo Mk4 DIY Guides

Use a small screwdriver or punch to slide the purple plastic terminal retainer arrow out of the electrical connector. The pics in this thread don't show any but are you Hella lights different to these ones? Step 1 Mount relay Mount the fog lamp relay lower arrow in the engine compartment near the battery. There were some differences over the years so watch out for those. The only tools I needed were : 8mm socket head, T20 Torx head star shape head , Blu Tack thanks to jamesf for this tip , a screw driver type socket handle and flexible extension. Posted on Oct 27, 2009 you shouldnt need to remove the rear valance to fit a towbar ,i would suggest you contact a authorised towbar fitting workshop as it is not permitted to fit a towbar yourself ,it has to be done by a company with the correct authorised dealership as the towbar has to be certified with a europeon certificate of homoglonation and a plaque. Hope this helps a few poeple.
How do you remove Mk4 headlights?

Will I break something if I just twist harder? I can be completley honest now. To get the posts out you need to push in the pin in the centre and then pry out the post by moving around the outside of it with a flat headed screwdriver or similar. I worked my way around the grille carefully nonetheless in the order indicated in the picture. I'm off to Holland on Sunday for a few weeks and a guy in Rotterdam sells these, supposedly Xenons direct replacement with black lenses so I'm going to meet him and if they're good buy a set £300. To remove the rear bumper First, if your taillights have not been removed, remove them now as instructed above. Aug 04, 2009 It depends on what year your car is, If it's the pre 02 car then inside the boot there are 2 M10 nuts near the tie down eyes, remove these and then pull the bumper tips outwards whilst pulling the bumper rearwards.
Lower Grille, Fog Grille, and Fog Assembly Replacement
The space there is tight and I am having hard time changing the bulbs. The damage was to the lower grille the one in the bumper , the drivers side fog grille the piece you pry off to get to the fog light , and the fog assembly itself one of the plastic mounts was broken so the fog light had some give in it if you pushed on the bottom of it. By using a sawing motion, its possible to cut through the adhesive but it takes time. Fit connector block back in place, replace the headlight rear cover and the other cover with the 2 screws, and put the battery cover back. I think that as long as what you are using to pop the tabs is either a plastic or rubber coated you should be fine.
Reverse Light Replacement 2006

An 18 month-belated thanks for posting it. You'll also need to release the wheel arch liner from the rear bumper which we found jacking up the rear of the car gave more space between the wheel and the arch to allow us to work without the need to remove a wheel. The top part of the clip actually contains a vertical patch of black plastic which closes off the whole assembly. There is one pin in the pointy corner see pic. This just pulls upwards, the same as battery cover. Now its a matter of gently pulling the bumper away from the car and getting a second pair of hands to disconnect the rear plate bulbs as your sliding the bumper away.
Video of airbox, bumper light removal.
The rear light unit should just pop out a bit now. I recovered the plastic piece that had broken and packaged the old assembly and bits away for some future date when I get a rock through the fog and am inspired to glue the works back together. Not so as you will see later. Note: if your car is equipped with fog lights, disconnect the electrical connection on the backside of the light. You can see here that my dealer successfully found self taping screws long enough to puncture the bumper underneath the license plate mounting bracket.