Make disk bootable mac terminal. How to make a bootable, external macOS Mojave install disk 2019-01-17
How to make a bootable, external macOS Mojave install disk

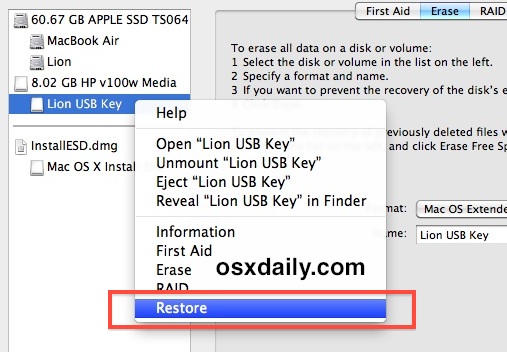
You'll also need to and ensure that it's sitting in your Applications folder. Click Restore, and then click Erase in the dialog box that appears; if prompted, enter an admin-level username and password. So if you have any idea what am i doing wrong, please please please don't keep that info in yourself, teach me! This Terminal command, called createinstallmedia, can create a bootable copy of the installer using any drive connected to your Mac. For our purposes, we only care about the drive. If it automatically launches after download, quit the installer. Get Info on it in the Finder.
Create Windows 10 Bootable
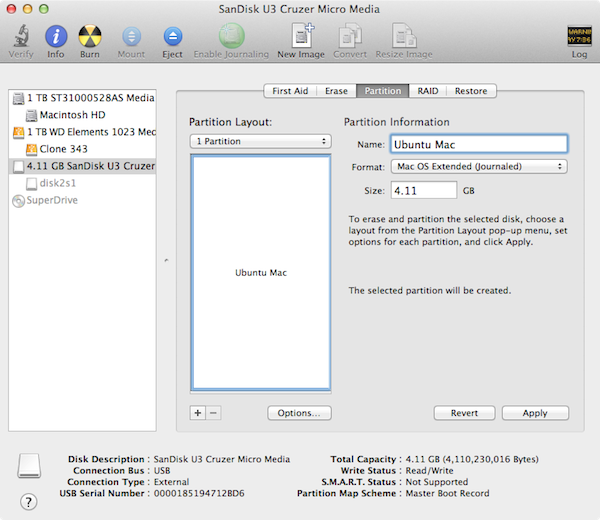
Respectively: Mavericks, Yosemite, El Cap, and Sierra. You can use Disk Utility's Restore screen to create a bootable Yosemite installer drive. This means that if you moved it before installing Yosemite, you need to move it back before making your installer disk. This will take a few minutes. This will take several minutes to complete but your data should be copied and the flash drive will be bootable. The procedure is a bit more involved with Yosemite than it was for Mavericks which was itself a bit more involved than under Mountain Lion and Lion. It is specifically characterized by the extension it uses, that is.
How to create a bootable Windows 10 USB in OS X using Terminal

Traditional flash drives only fit one way, so don't force the drive if it doesn't fit. You can also check out our official account for exclusive photos. But why we should not use the Terminal which is a built-in feature of mac. After that, type exit into Terminal and when it says Process Completed then choose File, Quit. Rather than working through Apple's installer, you download that once and stop it before it begins working. And if your Mac is experiencing problems, a bootable installer drive makes a handy emergency disk. This process can take some time, so be patient, have some yogurt and blueberries or your snack of choice ; that should just about match the amount of time needed to complete the copying process.
How to make a bootable OS X 10.10 Yosemite install drive
Make a copy of Apple's installer. The Disk Utility method is the way to go for people who are more comfortable in the Finder though it does require a couple Terminal commands , and it works under Snow Leopard, Lion, Mountain Lion, Mavericks, and Yosemite. Not only does it save time, it also saves bandwidth, specially for those with metered Internet connections. In the past, I've always shown you the manual method, which uses the Finder, Disk Utility, and Terminal. That means you can eject that drive and take it to any or all Macs you've got.
How to create a bootable Windows 10 USB in OS X using Terminal
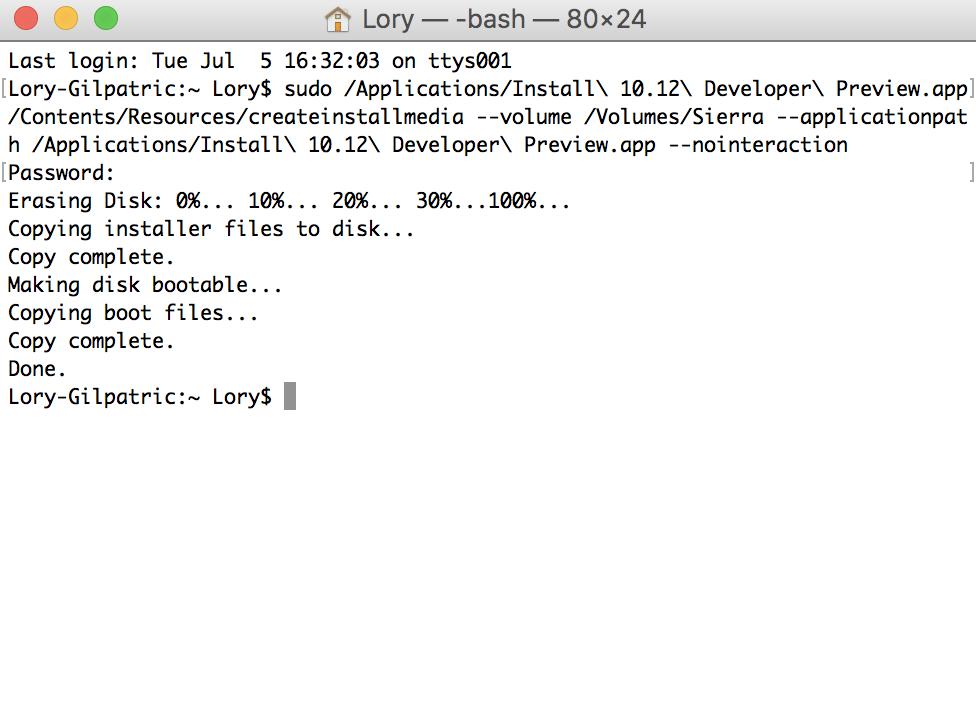
Also if you think this post worth for sharing, please share it with your friends and colleagues. If you wish to continue type Y then press return: Y Erasing Disk: 0%. Apple uses its App Store to distribute its software, like new Mac operating systems. Then type some commands in Terminal to extract Mojave, and put the installer on an external drive so you can re-use it without having to download it every time. Lastly it makes that drive bootable. Also I don't believe that formatting matters at all.
How to create a bootable installer for macOS Mojave
For this reason, I strongly suggest using a name with no spaces and no special characters. Here I'll show you how you can erase and format a disk using the command line. And once it's run, Apple immediately deletes it. Then I dual booted my system. While it is quite easy to download and install from the Mac App Store.
Terminal, bootable usb, Sierra OSX = …
Right-click or Control+click the Yosemite installer to view its contents. The quick and easy way The process detailed below involves the Terminal. When that part is done, your Mac may ask you if you want to use the drive for Time Machine. From recovery mode you can run Disk Utility, get online help and do a restore from a Time Machine backup and re-install Lion leaving all your other files intact — it just replaces the core operating system. To confirm that you want to continue, type Y and hit Return. Keep the installer in the Applications folder.
MacOS Terminal: Create a Bootable USB from an ISO Using
Given that we have lives as well as multiple Macs, we need to do something about this. You can actually use any name you wish, but it must exactly match the name you enter in the createinstallmedia command below. Here are the steps for using it to create your installer drive. A stray typo isn't likely to cause you problems, it's more likely to just not work, but it can. Drives are labeled as disk0, disk1, disk2, etc. It just writes over anything and creates it's own filesystem.
How to make a bootable OS X 10.10 Yosemite install drive
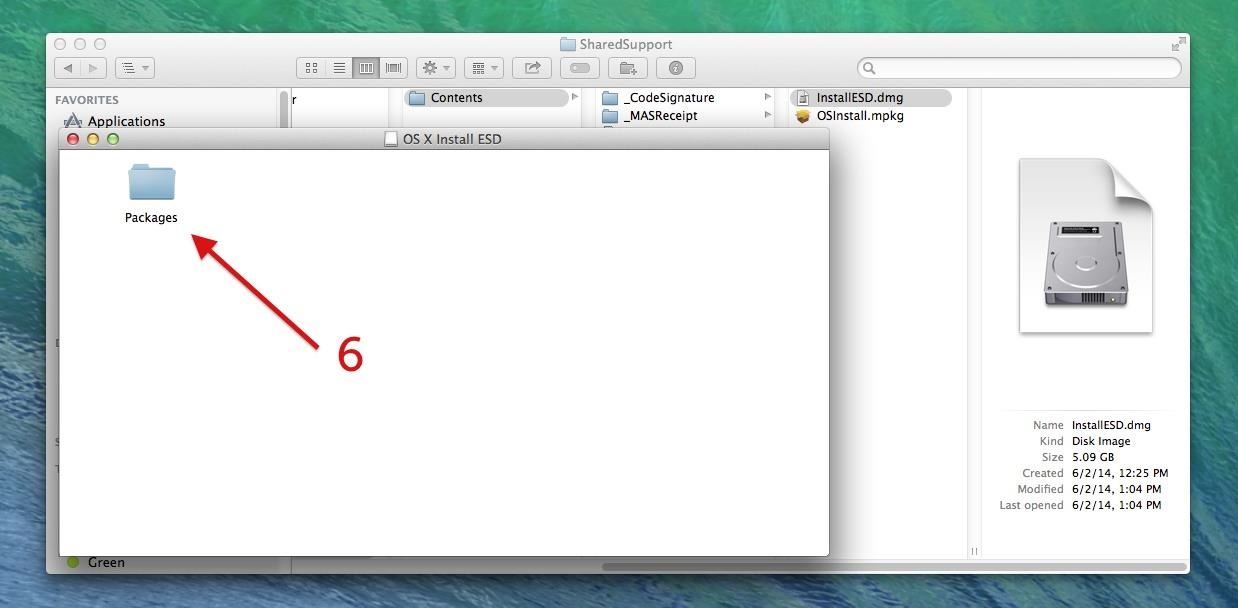
I assume that your mac is newer than that? Rename the drive to Untitled. You're replacing the deleted Packages alias with this Packages folder. Keep reading to know them in full-length. You can use any in size or larger. Stop right there; do not press Return. This will ensure that you have the required source installer to follow the next steps.
How to Create macOS Bootable USB Drive Using Terminal
Click on the Download button, and your Mac will download the installer to your Applications folder. Drag that folder into the Installation folder on your destination drive. If the destination drive has additional partitions, just drag the partition you want to use as your bootable installer volume. Option 3: Use Terminal If you're a Terminal jockey, you likely know that most of Disk Utility's features can be accessed using shell commands—which means that you can perform the Disk Utility procedure using a few commands in Terminal. Terminal and createinstallmedia will remind you that this means erasing the drive and if you enter Y then it will start the process. The wikiHow Tech Team also followed the article's instructions and validated that they work.