Mac create bootable usb from dmg. Make bootable USB from DMG on Windows 2019-02-16
3 Ways to Create a Bootable Install USB Drive for macOS or OS X
You can easily convert between the two formats using Disk Utility or a host of other utilities. I'll come back and let you know if it works: Currently having TransMac make the usb boot stick. Not so easy anymore is it? You want to do this before creating the bootable media because there is a good chance that the drive was formatted using a Windows device. I downloaded the Iatkos s2v3 10. We will set an expiry date for the download link to prevent leaching and hot-linking.
Prepare Bootable USB Of macOS Mojave On Windows 10 PC

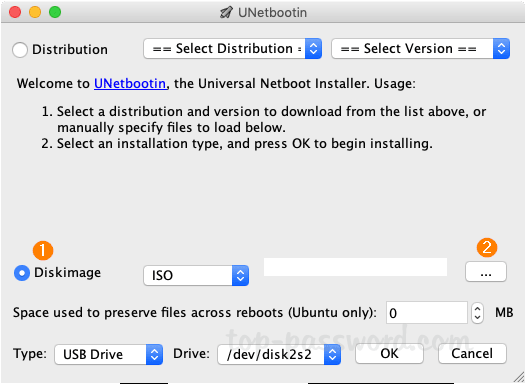
You will also see other functions like Extract, Create, Edit and Copy Disc. Not the answer you're looking for? You won't find that many tools that are so easy to operate. In addition, the burning process is extremely slow. But I Promise you as soon as I found the latest version I will update the link. Edit - I figured it out. How do you overcome this challenge? You'll be asked to enter your Mac's password. Browse other questions tagged or.
Convert macOS Installer .app to bootable .dmg or .iso image
Step 3: Launch TransMac software with admin rights by right-clicking on TransMac icon on the desktop and then clicking Run as administrator. Click the Yes button when you see the warning message on your screen that the drive will be erased. I renamed it but Its not that simple here. Instead, press Command-Q on your keyboard to quit the installer. Please be aware of the fact that you must have a new partition ready, if you want to split an existing partition with the snow installation application, you will lose all the date on that partition. This website uses cookies to ensure you get the best experience on our website. Enter the password and hit Enter.
Prepare Bootable USB Of macOS Mojave On Windows 10 PC
There are millions of Mac users still having the need to run Windows app on their Mac computer. The clean interface and minimal user input means a lower chance of errors while creating the bootable media. Install TransMac If you have downloaded the portable version of TransMac, then their no need for you to Install that. Only difference is he is using a real osx install and I am using a vmware install. Might just have to wait till I can get my friend to come over with his macbook pro someday.
How to quickly create a macOS bootable USB on Windows • Pureinfotech
I saw this earlier and it helped me figure something out, so I wanted to give thanks to the author and share what I accomplished and how. Since you haven't done any conversion, you can use this directly on a Mac for program installation, which you cannot do with the first method. Alternatively, can convert the image to an. Did u somehow fix it? Design new host by version 4. You will not see the app icon directly. I'm not sure if the same will apply to people trying to install it on hardware designed, originally, for Windows.
3 Ways to Create a Bootable Install USB Drive for macOS or OS X
You'll need this to make the drive bootable on a Mac. If you're not confident that you can carry out the steps properly, then continue to Method 2. Keep the burning speed at the lowest rate to avoid write errors, although chances are rare. Boot Camp Assistant is one of the alternatives, but it's a tedious process and not very easy to execute if you don't have the right experience. I am using the TransMac Portable Version which does not require any serial key, also I have a version which is preactivated. After you do this, the app will take a few minutes to create the boot drive. Select Erase from the confirmation box, if prompted to do so.
How to create a Bootable macOS Mojave USB Installer on windows?

If you don't want to modify the command, change the name of your flash drive into FlashInstaller. You had to buy additional and expensive app to achive this but now it is fully possible for free. While thoughtful, if working with multiple partitions, each will have the same name making them indistinguishable from the others. This is a paid software, but it gives you a 15-day trial, which is more than enough time. If the installer auto launches, press Command-Q on your keyboard to quit the app. Although more people are reading Pureinfotech, many are using adblocker. After that, you have to purchase that.
Convert macOS Installer .app to bootable .dmg or .iso image
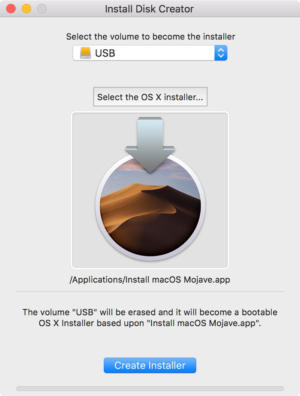
This will be a 100% working copy that you can then use for whatever installation, repair or recovery purpose you require. Skip down to the last step to use it. So Apple also suggests you make a bootable install drive via Terminal. We'll talk about those in a bit. Browse other questions tagged or. Would you like to answer one of these instead? So you can see why your help is needed. If you have only the High Sierra installer on your Mac, Install Disk Creator will automatically select it.
How to quickly create a macOS bootable USB on Windows • Pureinfotech
This is an independent site, and it takes a lot of time and hard work to produce content. When the download is done, you can move it over to your Applications folder. The medium will be automatically detected by the software and prepared for the burn. The default will be the maximum your hardware can handle, so you can reduce that. The conversation starts immediately, showing the progress in a command-line interface. Well it seem to be working. Not the answer you're looking for? Would you like to answer one of these instead? There are some settings that you have to keep in mind when burning with this software, but it's easy to get the hang of it once you do it a couple of times.