Land rover discovery 2 headliner replacement. Land Rover Forum 2019-03-28
Land Rover Forum

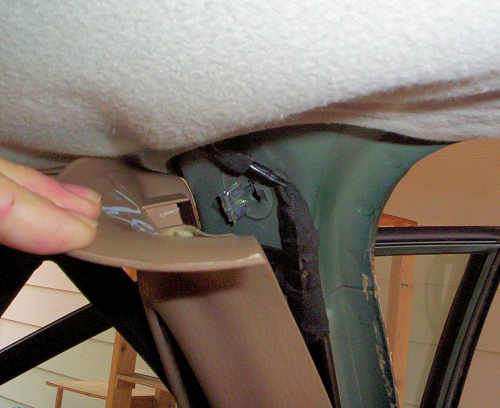
Steve I have a 04 Disco in need of a new headliner. After removing the screw the clip will still be held fast to the ceiling as it is a split-pin design. I started from the center and worked my way outward in circles. I just noticed that mine is starting to come off in the area of the second row seat grab handles. Worked out perfectly for me and looks like a factory job.
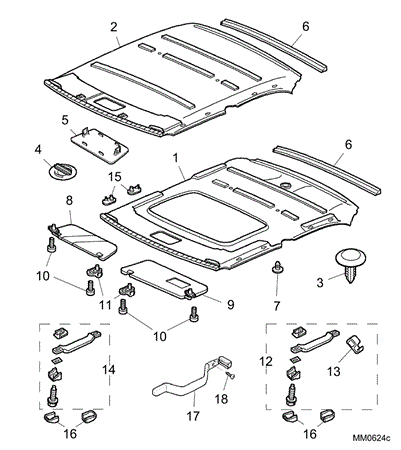
Discovery headliner part #1

I will need to remove the headliner again to seal up a few more things. Has anybody found a supplier for the cream christmas tree fasteners for the trim around the fixed rear glass. Hi CraigE, Any chance you've got some pictures of your son's finished job? You need to remove all the A,B,C, and D pillar trim, along with all the stuff screwed into the roof. I am new to Land Rover, just picked up a 2000 Land Rover Discovery. If you were able to laminated just the cloth to the Headliner Board any Bumps or Lumps in the Headliner Board would show right through the cloth, The Use of the Foam Backing will basically fill the voids and allow the cloth to aesthetically be pleasing to ones eye. This would be a good opportunity to clean out those tubes to prevent future obstructions and problems.
Used Headliners for the Land Rover Discovery

Simply remove the card holding the old material, plus any residue, and apply the headlining back to the card, before re-installing this into the cabin roof of your Land Rover. More likely to be a broken drain tube. The foam material has deteriorated, so the glue will not adhere to it. Featuring enough brush nylon headlining material plus the necessary glues and adhesives to complete the job, our Land Rover headlining kits make life easy for motoring enthusiasts to restore their cabin interiors back to the presentable way they should be. I wound up giving it a smack with the handle of my screwdriver to break it off. Take your time and don't force anything and you'll be fine.
Headliner kit for Land Rover Discovery and Range Rovers from WLS Headliners.
Have yet to have a failure on any of my Discoveries. Remove the screws and ease the rails out obviously, one side at a time. Should be good for a couple more years. Note drain tube at top center. Good luck be patient! The Drain Tubes Break where they attach at the plastic cup that attaches to the lower tub assemble, these can be easily fixed when the Headliner Board Removed.
Headliner Replacement

I removed both rails and applied an automotive weather sealant arount the base of the roof rail where it mates to the top of the roof. It is more resilient then you may suspect and has a great tendency to hold its shape. Land Rover Discovery Headlining Kits Land Rover headlining kits are the ideal way to recover a fallen, saggy, or stained headlining for your Land Rover or similar vehicle. Not sure where I got this, but the Author is listed: Note: Land Rover repair manuals instruct you to completely remove the headliner to complete this repair. There are a few tutorials around. Regards Ly I like it! I guess it is most likely to be those bolts for the roof rail.
Headliner Replacement

My instructions allow you to only remove half the headliner and pull it down and out of the way. We have some installation tutorials to help you install your headliner, they can be seen by. The old foam is miserable gummy sticky goey stuff. MattNot real difficult, just time consuming. Youll need to push up and away at the side posts near the rear-passenger windows to free the headliner. When taking it out and putting back in I found it easier to drop the rear seat backs down and move the front seats as far forward as they would go and drop the seat backs. Somebody had also done a previous dodgy replacement to a tube that had cracked off.
Headliner Replacement

Remove sun visor clips by prying the door of the clip open to reveal the screw. Discovered the leak was from the roof rail attachment bolt, which goes all the way thru the roof. I am sure it will be quite a job with all those pockets, lights, plastic bits etc! Their kit fit nicely and is of top quality. The purpose of the foam must be for sound deadening. The Headliner Material is made up of 2 parts. Looks like a swede leather to me and I am happy and it will never need to be redone. Curious to see it in charcoal.
Heavily stained headliner...

This is discouraging, since I thoroughly checked for leaks while the headliner was out and after I had repaired the drains. This headliner installation may take more than one can of adhesive - you can add more with the adhesive option only one comes with the kit. The black was going to be a little dark I felt, no pun intended. Remove the 3 screws that secure the sunroof motor and remove the motor itself. This kit includes 126 inches of headliner material, one can of , and generalized instructions.
D2SRK DISCOVERY 2 SUNROOF DRAIN TUBE REPAIR KIT

I also leave my truck in the garage most of the time and don't drive it, haven't driven it since Sunday. The Foam Backing is designed to remove any Imperfections within or on the Headliner Board! Most shops dont want to remove the headliner board because it takes time and money to do such a job, but is the only way to see with your own eyes where the water is coming from. I used to have to do this a lot because every time the sunroofs have to be replaced quite often the headliner has to come down. Sprayed the whole head liner with 2 cans, which just covered it. Take the old rails and throw them as far into the street as you can. I wore those thin plastic gloves and changed then regularly to help reduce the chance of getting grubby paw prints on it. Bill Avoiding sags, gaps and gathers.
Headliner Replacement
I've never had to replace a sunroof either-ever. Remove the front windshield interior posts by pulling away gently and inserting a flat blade screwdriver and prying gently on each of the built-up sections where the 3 tabs insert into the clip this is easier than it sounds. Champion have some but i have to check the size and colour. The bad news is that I am getting water again in the right front corner after the new headliner is installed. If that is the case, use a small knife or screwdriver to persuade the track out using the opening where the sunroof motor interacted with the track.