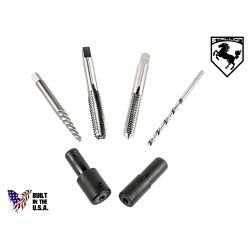
Gm en-47702. Bolt Extractor Set EN 2019-01-28
ENGINE SWAP: 2004 for 2002 GM ATLAS 4.2L MOTOR

Please refer to a service manual for applications on your vehicle. While most Piston Rings are generally well manufactured and very strong… the Top Compression and Middle Rings are also made of Extremely Brittle Metals. Prior to removing the cylinder head or main cap bolts, perform the following procedure: Using an appropriately sized punch and hammer, rap on the head of each bolt. If your engine block requires Cylinder Bore Machining to either. Return policy our goal is your satisfaction. Always make sure that the engine block threaded holes are clean and do not place oil or thread-locker on the bolts. You can add a set of high-flow cylinder heads to your powerplant, upgrade your valvetrain, improve your oiling system, or drop in a new set of pistons.
Bolt Extractor Set EN

Everyone is pretty good about helping anyone with any inquiries. At Auto Zone, high quality comes with the lowest prices on bolt extractors. The baffles seek to keep it from sloshing out of the pan from G-forces, and the tray seeks to separate the oil reservoir from the crank as much as possible-making the reservoir a semi-sealed package. And do I need to replace all of them when I finally get the last one out? The other purpose for doing this was to observe whether or not the Oil would drain down completely and give any indication of either Cracked Pistons or Excessively Worn Rings. I'll keep a sharp eye and post on your Brand New Project rather than on this one here. If that turns out to be the case… no harm done if the screens get vacuumed up into the Oil Pick-Up Tube and captured inside of the Oil Filter, having no chance after that of doing any further harm. How much more clean this engine would be as a result? They are torque to yield and tend to break on removal.
Bolt Extractor

So the dimensions marked on the Piston Tops of this Donor Motor provide this necessary confirmation. Bolts that creak and snap while tightening will fail due to excessive torque caused by threads contaminated with debris, antifreeze or oil. This is essentially a Closed Loop that could trap the screens in the repeating circulating pattern. That is the actual name of a Machine Metal Flat File large enough to smooth off and radius the edges of the 10. Most of the power savings are at higher rpm levels as you might imagine. If it is done carelessly… it can turn out to be disastrous if all the rules of proper Engine Building are not followed.
Chevrolet Workshop Manuals > Colorado 4WD L4
To that is added a set of Heat Treated Steel Pins of varied lengths to allow this Kit a wider variety of applications. The presence of so much sand collected and clearly observed during the Oil Filter 'Autopsy' in an otherwise pristine condition of clean internals from regular oil changes with no serious bearing wear indicates that this Cylinder Wear was caused by repeated ingestion of Dirty, Sand-Filled Air from a missing or compromised Air Filter. Bolts that creak and snap while tightening will fail due to excessive torque caused by threads contaminated with debris, antifreeze or oil. The time to remedy such obvious mechanical problems is now. Frequent cleaning, examination using a Micrometer for measuring of the Journals and then washing and re-wetting the Sand Paper Strips with 3-in-1 Oil is the order of the day.
Kent Moore En
Not matter that I had the Engine on a stand and can recommend this work to be done only in this manner. If the Crankshaft is almost Pristine… using Long Micro-Fibre Cloth Strips alone coated with a small amount of Metal Polish Paste to brighten up the Journals and remove minute defects and Oil Staining is best. I have a drill press and a cut off wheel. If the screens come loose… they will not be able to pass into or enter the Oil Galley Stream leading to the Bnk of Exhaust Valve Variable Lash Push Rods. When I started to remove the head bolts, three out of the six I attempted broke off.
ENGINE SWAP: 2004 for 2002 GM ATLAS 4.2L MOTOR

Thanks in advance for your help in this matter. If nothing else… even if the Gerotor Oil Pump did not completely fail based on the present Good Conditions inside of this engine… if that Hardened Steel 10. We even have everything you need to restore the horsepower that time has stolen from your daily driver. During checkout, make sure you check the shipping options. You do enough of them and you get a good feel for what they want and what they will do. If you wind up getting this part wrong when assembling the Pistons to the Connecting Rods and have these clips dislodging from their insert grooves and allowing Piston Pins to make contact with the Cylinder Walls… it means it will soon be over for the Engine.
Kent
. The Bearings will overheat and seize on the Crankshaft. This is a process that should be performed by experienced, thoughtful Mechanics. Salesmanager told me it would cost thousands to remove head bolts and then the tapped bolt locations may not be as stong as they need to be. Part of the reason for deep-sump designs is not just to increase oil capacity, but to move it down away from the crank. The next place for the Water to intrude if this happens… is right down inside the front of the Engine and into the Oil Pan.
Trouble Shooter

It would be good for you to also peruse the works and suggestions of , , , , , ,. The price was too good for me to pass up since I have no intention of boring the block over-sized. Doing this work carefully will ensure that the Crankshaft behaves itself for a very long time afterwards because there will be no carbon-separation ferrite nodules or errant rough spots left on the surfaces of the Journals to tear up the Brand New Aluminum Babbitt Bearings. Next it the Hollow Center Pin with Fine Threads that require the application of High Pressure Grease to ease the stress of the thread-lines that will have to pull outwards with around 700 Fit Lbs of Torque in very tiny turning increments. When you attempt to remove the bolt, it breaks at its weakest point before the seized threads break free. The properly sized New Bearings should be within around 0.
Engines & Engine Parts at Summit Racing
But this is where my prior experience comes into play, knowing now that I should have just continued with this process way back when I was working under the Trailblazer hood and just pulled the head off first… before attempting any Broken Bolt Extractions. Look at the images… the Damage from these actions is obvious. It's bound to pick up at least a mist of that oil and carry it around with the spinning assembly, right? Is there a special procedure for removing these bolts? But be Warned… Be prepared for a Horrendous Smell to escape from the hollow interior of the Crankshaft as the Bolt comes out. Am I doing something wrong? Equally problematic is the possibility of rounding off the edges of the Gap Ends and losing vital compression as a result. Bolts that creak and snap while tightening will fail due to excessive torque caused by threads contaminated with debris, antifreeze or oil. These Twin Thin Steel Rings act like the Bread of a Sandwich. The same kind of question about performance and endurance lingers for the Oil Pressure Sensor as well.