Ford transmission 4r70w identification. List of Ford transmissions 2019-02-03
Transmission Identification Ford

Step 8: Install Front Pump Gasket The front pump gasket has been located and all passages and bolt holes checked for proper alignment. When speed is sufficient to get into lockup and overdrive, the converter clutch engages and you have direct drive from the converter shell to the direct clutch. Is it a noise or vibration? There should be nine springs in serviceable condition free of distortion. However, for the sake of longevity, replace yours. Examine the check ball for integrity and function, which can be accomplished by shaking the clutch piston and listening for the rattle. The valve body is also different to accommodate this production change; it employs a revised separator plate. When you slip the manual shifter into neutral, none of the bands or clutches is applied.
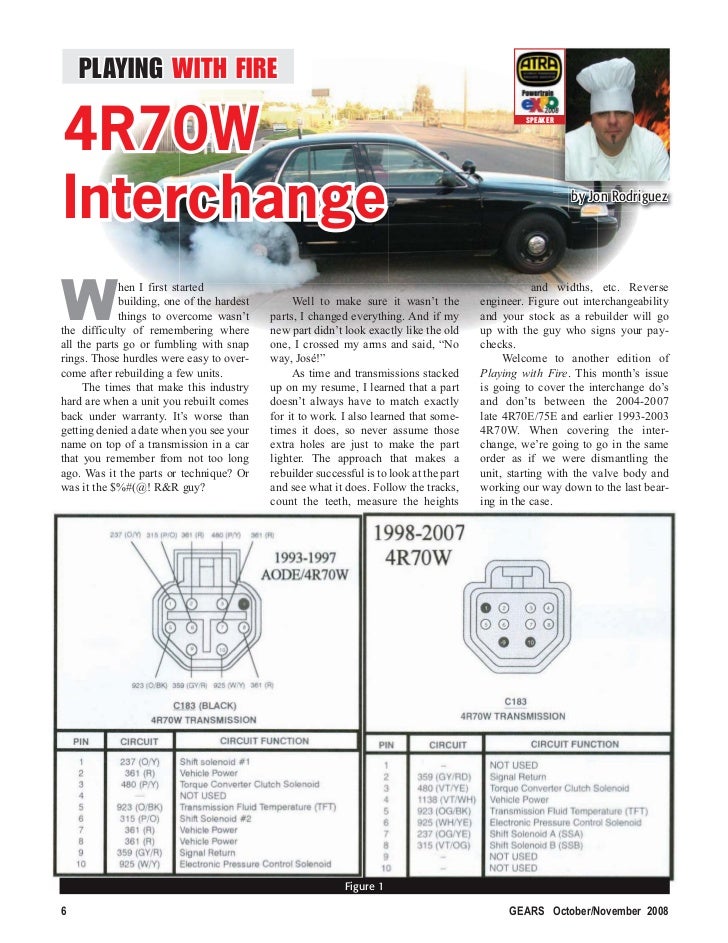
Ford AODE/4R70W Guide: Calibration, Building, Troubleshooting

Step 14: Inspect Pump Stator Support Sealing Ring Gaps Examine the pump stator support ring end gaps and position them at 45-degree increments. Step 8: Install Intermediate Clutch Pressure Plate Check for proper spring alignment and positioning. The plates should have been resurfaced or replaced. We are making the assumption that your vehicle has the original type transmission that was installed at the factory. If it is, and it's not worn no more than. Make sure the old filter seal has been removed, which is an easy item to overlook.
Ford Transmission Look Up Table
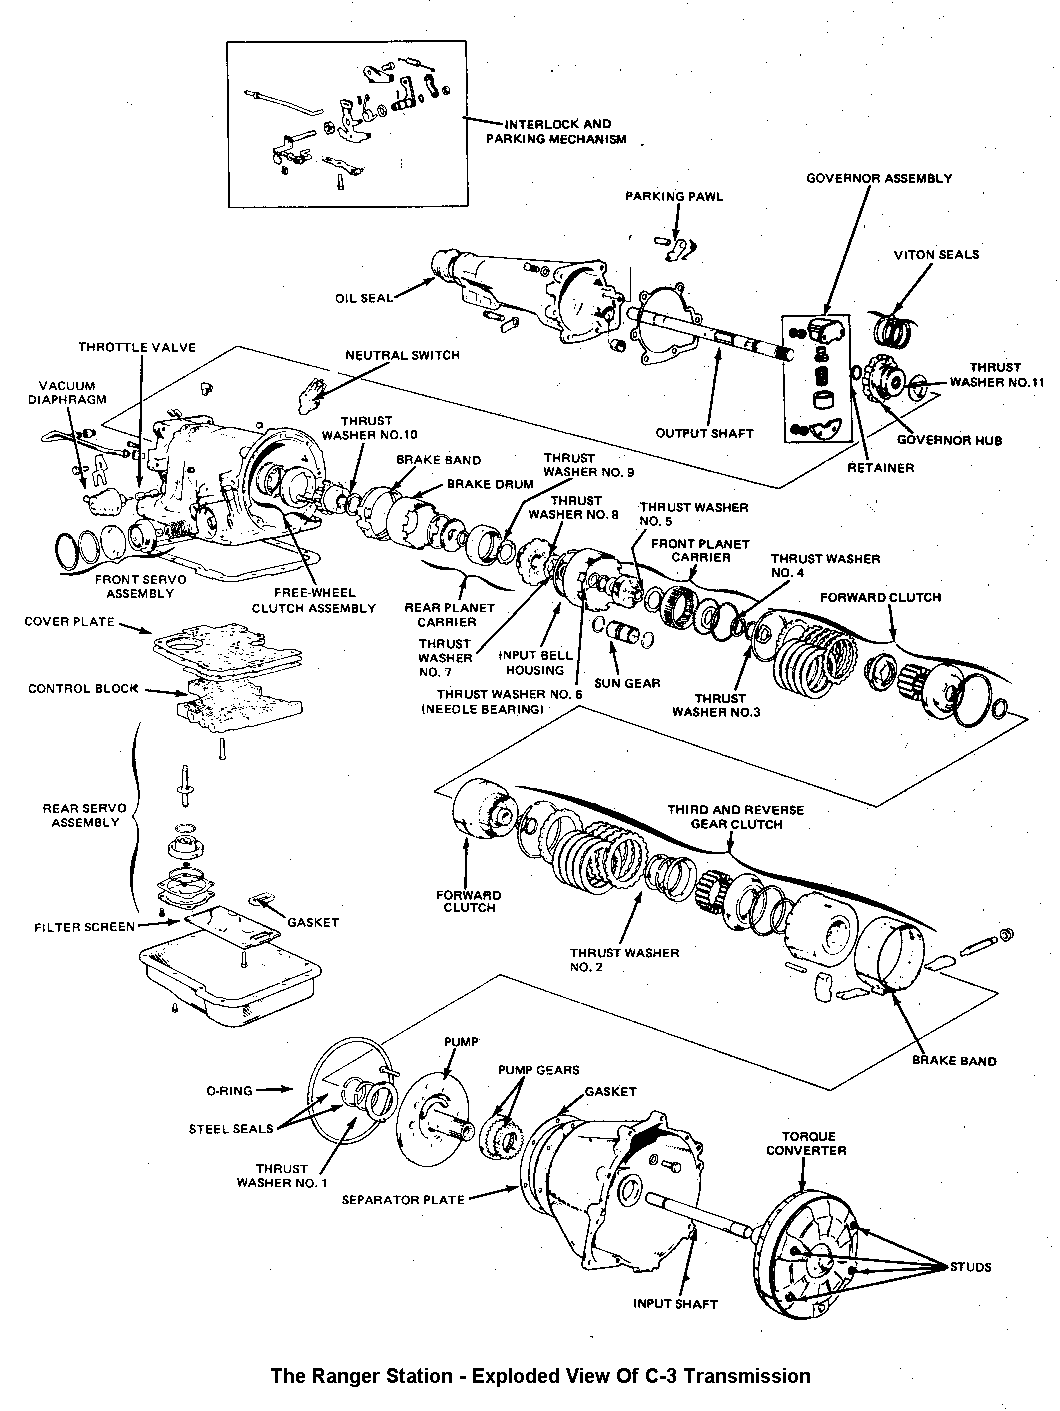
Step 14: Install Number-3 Thrust Needle Bearing The number-3 thrust needle bearing installs inside the forward clutch hub. Step 6: Install C-Clip Using a spring compressor or C-clamps, compress the forward clutch piston return spring and install the retaining C-clip. Here is an of a C-3. Now You can too, here's my affiliate link Join us Sundays live at 2pm and Wednesday night at 7pm our Sane community is mostly channels of guy stuff. What this modification does for you, is give you an automatic with all of the advantages of a manual. There are four grooves but just three sealing rings.
Do I have an E40D or 4R100?

This feature offers non-slip direct drive in fourth gear overdrive and to some degree in third gear as well. So it's definitely something you want. This allows for a pressure path to the direct clutch engaged. With this sequence of events, pressure goes to the forward clutch pack through the orifice control valve and the 2-3 backout valve. Step 7: Install Reverse Clutch Plates Lay the clutch discs and plates into the reverse clutch drum. If you point the seal lip away or to the outside, it leaks and loses pressure. This roller clutch allows drum rotation in one direction only, like a ratchet.
Ford AODE/4R70W Guide: Calibration, Building, Troubleshooting
Do a leak check with compressed air. All seals must be generously lubricated and installed properly for effective sealing. General Motors and Chrysler swiftly followed. Although these transmissions have a great deal in common, they are also very different, with limits in interchangeability. This gives a much greater availability of ratios, and makes it real easy to keep the engine in its power curve. Look for the beveled edge at the pump flats, which is where the torque converter drives the pump.
How to Identify a Ford AODE Transmission
Coupled with the electronic throttle strategy, the transmission computes the output torque required to maintain the vehicle speed, and chooses the correct gear and converter state accordingly. It offers faster engagement, quicker shifting, smoother operation, and increased service life. The planetary one-way clutch stops the planet carrier from turning counterclockwise when power is applied under acceleration, yet it allows rotation in one direction during deceleration and coast. Included with the front pump is the intermediate clutch piston, which holds the forwardmost clutch pack in the case immediately behind the pump. Has aluminum case with non-removable bell, modulator in right rear side.
Ford Transmission Look Up Table

Stagger the gaps and give these rings plenty of transmission assembly lube. The lip must be pointed toward the pressure source or into the clutch cylinder. I purchased a used 1998 5. Step 2: Install Overdrive Band Install a new overdrive band and anchor it to the pin. Band assemblies, such as clutches, can be installed wet or dry. Step 9: Install Forward Sun Gear Drive Shell The forward sun gear drive shell splines into the planet carrier and stub shaft. Turn the engine over and check the runout of the converter hub.
Ford Transmission Look Up Table
Step 3: Install Manual Shift Linkage and Manual Valve The manual shift linkage and manual valve line up like this. Give these rings and grooves abundant lubrication. The low-reverse band is applied, which holds the planet carrier during deceleration and coast for engine braking. Is the noise or vibration in rhythm with the engine, driveline, or wheels? Use an abundance of transmission assembly lube. Step 6: Install Clutch Piston Special Tool Use a seal protection tool to install the intermediate clutch piston installation.