Fl studio not exporting automation. Automation issues on export : FL_Studio 2019-03-29
FL Studio 12: Six Automation Tips : orgmode.com

Now go in and add a different pan setting for each note. To save in more than one format simply select multiple options on this panel. Just click, hold and drag. Use this bit-depth if 32-Bit see below float is not supported by the device or application. Dither should only be applied once to 16 Bit audio file during the final render if at all.
11 secret FL Studio tips
Select any of the following! Video Resources: Brief Explanation: For example, if I use a to change a sound throughout my track, I will automate it. Can you bounce in real-time and does the problem persist? For example, the begining of the song is incredibly loud even though I have it crescedoing from almost nothing. The problem is that it sounds shitty everywhere else, including streaming from bandcamp. The typical steps making a track are outlined below: 1. More advanced effects like flangers and phasers are also used. I've never had this problem before with my laptop, but this track is more complicated than most of what I've written before.
FL STUDIO AUTOMATION TUTORIAL
There are no rules when it comes to music production. Ready to advance your productions? Graduating from bands to composition then production, he relishes the chance to play anything with keys. It gives me way more control on changing slots, and making my loop sound how I want! You can add the exported file to any C. Program or record in a pattern and then go to the Piano roll window for this track. Save to a new project if required. The drop-down menu contains options for the exported wave file: What bit-depth should I use? Filters just spice up the track to not make it so boring! Otherwise, you will play only the selected pattern. More Selection in Gross Beat After creating this tutorial, I watched a few tutorials on Gross Beat for my own knowledge, and I found out a powerful tip! Gary is a devoted Logic and Ableton user, but he al.
Flstudio export midi automation : FL_Studio

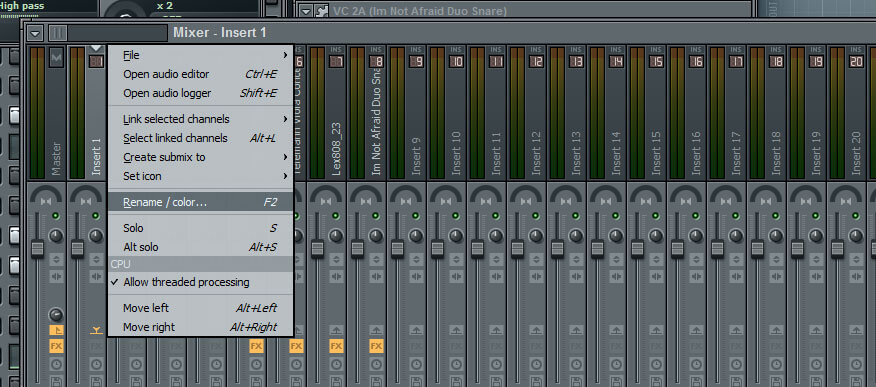
Now, create a new point after your effect, right click, and paste the original value into it. In this article we'll look at some different options you have around automation using: automation clips, channel automation editing or per note automation, each with their unique benefits. Head over to the point you already created in your automation clip, right click on it, and go to paste value! Giving you the last push you might need to get your track to that pro level. You should now have an automation clip created in your playlist! See also: this removes delay caused by the setting during recording. There are many effects to choose from and many parameters within each of those effects while mixing. But I'll quit with the nerd talk now.
Automation Clip Fl Studio not working

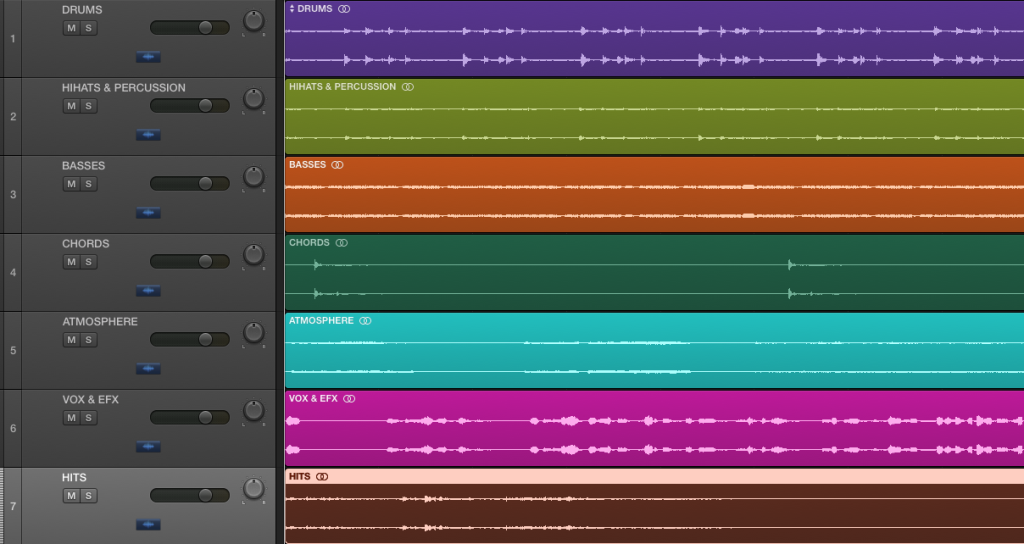
If anyone has any suggestions for how to approach this issue, I'd be really grateful. Highlight the area on your playlist where you want to create an automation clip. In the example above, Pattern '1' consists of a Channel being played by a Piano roll and a Hat Channel. The way the clip moves will depend on the snap settings and zoom level. The Step Sequencer, is a pattern-based grid sequencer ideal for creating drum loops when Channels are loaded with the native , that holds a single percussion sample per Channel. What you want to do is move the knob first, and then head over to:. So the first step would be to actually create your automation clip, or copy the value of the sound so you can paste it to another sound.
How to Use Gross Beat in FL Studio • GratuiTous

Make a one-time donation Click the button below to make a one-time donation. He excels at original music, remixes, tutorials, and thinking outside the box. Let's see how to automate the volume on a track for example. There are many ways to make your song embody a human feel when shown the proper ways. You are building the foundation. You can also automate the volume of a vocal, or the panning of a snare drum. And I almost never render to.
11 secret FL Studio tips

What format are you bouncing to? While Repeat marker positions are usually ignored, if they are placed after the last Pattern, Audio or Automation Clip in the Playlist, the project will be rendered up to the position of the Repeat marker. You don't need the increased dynamic range in rendering because it's totally useless and inaudible, but it still takes up 50% more disk space. It consists of two main sections: Time Manipulation and Volume Manipulation. Albums played like a whole story, and part of the mastering process made sure they flowed like a story and that each song complimented the next. You should always check your rendered files with a good pair of headphones prior to release. Does the track contain automation that's not handled correctly during rendering? If you are an artist, he can describe to you your exact rights in songs you create. Automation allows you to enter a specific command on effect parameters which will always play back on your song.
How to Use Gross Beat in FL Studio • GratuiTous

Quick Blurb: Shaun Friedman is the original music composer at. If the decaying sound comes from notes before the last bar it won't be wrapped. For example, the tail of a reverb of a sound may be important for the impression of smooth continuity when looping, or to prevent the decaying reverb in a 'straight' render being chopped off. If different Mixer and Render interpolation options are set, this can cause the live and rendered audio to sound different, specifically in the high frequency regions. Sometimes, based your your goals and competition, you will have to have your final master sound very loud like in rap and hip hop genres. Some material may still produce audible compression artifacts.
FL STUDIO AUTOMATION TUTORIAL

Of course, there was still use of compression and limiting to bring up the level of your final master track. That's it, go make some organized noise! Alternatively you can Right-click the sample in the Browser and 'send' it to one of the instruments in the pop-up list. The filter simply follows the lines and moves exactly along the path we drew. Sounds are created differently, and have different frequency content, making some sounds louder than others etc. Again, with music production there are no clear cut rules. At the very bottom of the right-click pop-up menu. Per Note Editing With Per Note editing you can make automation changes at the note level, so each time a different note is played you can assign a different value.