Emachines e727 bios password reset. SOLVED: Emachines e525 bios password 2019-05-15
SOLVED: How to reset bios password on e machines e627
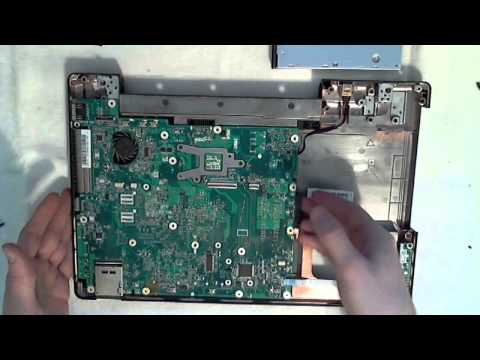
That asset tag disc is also available at dell if the link above becomes invalid. Data will be lost if the battery to become fully depleted and the computer shuts down. It booted to windows after this. Never use any charger or battery that is damaged. Only qualified personnel should service the device, or install the device in a vehicle. Anyway look over here and then over here and if all else fails use phoenix recover tool to do a complete re-flash to factory. He recently passed away so now I do not know how to get into the system.
Emachines EM350 BIOS reset

I'm going to try to flash it a little while, but i doubt it'll work. Remove that battery from your motherboard and replace it back after 15 mins. That being said she has a Toshiba Satellite L655-S5153. If To protect your hearing, follow these instructions. There is a works, contact your dealer or an authorized service center as the internal keyboard cable may be loose. The good thing is that I can boot up to Windows. While the eMachines logo is showing, press + at the same time to enter the recovery process.
How to Reset an eMachine BIOS

. It asks for a new one after that — enter it exactly the same. If still demanding a password, try the passwords above or the backdoor ones for your machine again, 3 Pay Toshiba to do it. The Bios updated but it still has a Bios password. They guarantee it to work or they refund your money. Do not tamper with batteries.
SOLVED: I want to reset the password in a emachines d620 s

And you won't believe it, I was going to unscrew my laptop today and just before that I saw your post. Hold and then press the key at the upper-center of the keyboard. I entered old password and on the new password i left it blank and just pressed enter twice. What you need to do, is remove the jumper and join the center pin to the opposite pin. I just got done resetting the password on the emachines e627.
SOLVED: How to reset bios password on e machines e627
Expand it to a folder to look at. It will force the flasher to reflash the password and thus removing it. He recently passed away so now I do not know how to get into the system. If the jumper is on a 2-connector pins and that is holding on a single pin, place it on both, wait one second and then return it to its original position. Be very careful not to cause damage with static electricity from your body. Please refer to the online help for more information.
eMachines E727

The central location on the palmrest provides optimum comfort and support. Theres a windows flash exe and a dos file but none are pointing to anything editable, they both point straight to the bin files so I cant seem to see where I can flash without password. Failure to remove the media can damage the drive head. However, if you encounter configuration problems, you may need to run it. The recovery utility may prompt you to restart your computer several times during the recovery process.
eMachines E727

That is great news, Hilal. Cleaning and servicing When cleaning the computer, follow these steps: 1 2 3 Turn off the computer and remove the battery pack. I've tried all I can think of, but doesn't work. And this is the only reason why you are getting a 'Enter Current Password' prompt. If you like I will talk about a few of the things I did to remove this malware.
SOLVED: How to reset bios password on e machines e627

Insert a system bootable disk into the floppy drive A: , then press to reboot. Now wait for a few seconds and then again remove the jumper and join the center pin to left pin. A friend told me that this could be solved by updating the bios but bios is already upto date what can i do? Removed the battery and power supply and left off overnight. There are 2 ways to try and take the pass word off. There will be 3 pins and the jumper will be joining the center pin to either left or right pin.
SOLVED: Emachines e525 bios password

Pull the battery from the battery bay. Then open the flasher exe file and Flash! I had a full install of windows 7 pro all drivers updated, the laptop continues with the same problem, i then went to update bios and got message that bios is uptodate. Tapping harder will not increase the touchpad's responsiveness. Refer to the onscreen instructions to perform system recovery. Remove it and let it sit for 10 minutes, then replace it and reassemble the laptop. Thread starter Similar threads Forum Replies Date 1 Feb 4, 2019 1 Nov 1, 2018 1 Sep 1, 2018 2 Aug 22, 2018 3 Aug 13, 2018 1 May 29, 2018 3 May 28, 2018 1 May 22, 2018 1 Apr 27, 2018 4 Sep 2, 2017 1 Jul 24, 2017 1 May 9, 2017 1 Nov 27, 2016 1 Jul 16, 2016 3 Dec 15, 2013 3 Jul 27, 2012 3 Mar 30, 2012 3 Dec 31, 2011 2 Sep 19, 2011 G 1 Feb 28, 2010.