Drum rack ableton fade. 14 Ableton Live secret tips and tricks 2019-04-22
how to create a fade in effect?
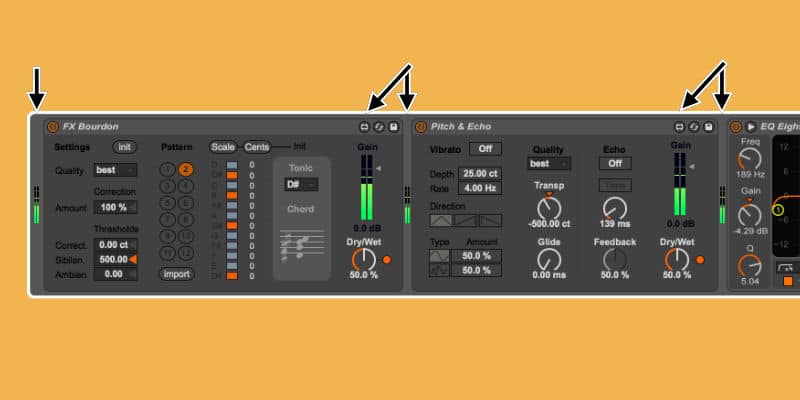
Drum Rack Tip 2: Layering Multiple Samples Using Drum Rack, we can add multiple samples to a pad, allowing one note to trigger multiple samples. Note that once assigned to a Macro Control, a device parameter will appear disabled, since it hands over all control to the Macro Control although it can still be modulated externally, via Clip Envelopes. You can create multiple parallel chains. But that's kind of a pain. By default it will always be playing a C3, but that can be changed. Therefore, in this situation here, we are clearly fading between the volume of the dry signal and the wet signal based off of what side we are on. Each Chain also has an 'Audio To' field.
Chopping samples manually in Ableton Live and assign to drum rack

Andrew Huang has a really old fun little video about it I can link if you want. Navigating Macro Mappings in the browser, ordered alphabetically by parameter Name. These Racks have chain select zones, which allow you to filter chains spontaneously via a single parameter. Many of us like to write our drums in audio, and this would mean manually going through and switching out each one…. Instrument, Drum and Effect Racks Inside An Audio Effect Rack.
How to Make a Drum Rack in Ableton Live

Drum Rack Tip 8: Default Drum Racks Live allows you to save a Default Preset for nearly anything, including Drum Racks. When a track has multiple chains, they operate in parallel: In Instrument and Effect Racks, each chain receives the same input signal at the same time, but then processes its signal serially through its own devices. Next, add some samples to the pads by switching to one of the three file-browsing tabs and locating a sample you wish to add. If you want to learn another way to humanize your drums, check out this Ableton tutorial: Tip 17: Quick Warping Having to warp clips inside of their own personal clip view can often be disorienting. Moving this square by clicking or using the mouse's scroll wheel brings different banks of pads into view. Great care has been taken to ensure accuracy in the preparation of this article but neither Sound On Sound Limited nor the publishers can be held responsible for its contents.
Free Ableton Drum Rack Made 100% From Turntable & Vinyl Samples : orgmode.com
You will see a number of folders for Live's instruments and effects, and also for Dropping Samples and Slicing. The neatest feature, when using a pad controller, is that if you have one of the directly supported units which includes the Trigger Finger and Pad Kontrol, as well as Korg's Kontrol 49 and Micro Kontrol , you can select which pads are being controlled from the software and the controller will follow. You can now drop your global effects into the top-level Rack. That was maybe 6 years ago though. This one is for all the questions I got regarding how to have more control over your chops before you slice and assign them to the drum rack. Three Instrument Rack Chains with crossfades programmed from one to the next; at the current Chain Selection value of 40, the Sub Chain is fully audible, with a bit of the Chords Chain starting to fade in. If you want to learn more about hot-swapping audio, check out this Ableton tutorial we made: Tip 5: Grouping Groups Ableton can in-fact group groups… sort of… At least the audio routing part, just not the visual.
Help and support for Live & Push

Note that these Live Sets, once saved, can no longer be opened in older versions of Live. Check out the Video Demo This effect rack was design was inspired by my friend Rion King when he came to my house to help me with some ideas on Lux Divon Track I was working. In the screen below, a second snare sound has been added. Once and a while I look online for a new technique, sound design, or idea and love checking out Ableton Live Packs and Racks to play around. Making these settings each time you add a sample soon gets tedious, so check out the 'Default Drum Drops' box for advanced tips on saving your own default Simpler settings.
Chopping samples manually in Ableton Live and assign to drum rack

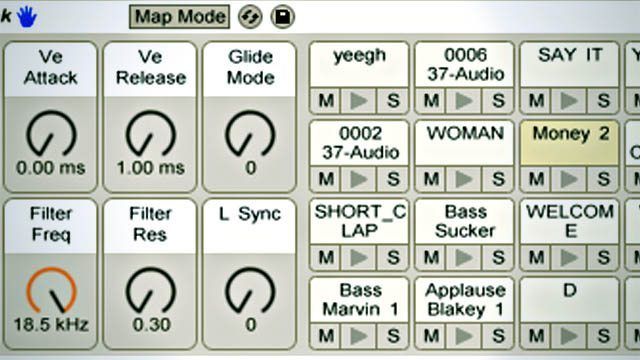
Next, click and drag the light blue bars above in opposite directions, these are the zone volume faders. You could just push this up, but a more sophisticated approach is to adjust the Velocity response. Live 7 has a largely undocumented feature that enables you to save default actions and settings for a number of different operations and devices. To change the range of the control, enter Map mode, and set the min and max values in the Browser area. There's also an excellent video at that summarises the features of Drum Racks. Next, map the fader to a macro.
7 Tips For Designing Racks In Ableton Live : orgmode.com

A final adjustment that's recommended for drum samples is to turn the number of voices assigned to the sampler down to one. All your Chains will be collapsed into a new Drum Rack, with all the Macros automatically tied to the top-level panel. In Drum Racks, this view can include both drum chains and return chains. All you have to do is select your note or notes, hold shift, and press the up and down arrow keys. Selecting a chain, then dragging and hovering over another Session or Arrangement View track will give that track focus; its Device View will open, allowing you to drop your chain into place. This may sound daunting, but allow me to provide an example to clarify. Another example is parallel saturation, where you can send a different amount of each sample to a Saturator, helping fatten up the drum group.
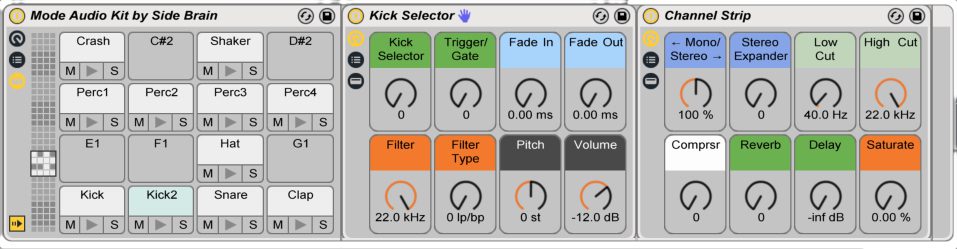
Exclusive Free Drum Rack from Mode Audio
For example, choke groups are useful for cutting off open hi-hats by triggering closed hi-hats. In the example below, I applied various amounts of reverb to different drum sounds. By Simon Price New in Live 7, Drum Racks takes the Instrument Rack concept in a percussive direction. Velocity Ranges distributed evenly between four Chains with no fades. A Drum Rack is a specialised form of Instrument Rack, with functionality focused on drums and percussion.
Chopping samples manually in Ableton Live and assign to drum rack

The bass is there, just no snap. Setting the zones as shown maintains four exclusive values for our presets, so that each still has one point where neither of the others are heard. Racks can be used to build complex signal processors, dynamic performance instruments, stacked synthesizers and more. Doing this also creates a Rack within a Rack. In Ableton you can actually deactivate musical ideas. To extract a sound, simply click and drag its channel to an empty space in the mixer. This is the cream of the drop.