Dell xfr e6420 disassembly. Dell XFR 2019-03-14
Dell Latitude E6420 XFR Hard Drive/Memory/Power Replacement Parts

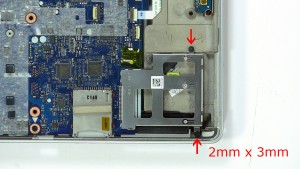
Replace the display bezel see Replacing the Display Bezel. Position the Bottom Access Panel into place. This video shows Dell Latitude E6320, E6420, E6520, disassembling and fan cleaning. Disconnect the antenna cables from the card. Remove the two M2 x 3-mm screws from the express card cage assembly. Align the screws holes in the fan with the screw holes in the base assembly.
Dell Latitude E6420 Keyboard Replacement

Open the door to relieve hinge pressure. Clip cage onto connector by applying light downward pressure above connector. For each hinge, install the bottom side screw first, then install the two rear screws. Slide the card out of the card connector on the system board. Replace and tighten the seven M2.
DELL LATITUDE E6400 XFR SERVICE MANUAL Pdf Download.

Refer to figure above for connection locations. Replace the bottom access panel see Replacing the Bottom Access PaneH. Replace the bottom access panel see Replacing the Bottom Access Panel. Replace the display bezel see Replacing the Display Bezel. Then, shut down your computer and try again.
Dell XFR
Remove the tape backing from the smartcard gasket and adhere to the chamber ceiling. With the hard drive door open, carefully peel the smartcard gasket from the ceiling of the chamber opening. Allows you to choose one or two methods to enable the keypad that is embedded in the internal keyboard. Install the operating system, drivers, and utilities for your computer, as needed. Follow the procedures in Before Working on Your Computer. Use the cleaning pad provided with the processor kit to remove any old thermal grease between the 4 captive screws. If you cannot shut down the computer using the operating system, press and hold the power button for 4 seconds.
Dell Latitude E6420 Motherboard Replacement Video Tutorial

Open the rear battery door by sliding the latch to the right and then downward. Lift up express card cage starting from the right side and unclip the cage from the Express Card connector on the system board. See the instructions in the tech sheet that was shipped with your replacement system board. Default Setting: Disabled Allows you to activate or disable the optional Computrace software. These trademark holders are not affiliated with Laptop Parts Expert, our parts, products, or our website.
Dell Latitude E6420 Motherboard Replacement Video Tutorial
Follow the procedures in After Working on Your Computer. Remove the Bottom Access Panel see Removing the Bottom Access Paneh. Before disassembling, make sure that the warranty on your laptop has been over. Replace the bottom access panel see Replacing the Bottom Access PaneH. Turn on or restart your computer. Slide the drive in the modular bay. Follow the procedures in After Working On Your Computer.
Dell Latitude E6320, E6420, E6520 Disassembly Video Guide

Install the operating system, drivers, and utilities for your computer, as needed. Install and tighten the shoulder screws to secure the speakers to the chassis. Replace and tighten the twenty-three M2. If you do not renew the Cummins registration, only the code reader functions will stay turned on. With the hard drive door open, carefully peel the smartcard gasket from the ceiling of the chamber opening. If not clean the cooling system in a timely manner, it may cause damage to the laptop. Remove the bottom access panel see Removing the Bottom Access Panel.
Dell Latitude E6420 Keyboard Replacement

While pressing in the blue locking button, use the tab on the edge of the hard drive to pull the hard drive module from the compartment. Replace and tighten the two M2 x 3-mm screws. Remove the palm rest see Removing the Palm resO. Flip keyboard over toward display exposing the flex cable attaching the keyboard to the system through the keyboard access door. Carefully lift the processor plate of the assembly up at an angle. If you are making the laptop disassembly for the first time in your life, pay attention to this tutorial —. Follow the procedures in After Working on Your Computer.
Dell Latitude E6420 XFR Hard Drive/Memory/Power Replacement Parts
Use your fingertips to carefully spread apart the securing clips on each end of the memory module connector until the memory module pops up. Set the express card cage in place by aligning the left edge of the cage over the Express Card connection on the system board. We accept no liability for damage caused to your device while following the video instructions. Follow the procedures in Before Working on Your Computer. Follow the procedures in After Working on Your Computer.