Civic si valve adjustment. How do you adjust the valves on a 1998 Honda Civic EX 2019-02-01
Valve Clearance Adjustment

Also, the 1998 Honda Civic dX shoots flames from it's exhaust pipe. A compressor with impact wrench hi torque! You should first start by removing the negative battery terminal. Removing both of these will make it easier to take off the valve cover. It could screw up some tensioner, I believe. Please download the following file: 1.
2002 Civic Valve Adjustment

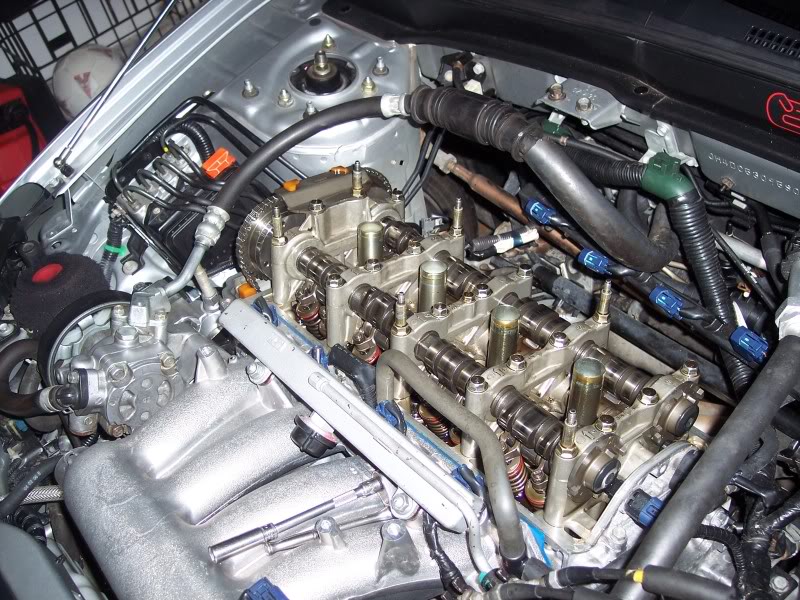
Note - you can't do a valve adjustment on a head before you install it on the block because torquing it down will change the thickness of the head. Rotate engine clockwise as needed to set the No. You will then have access to the crank shaft via a hole in the wheel well. This is in error, it should show at left side. Remove the cylinder head cover. Slip the wire harness off of the two studs on the valve cover circled in blue. Or at the least find an independent mechanic that will do it for you.
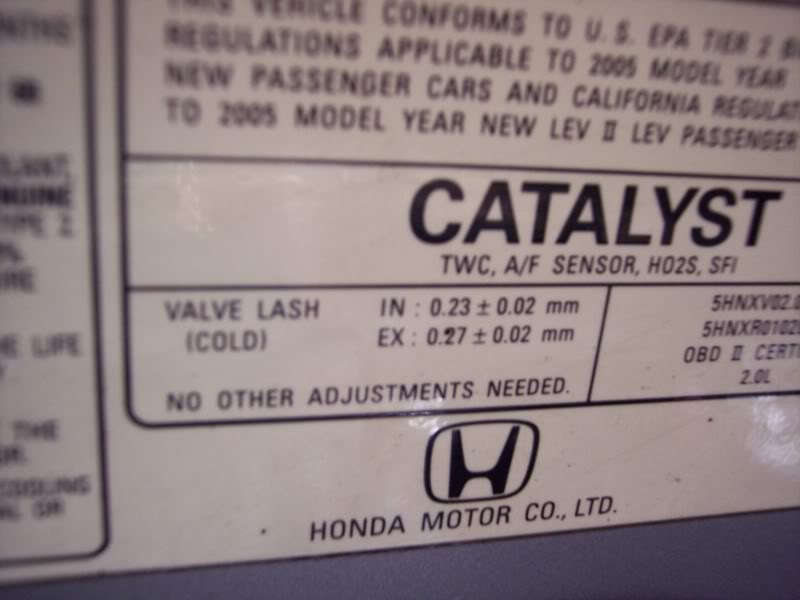
D16A6 Valve Lash Adjustment
I adjusted my valves yesterday. Just put a 19mm socket on a long extension through the opening in the front passenger wheel well, and crank the engine clockwise till one of the configations lines up. Remove the valve cover by prying up on it. Reinstall the Valve Cover Clean the gasket mating surface. The firing order is 1, 3, 4, 2. When done well, the valves won't cause constant engine misfire.
is a 105k mile valve adjustment required? : CivicSi
.ashx?modified=20181010140721&mw=1920&hash=1D4F922C989E0DB1533D9168BE5A3649D9402CF0)
For the intake side, ensure the spacing between the rocker arm and valve is 0. As long as your valve cover bolts come off easy it really is easy to do yourself. Remove the Spark Plugs Pull the spark plug wires out of the valve cover and set them aside mark them with a sharpee, one closest to the crank pulley is 1. Clean the void on the head where the valve cover gasket goes of any debris or oil buildup. The rest of the installation procedure is the reverse of removal.
2006 Honda Civic Adjusting Valves?: Hello, Recently I Took My ...
I'm better what happened with my car is the exhaust valves wore down the head slightly in the combustion chamber, causing the valves to seat upwards of where they were from the factory. Anyhow Mendel, how's the engine running after the adjustment? It should not fit don't force it. Learn how to do just that. Check the valves for the number three piston. Step 4 — Adjust exhaust side valves To adjust the Honda Civic valves, you will need a 0. Page 9 of that document contains the instructions.
2002 Civic Valve Adjustment

I use a digital tire pressure gauge, and adjust to within a tenth of a psi difference between all tires with no issues. Removing the spark plugs makes it much easier to rotate the engine by hand. While I got the dealer to do it, I read the pdf instruction from end-to-end. Then take out three bolts that hold the pulley cover down. Remove the bolts holding down the valve cover and gently pry it up at a point that isn't critical to sealing - or tap it with a rubber mallet. I'll take a video clip of what it sounds like at a cold start.
Checked Valve Clearance on our '06 Civic Hybrid

Start the car up, and listen for ticking or any unusual noises. I watched your video on the honda element when you did your valve adjustment. Here's a quick text summary: Valve Clearance Adjustment Note: Adjust the valves only when the cylinder head temperature is less than 100 F 38 C. Repeat step 2 for cylinders 4, then 2. Cylinder 4 Valve Clearance Next is 4.
Checked Valve Clearance on our '06 Civic Hybrid

Loosen the screw just a hair until you can barely free the gauge it should drag. Using a 10mm socket, remove the valve cover bolts around. In most cases you'll notice the car is more peppy, the idle is smoother, and you'll pick up some mpg. Insert a long screwdriver into the spark plug hole while slowly turning the crank. That or a hillbilly adjusted them last.