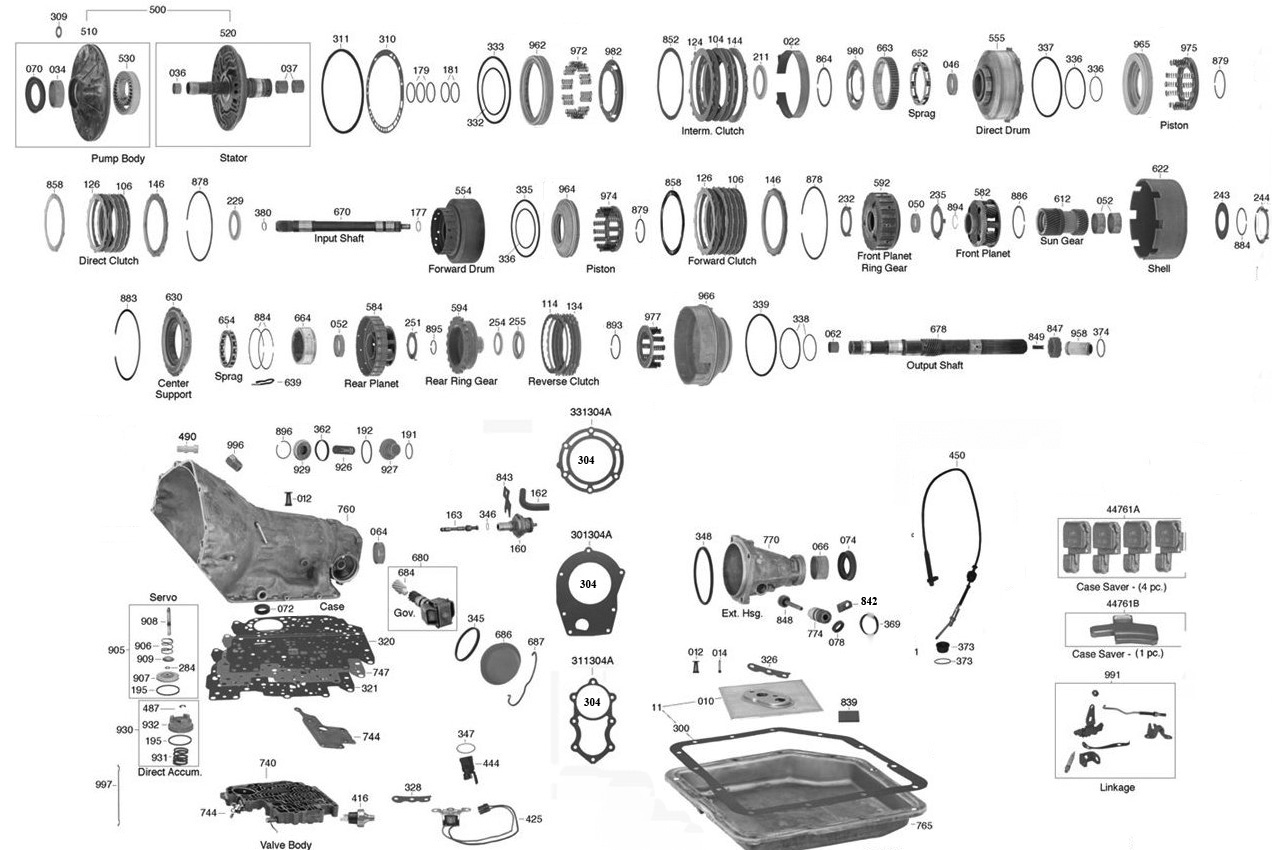
Chevy turbo 350 transmission diagram. Identify Your Transmission, Transmission Lookup, Transmission specs, GM transmission lookup, 700r4 diagram, 4l60e diagram, th350 diagram, 4l80e diagram, e4od diagram, 4r100 diagram, Transmission identification 2019-01-20
THM

Locate the correct bushing driver for this task if you have one. Step 2: Drive in a new front seal. Clogged fuel filter - change interval is 20,000 miles but biodiesel use cleans out old buildup or bad fuel could clog it early, resulting in fuel starvation. The staff has been amazing to work with and takes care of their customers better than any other company I have ever dealt with. The lever on the outside is welded to a lever inside the turbo housing. Step 4: Note that there is a third seal in the direct drum, and that the lip faces upward. Be sure to also check the case very closely for cracks.
GM TH350 Transmission Assembly Guide
It may help to hold the output shaft while turning the planetary assembly to get it to drop onto the sun gear. Direct Clutch Apply Piston Installation Install the direct drum center seal in the drum, lip facing up, and make sure that it is fully seated in the groove before attempting to install the apply piston. This allows some latitude to align the crossmember to transmission mount bolts. Sealing Rings and Thrust Washer Removal Step 1: Unhook the ends on all four sealing rings. Notice how the retaining spring also loads the center support against the case lugs, and how much clearance is present.
THM

Be careful not to cut, tear, or fold over the lip seals. If you are installing your transmission that was purchased from Monster Transmission, our sales and support staff is here. Breaks here are sometimes a source of 'mystery clanking'. Step 2: Remove the 2-3 accumulator and spring from the valve body. There are many other choices, but the main other factors are: Vehicle weight Rear end ratio some of the manuals have relatively high first gear ratios, since they were intended for cars with low rearends Physical size Electronic shift or not Number of gears the more the better if your engine has a narrow torque band Comfort if you arent a racer, hard shifts may not be an enthralling idea Cost.
What is the best transmission to use for a Chevy 350 engine?

It may not be fully seated into the oil pump. Inspect the pinions for damage and endplay, as you did with the low-planetary assembly. Be careful not to dislodge any of the rollers during this process. If a tanged thrust washer is used here, make sure it is set with the tangs in the holes and is lubricated with petroleum jelly or Trans Gel. The snap ring ends should be between the notches in the drum as shown. Install at least one bolt on each side of the bellhousing.
Identify Your Transmission, Transmission Lookup, Transmission specs, GM transmission lookup, 700r4 diagram, 4l60e diagram, th350 diagram, 4l80e diagram, e4od diagram, 4r100 diagram, Transmission identification

Install a new roller clutch assembly with any level of rebuild; the springs tend to crack, break, and lose their tension in high-mileage units. If a TransGo shift kit was installed, see Chapter 6 for further adjustments such as custom tuning the shift points by changing governor springs, removing the spring under the modulator valve, and adjusting the modulator. A bad blown convertor or the pump gear is broke. We are dedicated to giving you the technical support you need, when you need it! A safety relay in the system shuts the pump off after two seconds, to keep the fuel from flooding. Front Planetary Reaction Carrier Bushing Installation Step 1: Use a sharp punch to remove the bushing inside the front planetary carrier. Faster and cheaper to replace the flexplate while the trans is out.
orgmode.com build

Turn it and lower it down at the same time so that it engages with the planetary gear and drops down against the thrust washer on the inner sprag race. Install all of the bolts that go through the crossmember to the frame, but do not tighten them. A clogged snowscreen large debris air pre-filter shouldn't block off all air unless the aux-intake flap is also clogged. Make sure to use Grade-8 fine-thread bolts if new hardware is required to bolt the torque converter in place. Step 4: Install the spring cage, compress it with a spring compressor, and install the snap ring as shown. Step 7: Put the parking pawl guide in place and tighten both attaching bolts to 20 ft-lbs.
Turbo 350 Valve Body Diagram
The alignment of the 350 transmission is done by two metal pins sticking out of the rear of the engine block; the 6 bolts hold the trans straight against the engine block. Turn it and feel for rough spots, which are tight when it turns. Otherwise, it is usually best to replace the torque converter with a new one or with a properly rebuilt one. It goes to the intake manifold, not to the carburetor. At the same time, engage the S-link with the linkage. The transmission can then slidebackwards. Be sure to use some red Loctite on them.
THM

Step 2: Install the governor into the transmission and turn it so that it engages fully with the output shaft. Step 3: In most cases, the apply piston lifts out of the drum easily. Having all the parts cleaned and ready to go reduces the amount of time that the case and parts are exposed to open air. You can see both the valley and peak designs below. Case repairs and upgrades are covered later in this chapter.