Chevy 350 manual transmission 4x4. Automatic Transmissions 2019-01-13
GM TH350 Transmission Assembly Guide

Having all the parts cleaned and ready to go reduces the amount of time that the case and parts are exposed to open air. Note how much longer the rollers are on the aftermarket part. Your actual range will vary based on several factors including temperature, terrain and driving conditions. Apple CarPlay and iPhone are trademarks of Apple Inc. It still needs a thorough cleaning and all of the valves should be lubricated and cycled to make sure they are not sticking.
The Top 10 Off

Step 3: Check for clutch pack clearance. Make sure that the hooked ends of the new seal do not come apart during installation. Make sure that the ends of the snap ring are between the raised areas of the spring cage. Convenient pairing with the heavy-duty T56 Super Magnum 6-speed manual is also available. Step 3: Most rebuild kits come with the hook-end metal sealing rings shown.
WILL A S10 4X4 manual transmission work in full size K1500 Chevy 4X4

Forward Clutch Disassembly Step 1: You are now ready to rebuild and install the forward clutch assembly. Cargo and load capacity limited by weight and distribution. Step 10: Note that I am installing a wider bushing into the direct drum. Each transmission kit is engineered with factory-matched torque capacity ratings, helping ensure the transmission you purchase will stand up to the power of your engine. Your actual range will vary based on several factors including temperature, terrain and driving conditions. Apple CarPlay and iPhone are trademarks of Apple Inc. Step 5: Use a spring compressor to compress the spring cage while working it carefully over the end of the drum.
K1500 Pickup Transmission

. Chevrolet Performance customers are responsible for ensuring their use of Chevrolet Performance complies with applicable federal, state, and local laws, regulations, and ordinances. The older 3 speed autos could take a bigger beating. Step 2: Locate a suitable driver to install the low-planetary bushing. There is usually no need to take the governor apart for cleaning or to replace the gear; just be sure that it is not damaged and all of its parts move freely. Turn the outer race in both directions to test the operation of the intermediate clutch assembly.
Connect and Cruise Powertrain System

Step 3: Install the bushing in the output shaft. Speedometer Installation Carefully inspect the speedometer drive gear for wear and cracks. Stator Bushings Installation Step 1: Drive two new bushings into the lower end of the stator. Cargo and load capacity limited by weight and distribution. The installation of an aftermarket shift kit usually requires that some of the valves be removed and the springs be replaced. Step 6: Install the case to tail housing seal as shown.
1989 Chevrolet Suburban Silverado, 3/4 Ton, 4 Spd Manual, 4x4, 350 V8, 98k Miles
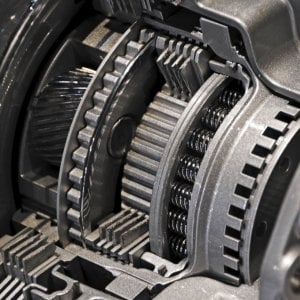
The bolt in center support assembly is for a 4L60 case, which not only strengthens the center support, it upgrades to the stronger roller clutch. If you do not have a spare shaft, you can use the forward clutch assembly for this purpose. Shifts gears without any issue. First, there is at least 6 major ribs 3 per side, vertical and horizontal on the case of this all-cast iron transmission. Trying to do this on the cheap my usual approach makes it tough.
1989 Chevrolet Suburban Silverado, 3/4 Ton, 4 Spd Manual, 4x4, 350 V8, 98k Miles

Horsepower rating is important too, but torque is what will eat your clutches up or otherwise snap parts within the unit. You will be charged at then-current rates. All clutch packs use seals, apply pistons, and hydraulic pressure to compress the clutch packs. Brakes feel like the lines need bled. A notch references the location of the steel in the case, even though they only install one way.
1989 Chevrolet Suburban Silverado, 3/4 Ton, 4 Spd Manual, 4x4, 350 V8, 98k Miles

Step 2: Install the inner race for the low-roller clutch. Do not force the piston into the bore or you may break the sealing ring. Step 2: Flip the sun shell over and drive out the lower bushing. Tail Housing Seal and Bushing Replacement Step 1: Use a sharp punch or the correct bushing driver to remove the tail shaft bushing and seal. Step 2: Remove the 2-3 accumulator and spring from the valve body.
What is the best transmission to use for a Chevy 350 engine?

Step 3: Locate the new thrust washer for the sun shell. These parts are designed and intended to be used with experts supervising their installation and use, to help assure the proper and safe operation of the vehicle. Cargo and load capacity limited by weight and distribution. Step 5: Inspect for wear on the rear pump half where the inner and outer gears ride. Doing so ensures correct alignment of the torque converter drive hub in the oil pump inner gear, which reduces side loading and improves front seal life. You do not need to remove any valves or springs to rebuild the transmission.
K1500 Pickup Transmission

Repeat this procedure for both lower bushings. Valid on orders shipped in the contiguous United States. Click here to see all Chevrolet vehicles' destination freight charges. Because the forward clutch is applied for all forward gears, it only needs some clearance to work correctly. We sturggled with the placement for this venerable gearbox, bouncing around between 2nd and 4th, ultimately ending up here. Step 2: Repeat this procedure for the two lower bushings.