Bootable mac usb app. Make a Bootable Flash Installer of OS X or macOS 2019-04-20
Mac On a Stick
Step 2: Run Through the Easy Instructions Now open up DiskMaker X and choose Mavericks 10. Talk about the long way of achieving this! If it automatically launches after download, quit the installer. Make sure you take off any important documents. After you do this, the app will take a few minutes to create the boot drive. The first is the way to go if you want a complete clone of your Mac.
The best app for making bootable backups of your Mac

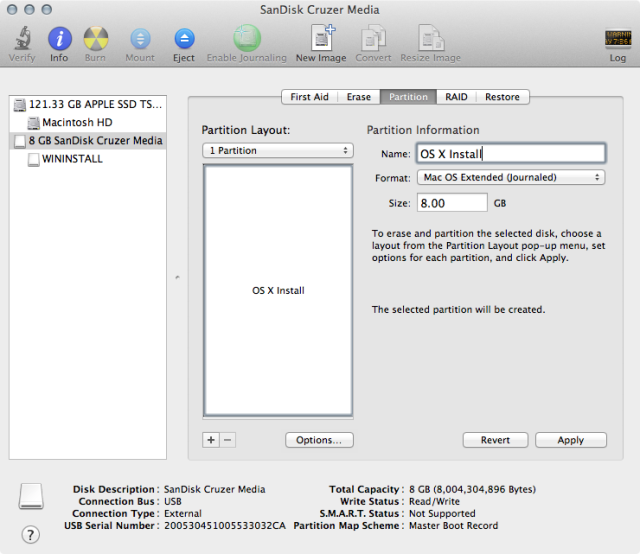
Figure A The Install Disk Creator window. Wait until a new window pops up informing you your bootable installer has been created and is ready to use. You'll be asked to enter your Mac's password. Carry on from Step 8. Step 7: Drag createinstallmedia to the Terminal window from the Finder location in Step 4. The process is fairly painless and, if you have a bit of time and patience you can complete the task on a Mac. If it automatically launches after download, quit the installer.
How to Create a Bootable Install USB Drive of Mac OS X 10.10 Yosemite « Mac Tips :: Gadget Hacks
If you would like to arrange one-on-one help or remote help, please contact us through our website at:. Image: Apple You bought that shiny new MacBook Pro or iMac, and you're ready to start working. Unless there is a hardware problem that only can be diagnosed at apple center you can fix your apple computer. Save and restore images of disks and flash drives. Advertising revenue that helps to pay bills is falling fast. That is the only thing hanging up my adventure.
Create a Bootable USB Sierra Installer in Mac OS X 10.12
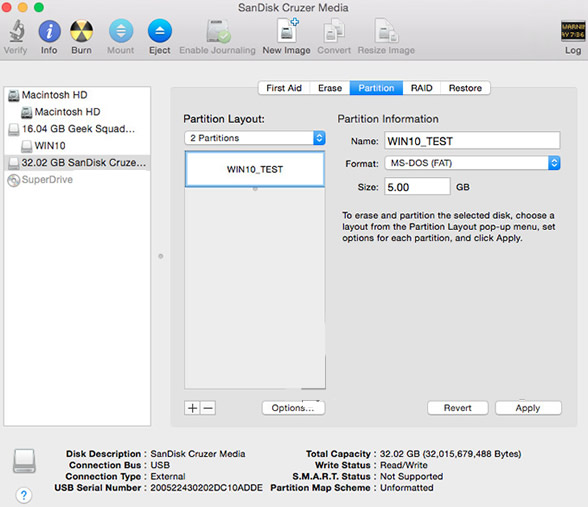
Primarily, a Time Machine drive cannot be plugged in and booted from. You can quit Terminal and your drive is ready for use. Of course, the speed is dependent on the device you're copying to. Use the Terminal to create a boot disk So you have your external drive, and the Sierra beta installer is in place. It will work on your Mac. Open up Disk Utility and do the following.
10 Apps to Create a Bootable USB for Windows
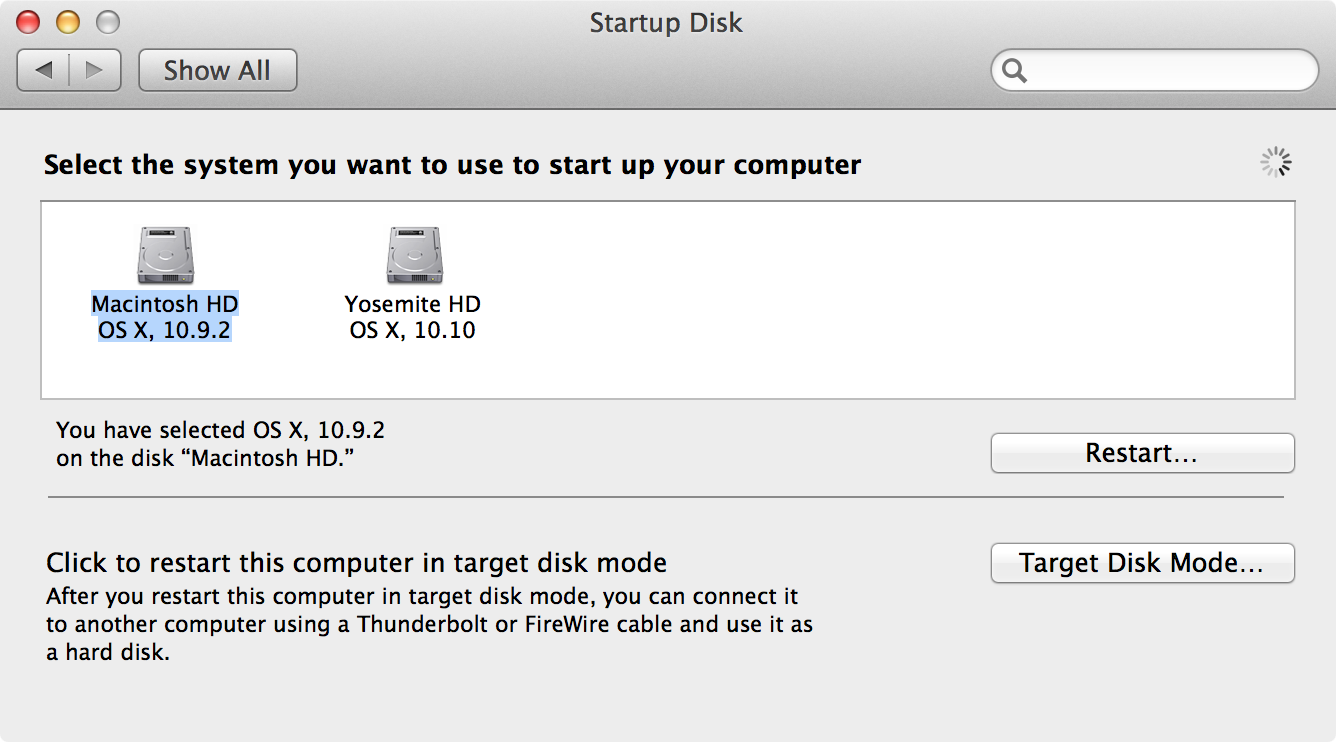
This command will select the disc partition of your choice. Just force eject your thumb drive, and use it to do the installation, it will work. If everything worked ok, your Mac will boot using the new installer. The Hardest Way: Do Everything Manually If you don't want to use DiskMaker X or Terminal commands, this is another option for you. It will find the installer file in your Applications folder. Go to System Preferences, click Startup Disk and choose the install disk you just created.
Mac On a Stick

Install Disk Creator should automatically select the downloaded installer file. Don't be left high sierra and dry Should something go wrong with your MacBook or iMac, the last thing you need is to be left without the means to recover. Alternatively, you can use the next method. Make sure it's empty, because you'll be deleting everything on it during the process of making the installer. This app has actually been around since Lion and Mountain Lion, and was previously called Lion DiskMaker, but it's recently been updated to work with Mavericks. Data Recovery Backups are only as good as the data recoveries they enable.
How to create a bootable USB installer drive for macOS

After you get it in there, just hit the Enter key. It should take less than a minute to copy over. You should be able to triple-click the command line below to select the entire command. If everyone who reads this site, who likes it, helps to support it, the future would be much more secure. I keep it around for those time when I would rather use the drive than rely on booting in. Enter the password and hit Enter.
Mac On a Stick

Carbon Copy Cloner can be configured to eject the destination drive when the backup is complete and sleep, restart, or shut down the Mac after the backup task is completed. Change the name of your drive to Untitled; you need to do this for the steps below. The wikiHow Tech Team also followed the article's instructions, and validated that they work. We've already covered how to do this from the command line See , but I wanted to give those with a fear of the command line a way to do the same thing. Then just follow the rest of the prompts to start the disk-making process. Although more people are reading Pureinfotech, many are using adblocker. Although this method involves more steps, it's easier for many Mac users because the majority of the process uses familiar tools.
Create a Bootable USB Sierra Installer in Mac OS X 10.12

If you're getting an Undefined error: 0 warning when trying to install, this more than likely means that you forgot to perform Step 6 above, so make sure to copy over those two BaseSystem files. This will display that is connected to your computer. I did the usb installation, i installed on the hard drive and when i tried to boot from hdd the boot process stops and the computer reboots. Step 5: Move the Packages Folder Over to Your Drive Go ahead and open the System folder. Creating a Backup To create or update a backup, plug in the destination drive and ensure that Carbon Copy Cloner starts. Disk Drill will start creating the bootable installer drive. It's free to download and use, but you can donate to the devs if you want.
Download MacOS Mojave .APP, DMG, ISO, Bootable USB image [Official Version] » MacBold
The Mojave installer app will be in your Applications folder, so you can go there and launch it later to upgrade your Mac to the new operating system. Hopefully, you'll never need it. Update: the public Yosemite version is out now, and you can download it from , , or. Schedule The last panel sets how often the backup should run. In the past, I've always shown you the manual method, which uses the Finder, Disk Utility, and Terminal. If you're not sure if you're going to like Yosemite over Mavericks, I would suggest and installing Yosemite there, that way if anything goes wrong, your Mavericks installation will still be untouched.