Bmw e46 passenger door panel removal. E46 Window Regulator 2019-03-03
E46 Window Regulator

This plate mounts to factory locations and takes only minutes to install, needing no drilling, tapping, or welding. At Step 7 reattach the door panel by first aligning all the clips with the holes on the door and with your fist hit the door panel back on. This is the basic kit that includes: solvent cleaner 125mL 1-part epoxy 80mL sandpaper applicator tool spatula For best results: Bonding surfaces must be cleaned with the cleaner and must be free from grease. It's best done with an assistant so that one of you can hold the door while the other fits the bolts. Disconnect the wires to the motor. I would grab a repair manual. Roll it up and down several times.
Removing BMW Door Panel & Replacing Window Regulator
I'm missing the majority of the screws in my driver's door. Side Window Deflectors also help reduce wind noise and allow interior heat to escape. Step 18 Perform Steps 11 through 1 in reverse order. All earlier cars will have 2-3 microswitches inside the door. Instead of pulling up, they need to be pulled straight out. One of my window regulators broke. The locking clip is located on the bottom.
Removing BMW Door Panel & Replacing Window Regulator

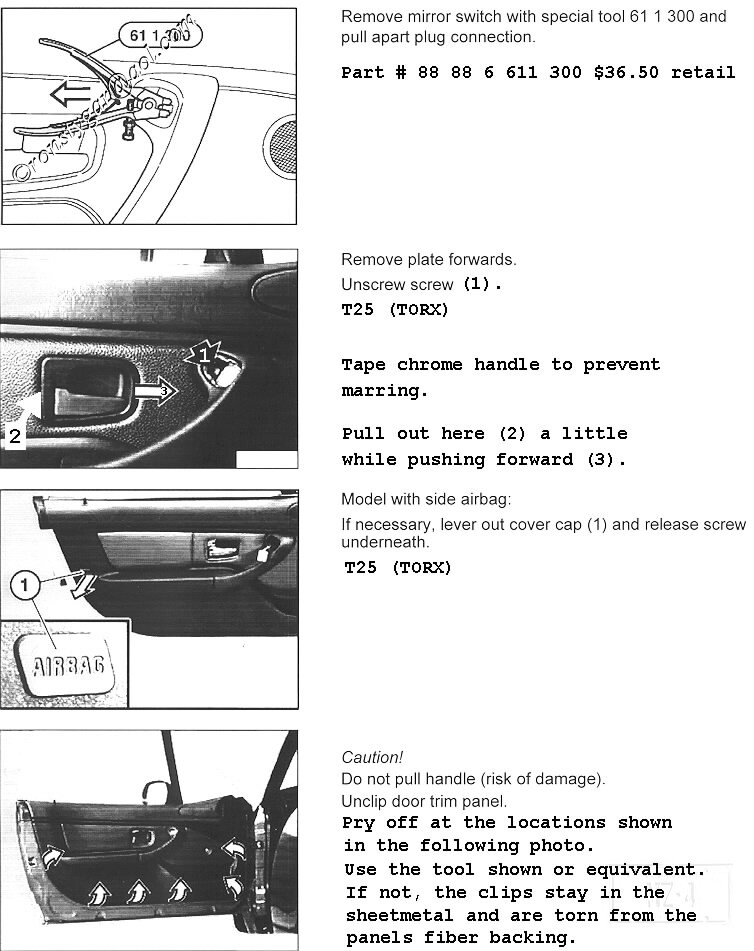
Then pull the door panel away from the door a little further and disconnect the speaker electrical connectors by pulling it straight off and the guide mirror wiring harness out of the door panel. If you have to remove the vapor barrier, have the vapor barrier sealant on hand. Slowly peel the weather barrier from the door starting at the top and work your way down. Don't bang on the panel you'll break the clips! Use of silicone during installation can help create a tighter seal. On a newer car the modules might not recognise each other, however you ought to be able to swap the control modules from the old doors to the new ones, so all the modules are still matched to the car. E46 front door panel remove instructions E46 front door panel remove instructions Unclip wooden finisher 1 with special tool 00 9 321. If we get a chance to perform the procedure, we will be sure to document it.
BMW Body Trim Parts & Accessories for BMW 3 Series E46 (1999

. I was rolling up the window when I heard a loud crack. I would grab a repair manual. If necessary, replace faulty clips 1 in wooden finisher 2. It's a very limited item, get it while it's available. Ready to put it back together? I re-inserted the cylinder into the broken clip and held it firmly in place by using 2 nylon zip ties, threaded through the metal bracket. Mechanically, it is exactly as you describe, although you might find that some care is required when tightening the new doors to ensure they are correctly aligned, otherwise you'll end up with ugly panel gaps and they might catch on closing.
BMW Body Trim Parts & Accessories for BMW 3 Series E46 (1999

It will not fit E46 Coupes. If I try and push the latch back in with the door handle closed it won't fit. January 13, 2014 Followup from the Pelican Staff: I am not 100% sure. Depending on model year, these could be either yellow or black, or both. Professional installation is highly recommended. Never work on your vehicle if you feel the task is beyond your ability.
How to Install new speakers into the door panel on a BMW E46 « Car Stereo & Audio :: WonderHowTo
If we get a chance to perform the procedure, we will be sure to document it. Now is a good time. Insert mounting screws finger-tight temporarily and check fit. Then lift the unit up and off the door handle latch pin. Carefully unclip door trim panel 1 at top with special tool 00 9 317 trim panel wedge.
BMW E46 Door Lock Actuator

Money will go to making this web site even better. It will have the procedure, special tools and torque specs. I know I need 5 screws, but I believe 2 of them are long, and the other 3 are short. The interior door panel has to be removed to access components behind it such as door speakers, side airbags, window regulators, door latches and door mirrors. Using single piece construction, the carbon is laid inside of a mold instead of being wrapped around it. With a flat blade screwdriver pry off the entire door panel off starting at the bottom and working your way around and up, leaving the top edge for last. If the vapor barrier is installed with a tear, an interior water leak can develop.
Removing BMW Door Panel & Replacing Window Regulator

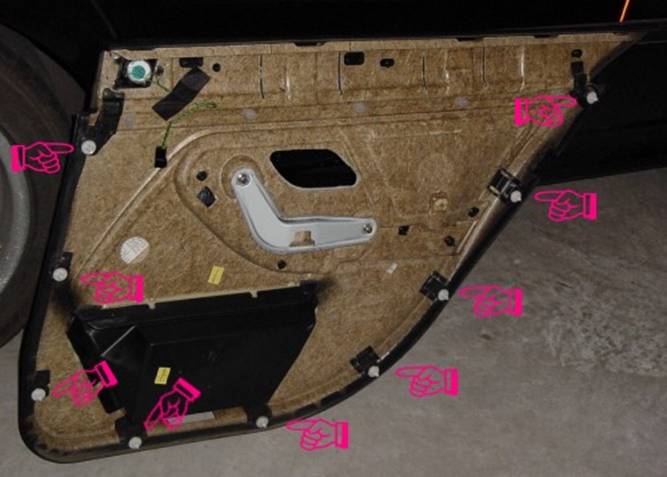
Maybe I'll do the remaining clips on the car also. Anyway I knew it would happen eventually and I wasn't too upset over it. Be very careful when removing the vapor barrier. Some white clips may not align properly with the holes so use a blade screwdriver or thin tool to move clips into position. You can now service items behind the door panel and repair as needed.
BMW Body Trim Parts & Accessories for BMW 3 Series E46 (1999
They can figure out what part or repair kit you need. Be sure to replace any damaged door panel clips. Using the Torx T-20 screwdriver remove the two screws located under the trim piece. There are four anchor points equally spaced along the length of the panel. To avoid this, you can disconnect the battery before beginning this procedure, and reconnect it after plugging the airbag back in.