Automation clip fl studio 12. 3 Invaulable FL Studio Automation Tips 2019-03-28
3 Invaulable FL Studio Automation Tips

. I hope you enjoyed this video, please do leave a comment down below and say hi, it's always great to hear what you guys thought of it and what sort of music you are working on : P. Step 2: Shape the Automation Clip We want to achieve that same ducking effect as before. Also, It is available for both 32-bit x86 and 64-bit x64 architecture system. Couple reasons why event editing is bad: -Events, as mentioned, are locked to patterns. This is also done in the Piano Editor. Step 1: Add a Fruity Peak Controller First, open the Mixer and add a Fruity Peak Controller to the kick Mixer track.
FL Studio 12 Free Download

I set a basic pattern for the kick and a few simple chords for the Swagger Bass synth I made in Sytrus and overlapped them in the Playlist. Add this as an instrument to the channel rack. When done, play it, you should hear it go from really low frequency then up to higher frequency. I increased the release time in our example so that the time spent compressing the bass synth is about equal to the time spent not compressing the bass synth. In the images below, I will show you how I can achieve the same precision that an automation clip would have if I were automating the volume knob at the beginning of the track, rather than using the edit event function. After purchasing the license, then he faces an issue, bug, a problem he can ask the developer team and they will fix that. It will take a little fine tuning of these parameters to achieve that pumping bass sound.
Image
Middle-click plugin title bar to rename. Learn what the list of parameters are or don't and just pick and choose forever until you get the right one every time you need to automate something in a track. Make sure to mute your kick pattern track temporarily little green button. And be sure to check out the complementary! Zooming in and out can be done using the Zoom time control in the upper right corner of the playlist. Your projects and ideas of automation will change dramatically. Release time is set too low.
How to organize automation in FL Studio?

Release the mouse button when you are done. Step 1: Make a basic beat to work with. You can use F7 to show and hide the Piano roll. This image depicts a basic abrupt rise in volume over time. Therefore, automation clips were implemented with the intention of simplifying the process. If you enjoyed this or learned anything from it please consider supporting our work on Patreon so that I can afford to keep making these videos Every Day for You! A : We didn't, we have been dioing this for about 1 year in our bedroom while studying a Biomedical engineering masters degree.
3 Invaulable FL Studio Automation Tips
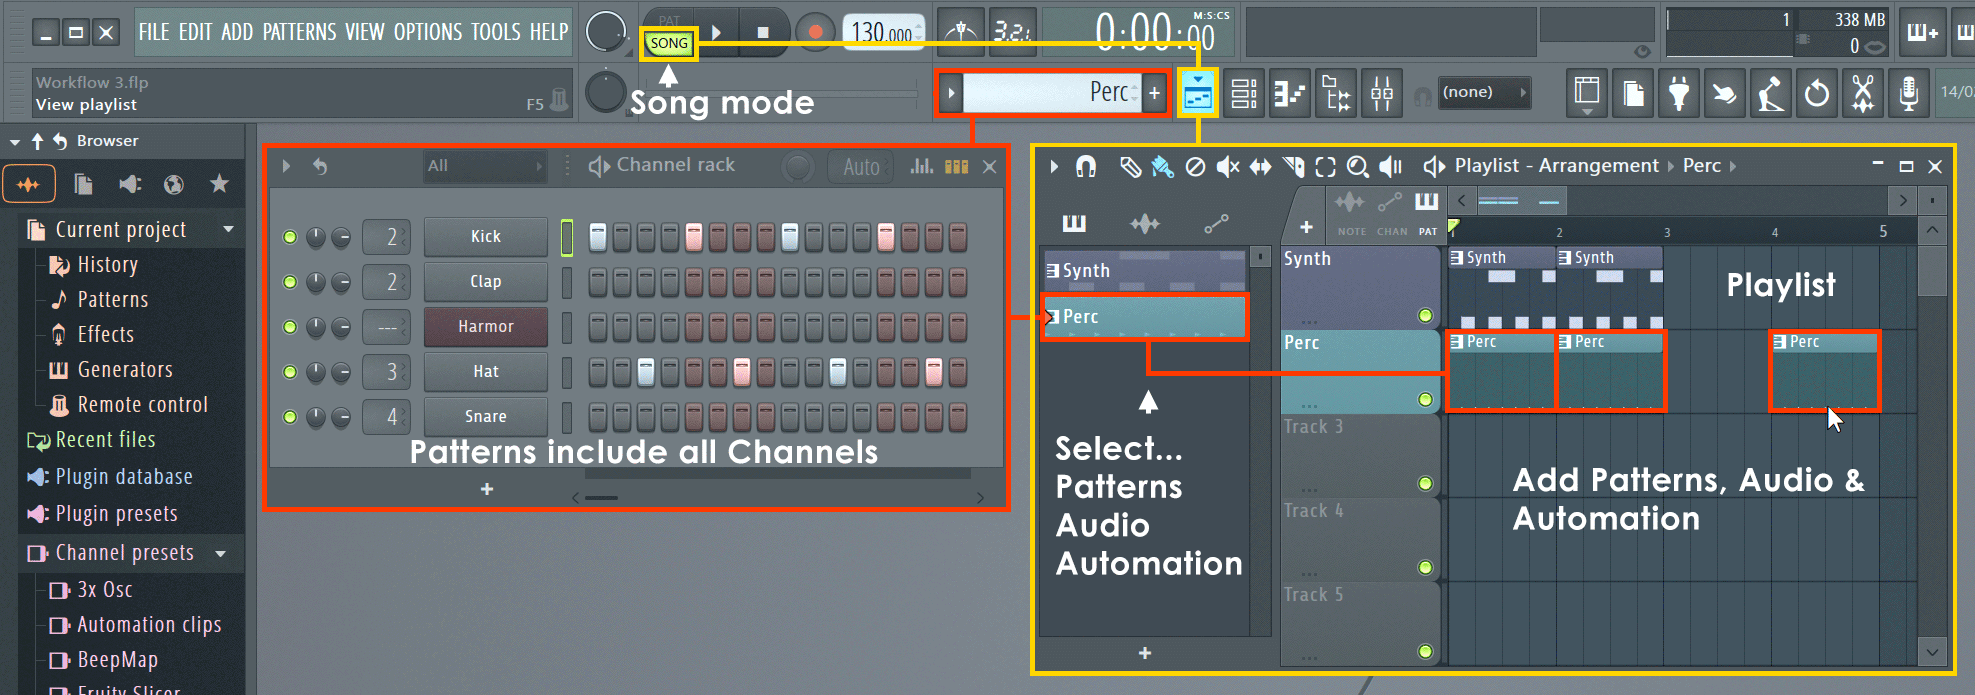
In the image below I will be automating the volume of the master track to give a nice 'fade in' effect to my project. The difference with this clip is that it has not yet been linked to a controller. Now we need to link the volume knob to an automation clip. However, I can now start to manipulate the clip. If I open an existing project by someone else, how do I find to which controller is, the automation envelope from the automation clip, linked to? You can merge 2-3 tracks from the playlist into a group.
Automation clip not working? : FL_Studio
Snow, I too used to get destroyed by automation clips in my projects. Release the mouse button when you are done. Let's see how to automate the volume on a track for example. Then, move to the frequency you want it to start out at. I will dedicate a separate article to that. It is a crucial step in producing music no matter what genre you are working on. When you listen to professional productions you will often notice that the drums have feeling and a groove to them.
Having problems with automation clips in FL 12. : FL_Studio

In this example, I want my automation effect to 'fade in' on my first pattern, aptly titled Pattern 1. Left click the end of each pattern, hold left-click and drag it back to the point you want it to cut off at. I suggest you use it and hopefully you will benefit from this tutorial as well as the beat making tutorials coming in the near future. Then draw in some mod X and Y note edits, and then hear how this manipulates the Mod X and Y parameters on the instrument at the note level. Make sure Stop Mode is turned on to get this effect. The 80% is a displayed value of where my mouse was sitting in the piano roll while I was taking the screenshot.
FL Studio 12.5

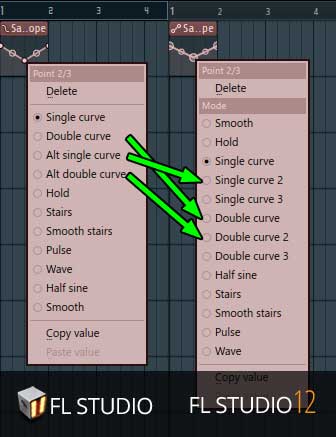
Now in the top right you'll see Piano Roll—Snare—Velocity. Would You Like Some Dope Drum Kits When They Drop? This is a great demonstration of how you can use automation to make your effects stand out in your beats. At the bottom you should see all the settings you can customize. The shape of the automation clip will closely resemble the compression curve and peak controller curve in the previous methods. Thanks a lot for your help, producers! O pen Fruity Balance and right-click the volume knob. As you can see, you have quite a variety of choices.