Ableton minimum loop length. Ableton Live: Simpler vs Sampler : orgmode.com 2019-01-12
Reducing the minimum loop size in arrangement view. : abletonlive

Focus on the final bar, with both new chords added. The picture here is promising, but slightly less clear. How does it know the tempo of the audio you drag in? Right-click in the Device Title Bar of either Simpler or Sampler and choose the conversion option from the bottom of the context menu. Multiple track rendering Many people don't realise that you can render multiple tracks at once. Obviously, as well as tightening audio performances to the grid, you can use Warp Markers to actually mess about with the timing and groove of recordings. Instead, I'll press the Scales button and select a Harmonic Minor scale in the key of G. Then try: Sign up for our free weekly newsletter The free MusicRadar newsletter serves up the week's biggest artist and product news stories alongside exclusive tuition and gear reviews.
Help and support for Live & Push

Firstly, some graphical displays within Live are now shown on Push 2. However, this is the most format for sharing audio on the internet. The Packs item shows installed Live Packs, as well as those which are available under your Live account but not currently installed, or any packs with updates. It released , endorsed its first hardware controllers and and celebrated its tenth anniversary. A fun way to interact with loops is to move this marker around on a single loop layer. The simultaneous juxtaposition of these two patterns creates an interesting auditory phenomenon.
keyboard
In the next example I imported a track of this kind and the analysis failed to identify bar one correctly. Multiple editing is supported for clips in the Session or the Arrangement, and the clips can even be in different tracks. There are seven available labels, and each can be given a customised name. This should be your go-to option. Double-clicking the bar five label in the ruler turns bar five into a Warp Marker.
Recording a fixed

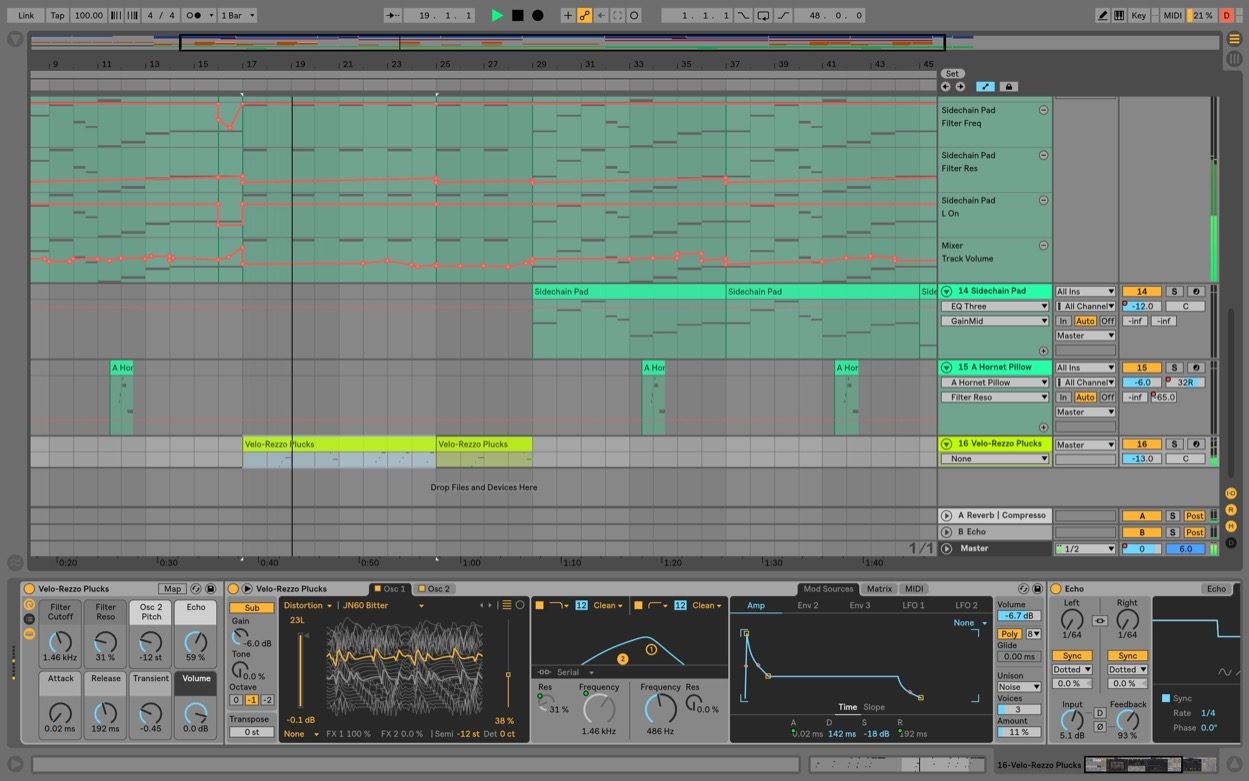
In an interesting and useful twist, you can unlink the automation from the Clip, in which case the automation gets a complete set of position and loop parameters of its own. The process minimizes artifacts when converting to a lower bit depth. . You can continue this approach with other loops to find out how they interact with your existing material. Video Encoder — Your options for which encoder you use for the video. This time, realigning the grid won't work, because there are many Warp Markers throughout the track, charting the drifts in tempo.
Warping 101 In Ableton Live

Along the way, Yeuda offers valuable lessons about basic music theory—concepts like notes, chords, scales, and time signature—that will make your experience with Push more rewarding. In our example, bar one of the loop is exactly at the beginning of the audio file, so the Warp Markers line up correctly and the loop plays back in time. Convert to Mono — Renders as mono one audio channel instead of stereo two audio channels. Len Sasso can be contacted through his Web site at. In all cases, Live will cleverly align the notes in the display to their correct positions according to the clip locations. Create faster ways to make specific scenes get copied over to the Arrangement at a determined location.
Ableton Live Loops, Loopers And Layering Tutorial
The end marker is still in place, so everything after the bar five marker has to be slowed down to meet the subsequent time points. The process of converting is easy. The Session and Arrangement views are connected in two ways: they share audio channels, and both are always active for playback, even though only one is visible. You can watch how to make one of these Like this video? In this review I'll give a brief overview of Live, then concentrate on the new features. Check this option if you intend to use the new sample in Live.
Help and support for Live & Push

Warp Markers can also be used to tighten up timing. Auto-Warp often needs some help determining where bar one should be. Plug list If you are working with a particularly large rack and don't want to keep scrolling through it to get to the plug-in you want to tweak, right-click on the Track View in the bottom left-hand corner to see a list of all of the plug-ins in the rack. However, there are deeper differences beneath the visual makeover. This option is great for exporting stem files for each track.
can the Loop Brace be smaller than one beat in length?

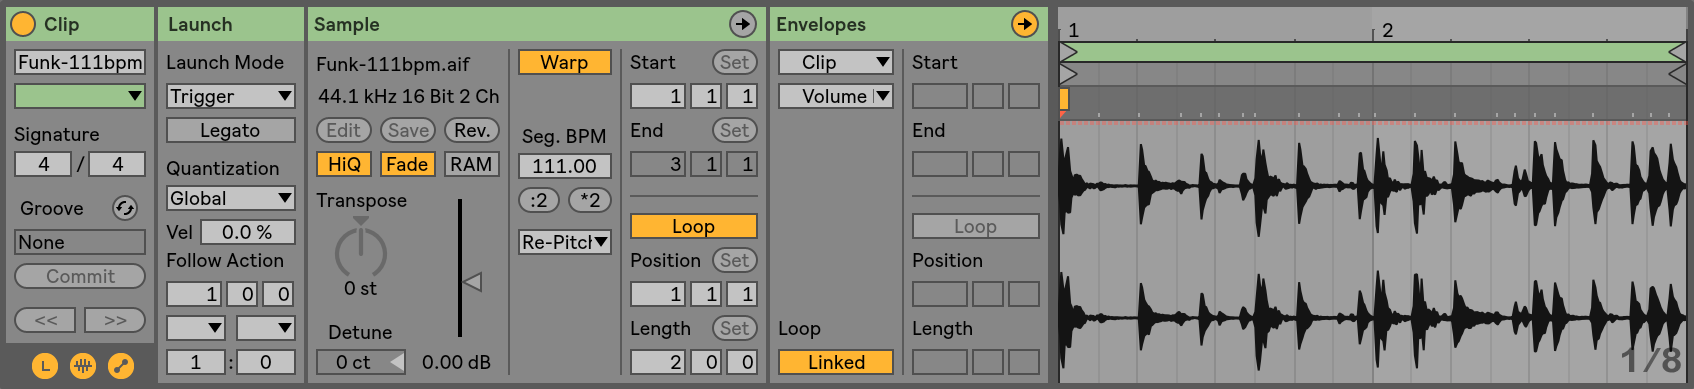
Ableton is one of the most unique music studio software applications around. They work best on the final render. Ableton Live Loops can be dragged into either Session or Arrangement View; most of you will opt for Session View due to its loop-friendly, continuous playback. Create Analysis File — Ableton will create an analysis file that will help load the sample faster in the future. You can now freely record and drag audio into the Arrangement, and the audio will be played back at its original speed, ignoring the tempo of the Live song. Humanize the sound of these beats by changing individual note velocity, length, and position and adding in quantization and swing. In practice, this placed a limit on the size and complexity of Live Sets.
ABLETON Live 3.0 (Mac/Win) loop sequencer

How can I record and hear the recording without using the instrument? You can now click and drag the end of the audio clip to resize it to the end of the Loop Brace. Applying Clip automation to the individual resonator frequencies opens up a whole new range of possibilities. The drums are polyphonic, presumably to allow for convincing flams and rolls. In short, Sampler is much more akin to something like Native Instruments Kontakt or Steinberg Halion because it has been designed to handle large multi-sampled instrument libraries, and it does so very well. Also, aside from just checking the software minimum requirements, see what Ableton has to say on the subject: One more thing to remember- Ableton can be run in 32 or 64bit versions. Converting between Simpler and Sampler The good news is that you cannot make a mistake in your choice of Simpler vs Sampler. Another difference is that Clip automation loops with the Clip, so if you stretch the Clip in the Arrangement view, causing it to repeat, the automation repeats as well.
Ableton Export Audio Clip/Loop
The same method works for things like Pan and Sends too. That includes Clip parameters, which can't be automated on the track level, such as Clip Volume, Transpose, Sample Offset, and — in Tone and Texture Warp modes — Grain Size and Flux. Custom colored notes in piano roll. Though exporting audio in Live is easy, there are some decisions to make as part of the process. It then analyses the audio using a beat-detection algorithm, and tries to add beat markers to sync the tempo with the current Live song's tempo track.