Ableton instrument rack transpose. aurex 2019-02-06
synthesizerwriter: Transposing Quickly In Ableton Live

Components of a Drum Rack. Setting the zones as shown maintains four exclusive values for our presets, so that each still has one point where neither of the others are heard. The adjacent Hide button whisks them out of sight. So I'll select that, and when I select that, I can see that. So now when I play down in this zone as I approach C3 I'll actually move from the road sound up into the pad sound.
aurex
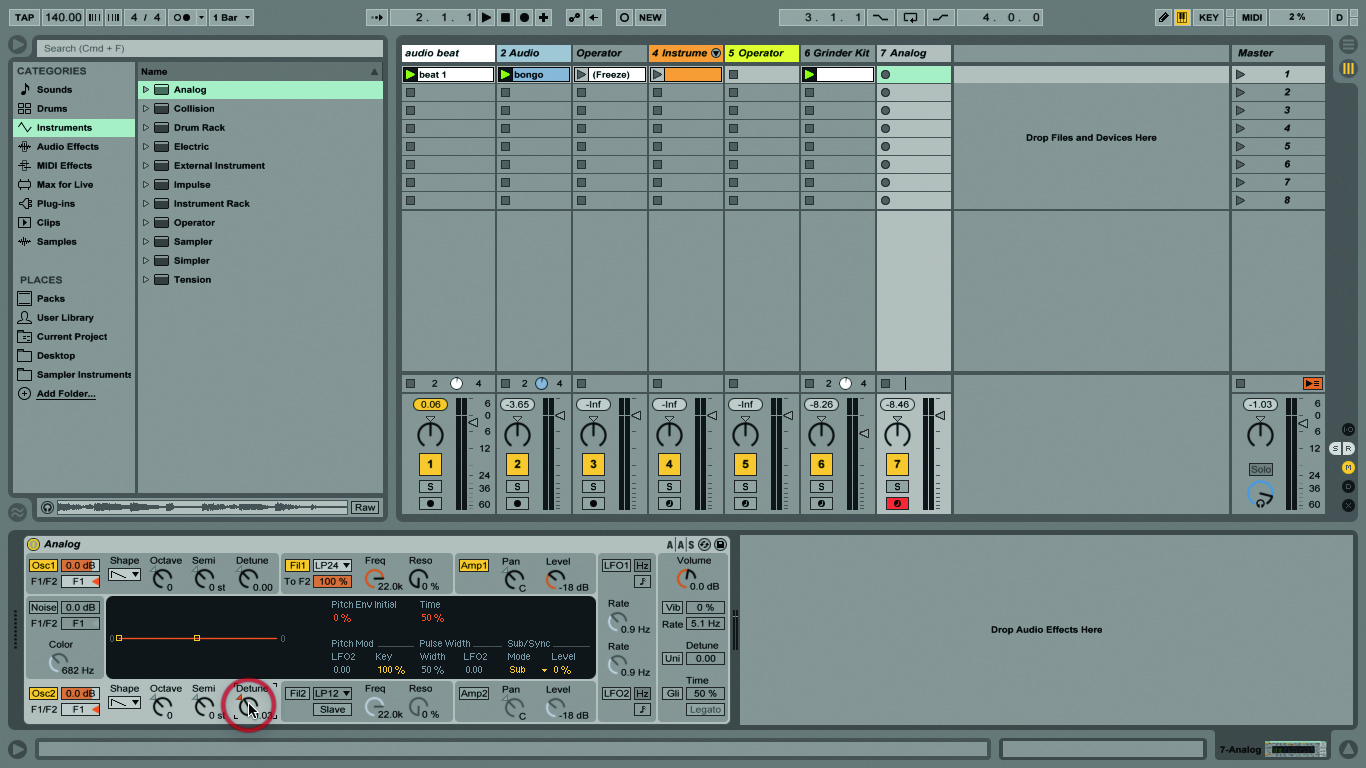
I think ableton would have to add it as a feature. So there I'm on c2, now E, and I'm just getting road sound. Once you have set up your ideal mapping, the rest of the Rack can be hidden away. So what happens, then, if the Chain selector is moved outside of the chain select zone where a sound is currently playing? Each of the four chains contain different effects that we would like to be able to switch between. Both modulators use a hidden oscillator whose tuning is set as a percentage of two octaves by the numerical to the right of the Ring button. But frequency shifting is additive - all the frequencies will shift by 1000 Hz.
7 Useful Shortcuts / Key Commands in Ableton Live 9
Crazy pitch sweeps Step 6: Now let's combine techniques. Instead of trying to imitate the hardware studio, offering console layout emulation, tape-machine style tracking and more fundamental mixing tools, it re-thought the way in which musicians interact with digital tools but in the studio and on stage. So let's check that out. Default Bootstrapping As you create more and more complicated Racks, you might begin to see it as a modular programming system. I can see that there's a chord plug-in.
Ableton Live Tutorial: Pitch and Transposition

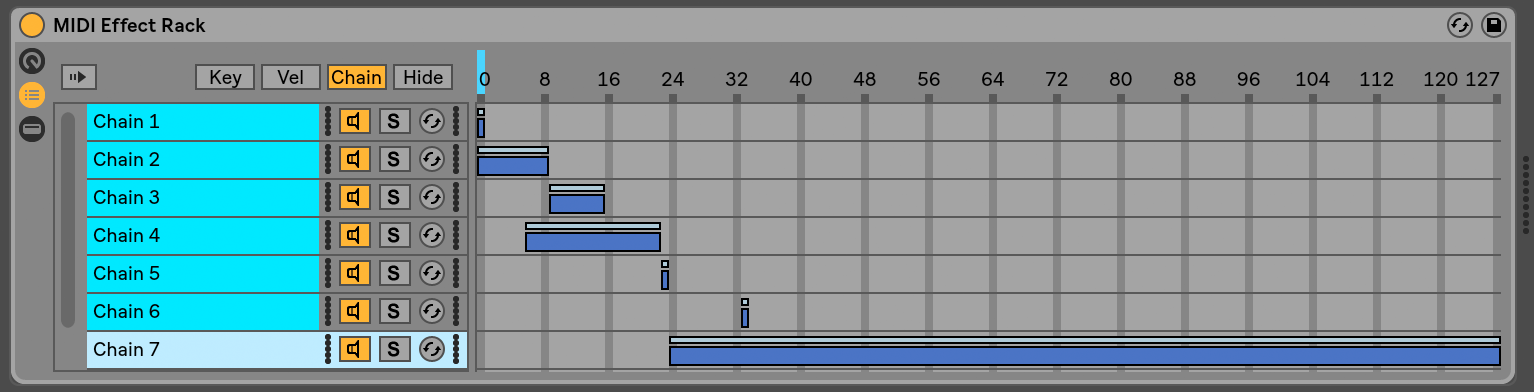
These Racks have chain select zones, which allow you to filter chains spontaneously via a single parameter. This means that adding a new Rack at any point in a device chain is no different than adding any other device, and Racks can contain any number of other Racks. Operator and Simpler are just two of the instruments that feature pitch and transposition-related controls. When I drop down to the pad, I only see the pad plugin and I don't see any effect over there. We can hear that sound. When I click over here I can see the two chains that are set up and when I choose the first one and go over here to the right I see the bracket of another rack. Live gives us two different ways to interact with midi note velocity values; we have vertical lines or stalks with breakpoints on top.
45 Free Operator Racks For Ableton Live :: Abletunes Blog

I have added a Quick Transpose and a Pitch M4L device in each layer, and mapped Macro Controls to each of them. The 'Ableton Pitch' method gives a rotary Macro Control that goes clockwise for transposing up in pitch, whereas the 'Quick Transpose' method results in a rotary Macro Control that transposes down in pitch for clockwise rotation. Use the Reverse and Recycle knobs to reverse and recycle the output. Create music in real time, on stage, or while producing in the studio, with Ableton Live. It doesn't solve the problem of being able to map a macro knob to similar parameters in all subchains though. And again I'll try and Crossfade those.
Bass Racks

Just type in the desired value or drag the mouse accordingly. Free floatin, swangin and shufflin time! So I'll just grab the default chorus and I'm going to drag and drop it. Select the parent Drum Rack, hit Automate and Record, then overdub Transpose sweeps into the clip as automation for wild effects. The context menu also contains a color palette where you can choose a custom chain color. I find that when building up a track in the Arrange View, I still need to make micro-edits inside of clips. Got a little problem here.
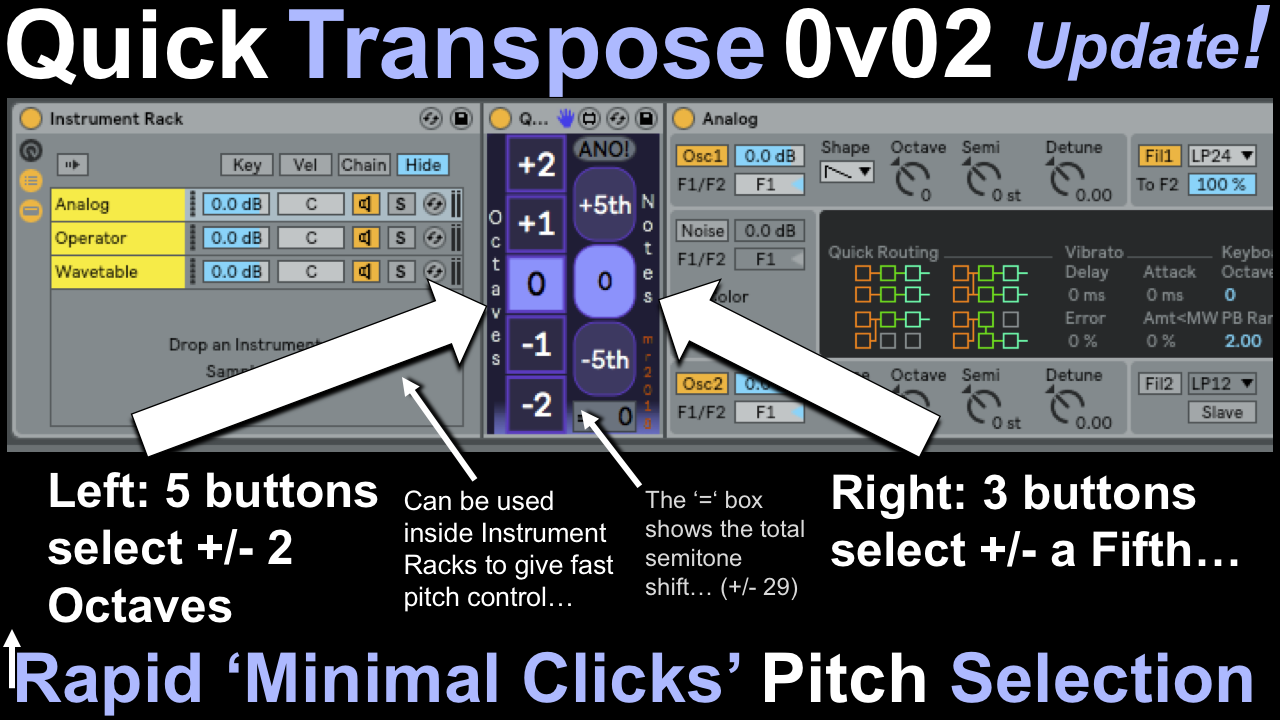
synthesizerwriter: Quick Transpose
On this second pad, we'll use Push 2's top encoders to alter the sample's Start position - increase the Sample Start parameter to remove unwanted clicks. An so I've soloed that chain, an now I'm going to solo the first instrument that's inside that. Because these tools let us be more spontaneous, and can be accessed mostly through hardware controllers, rather than being based on drawing with a mouse, they are equally useful for improvisation, performance and composition. And it looks like we've got two things going on. And if I move up another octave, music playing , I'm just getting the pad sound. Clips set to Re-Pitch change duration with project tempo changes, but also deviate upwards or downwards from their original pitch. What if you want to change the key of the song you're doing? I can actually trigger one or the other sound or both.
Bass Racks
These racks were built using only Ableton Live effects and Operator, and combined into instrument racks assigned with useful macros for quick and easy tweaking. Let's take a look at how to change the pitch of your audio so it's a perfect fit in your set. Plugin Boutique or its Suppliers do not accept any liability in relation to the content of the product or the accuracy of the description. I can solo the two of them separately if I want and if I am unhappy with one of the presets that I'm using, I can actually click this Hot Swap button. Navigate Racks Quickly Via a Context Menu. Close that category, and let's go into Operator, and into the Pads Area. The relevant mix bus or even a midi sidechain track can all be neatly packed inside of your group.
Help with Drum Rack Transpose?????

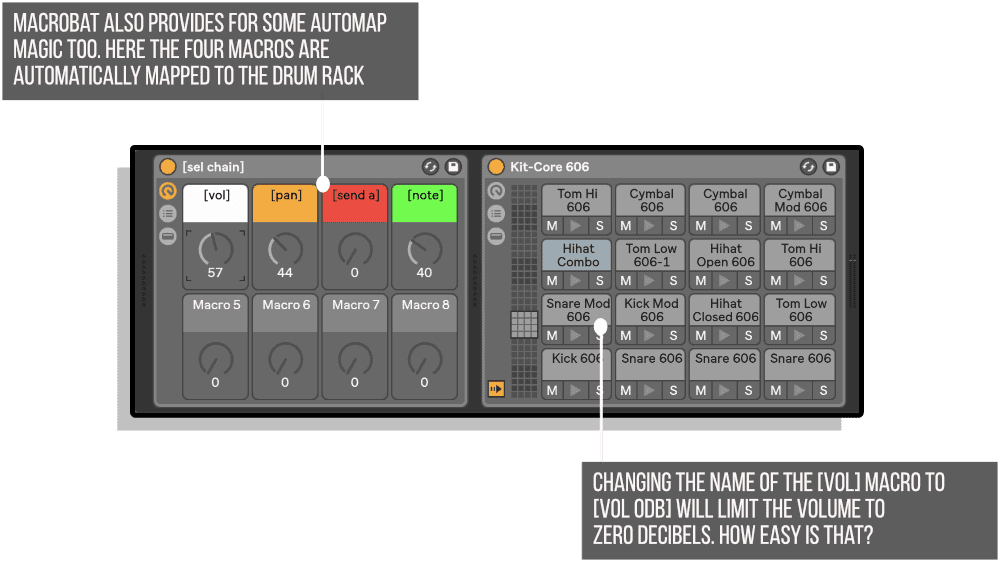
Now as you change delay time, the delay repeats will change pitch. If I want I can deactivate one of the chains from playing by clicking on that button. Below the list is a drop area, where new chains can be added by dragging and dropping presets, devices, or even pre-existing chains. I'm going to press my left arrow. Anyway, it turns out that you can use Macros to do this.