2014 toyota sienna coolant change. How to change antifreeze in a Toyota 2019-02-22
2014 Toyota Sienna Engine Coolant Change

You will want to be gentle with this as it is a plastic part. Be careful, they seem to be fragile although none of them were broken when I took them apart unlike the ones in the front middle of the bumper on top. This is the part that has the horns mounted on it: Reinstalling the radiator upper support sub-assembly Line up the rubberized holes in the assembly with the posts that stick up from the two top radiator brackets: Line up the posts with the rubber insert There are two bolts on each side. Owners may contact Toyota customer service at 1-800-331-4331. I love questions and comments and respond to all.
2014 Toyota Sienna Engine Coolant Change

Prying off radiator hose with a large flat screwdriver Lower radiator hose off—I got a bit of a face-full of antifreeze when that hose broke free First move your catch pan underneath the location of the oil cooler hose connections. It also has the advantage of forming readily identifiable deposits when it leaks, making find a leak easier. Great instructions; thanks so much for all the time you saved me. Old clips installed on new radiator Step 25: Install the lower brackets back on the new radiator. A warranty replacement was done for 1 of 2 at 35,000 miles.
How to change antifreeze in a Toyota

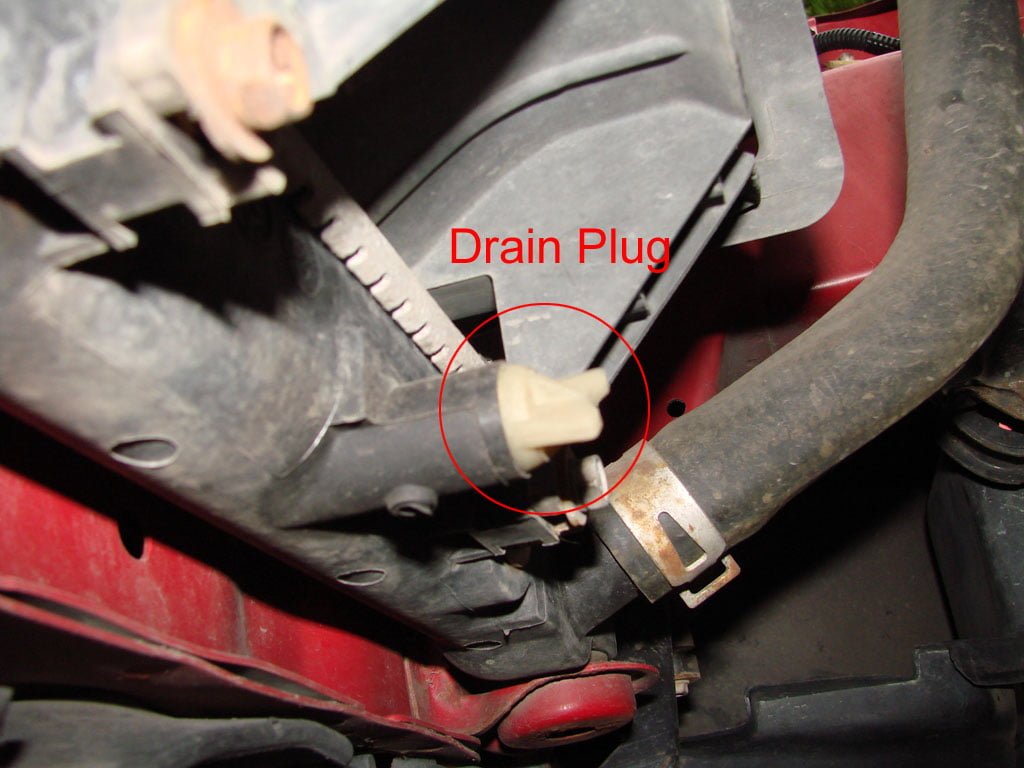
I'm staying with Toyota coolant unless someone can convince me otherwise. Jack Stands can be placed at the manufacturer specified jack points to support the car. I brought it in for an oil change and they kept it for a week. Jack Stands can be placed at the manufacturer specified jack points to support the car. You cannot see it until you start to remove it, but if you push your 6mm hex key up into the hole from the drain plug, you will feel it seat into the hole. If you start to hear gurgling or hissing, stop and retighten the radiator cap and wait for the engine to cool further.
2014 Toyota Sienna Engine Coolant Change
Air Cleaner vacuum hoses I labeled mine with tape before I removed them so that I was certain as to which one goes back on which nipple: Vacuum Hoses Labeled Loosen the two air cleaner cap bolts. Here in Minnesota we experience one temperature extreme to the other, testing your coolant to the max in both subzero and over 100 degree temperatures. I did as you describe except throughout. Does this Denso radiator has enough cooling fluid to handle the long distance driving since its 42% thinner 42% less cooling fluid. Also, on the front bumper, once you realize where to position a screw driver, that is easier.
Cooling System for 2014 Toyota Sienna

Second visit confirmed that a bolt had not been installed in one of the seats. I wish I would have known I was going to run into this problem so I could have ordered new brackets but I was at the point of no return so we were going to get that bracket out of there. How often do you need a coolant flush? Lift the vehicle If you are unsure where the lift points are for your vehicle, consult your owners manual. This is what the drain plug looks like from the back side of the radiator: Radiator drain plug location After you have the drain plug open you would ideally want to open the two Drain cock plugs and the radiator cap to allow air to be drawn into the coolant system while the antifreeze drains out. I like to go around the hub two times with the torque wrench just to make sure that they are all correct.
Radiator & Components for 2014 Toyota Sienna

Why are regular coolant flushes so important? To replace the coolant from the reservoir you will need to pull it out with a pump or a turkey baster, or remove the hose at the bottom of the reservoir, the latter of which will make a mess. Do you have additional questions or concerns about getting a coolant flush? It was too late before I noticed. As to what sort of transmission fluid to use, you need to make sure that the fluid meets the manufacturer specifications. She had a radiator replaced and she tells me the engine was replaced. This hose comes out of the radiator on the lower left-hand side of the radiator and rises up about half way to the top of the radiator and into the engine. I like to use a socket, because I can remove the lugs faster with my impact wrench.
Cooling System for 2014 Toyota Sienna

I replaced the radiator on my 2006 Sienna today with the help of your posting. The wise person would apply a bunch of this to the top and bottom of the upper radiator bracket a day or so before starting this project and maybe to the screws at the bottom brackets as well. I suggest hand threading it in with the 6mm hex key. Remove Transmission Drain Plug The transmission drain plug requires a 6mm hex key to remove. Needless to say, antifreeze coolant is a very necessary element to keep your engine from overheating. Cooling system protects the engine against the extreme temperature of summer and heat generated by itself. At that point I took my hand off the cap.
Cooling System for 2014 Toyota Sienna
It can be useful to squeeze the lower radiator hose every once in a while during the filling process to help get air out of the hose and fill it with coolant. Removing single bolt on bottom end of vertical support bar Step 21: Remove the two lower radiator brackets. After 4 trips to the dealership where we were called in for an appointment and then told they didn't have it in stock it was finally fixed. Spare tire tooling fell out of holder and rattled. Please check with us for more information. I replaced the coolant inlet tube, a plastic tube that had broken off causing a total and sudden coolant loss, thermostat, radiator hoses, and starter motor. You will need the 10mm socket to remove the two bolts holding this plastic cover that hides the transmission fill plug.