2013 polaris outlaw 50 service manual. Service Manuals 2019-05-04
2013

Release the cover from the vise. Remove the drive axle assembly. Do not allow anyone under 6 years of age to operate this vehicle. If recharging is necessary, use a. Use electrical contact cleaner if necessary to clean these areas. Remove line clamps at both ends of the filter. Do not attempt to clean the fuel filter.
POLARIS OUTLAW 9922485 OWNER'S MANUAL Pdf Download.

A helmet can prevent a severe head injury. Any other adjustments should be performed by an authorized Polaris dealer. These warnings are provided for your child's safety. If crossing a sidehill is unavoidable, follow these precautions: 1. Place the transmission in gear. Hot components can cause burns and fire. Replacement safety labels are provided by Polaris at no charge.
POLARIS SCRAMBLER 50 SERVICE MANUAL Pdf Download.

Fill the oil reservoir with Polaris injector oil. Engine exhaust fumes are poisonous. Push the engine stop switch down. While rotating the right front wheel, tighten the lower front brake adjuster nut on the right-hand control. Crankcase Separation Crankshaft Removal Tool: 28. Perform the proper battery tests and Following are two tests which can easily be made on replace the battery as needed. The rear brake is operated using the left hand brake lever.
Polaris Outlaw 50 Service Repair Workshop Manual
Remove the drain plug and wipe the magnetic end clean to remove accumulated metallic filings. Change fluids as recommended in the Periodic Maintenance Chart beginning on page 94. Allow the engine to run for approximately five minutes. The air screw controls the fuel mixture from idle to low Having the proper needle jet and jet needle has a speeds. Never attempt wheelies, jumps, or other stunts.
POLARIS OUTLAW 9922485 OWNER'S MANUAL Pdf Download.

Never ride on public trails. Remove the three bolts securing the battery mounting bracket to the vehicle. Remove the primary fixed sheave and washer claw. Piston Installation Flywheel Nut Torque: 14. Allow the engine to run for a while to evaporate any water that may have entered the engine or exhaust system. Call 800-342-3764 for additional information. Never start the engine if you have a sticky throttle.
Polaris Outlaw 50 Service Repair Workshop Manual

Improperly assembled air intake system 5. Tighten the carburetor drain screw. Measure glazed or hourglassed, replace. Brake Cable Tie Rod Brake Shoes Return Steering Nut Spring Retainer Spring. Mount the front brake assembly on the spindle.
Polaris Outlaw 50 Service Repair Workshop Manual
The parking brake will release automatically. An obstacle, a sharp drop, or another vehicle or person could be on the other side of the hill. This means that the wheel on the outside of the turn must travel a greater distance than the inside wheel when turning, and the inside tire must slip traction slightly. There are exceptions in the steering, suspension, and engine areas. An adult should always be watching you in case you need help. Operating on Steep Hills Operating on excessively steep hills could cause an overturn. Avoid crossing the side of any hill unless absolutely necessary.
POLARIS OUTLAW 9922485 OWNER'S MANUAL Pdf Download.
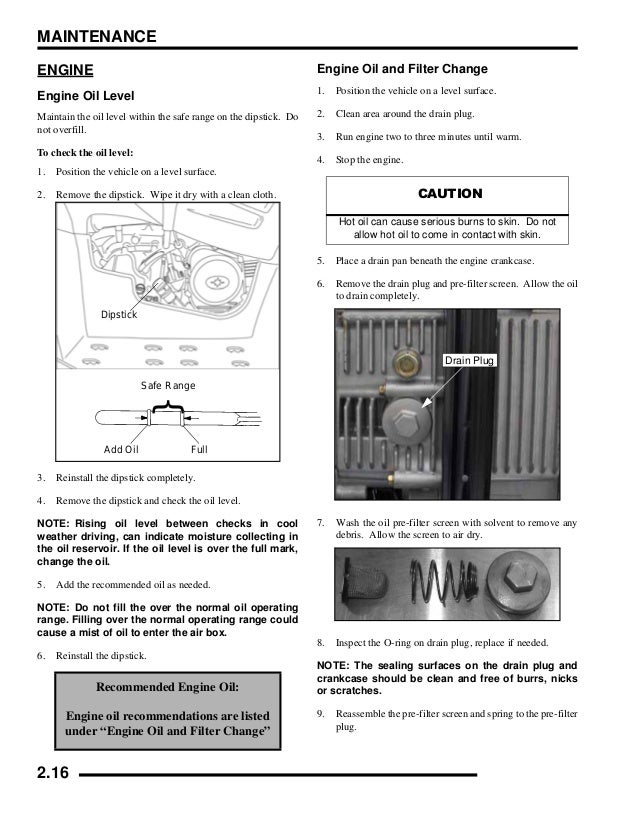
Position the vehicle on a level surface. Carefully install the engine into the chassis. Install the rear axle bearing carrier and rear brake assembly on swing arm. Remove the flywheel using flywheel puller. Do not use plastic or coated materials.
2013

Do not use automotive oil. Use caution and drive at reduced speeds in conditions of reduced visibility. Stop the engine and lock the parking brake. Turn the fuel valve off. Adults have riding rules, too. Install the front and rear cab to the frame and tighten the mounting bolts to specification.
Polaris Outlaw 50 Service Repair Workshop Manual
Remove the idle gear plate, two washers, and idle 7. See your dealer as outlined in the owner's manual. Rinse thoroughly, dry with compressed air, and oil the bore immediately with Polaris 2 Cycle Lubricant to prevent the formation of rust. There are three 3 mounting positions for the Grip front and rear cab to the frame. Maintain the oil level in the proper range. If adjustment is required, turn the adjustment nut until the freeplay falls in to the acceptable limit. Apply the brakes until the vehicle stops moving.