2010 transit connect rear bumper. 2010 Ford Transit Connect Specs 2019-04-23
2010 Ford Transit Connect Specs

Jul 13, 2014 Lift the front end of the car and support on stands. The sound seems to be like a whistle, like that of air entering the car. Shop with confidence on eBay! It isn't the sort of item where you need to get into thread sizes and thread pitch. Generally, vehicles need more frequent and more intense cleaning cycles during winter because of the presence of damaging road salt on the road. Aluminum is more expensive, although it is offered in a wider range of styles compared to steel wheels. Remove the rear bumper cover by pulling the cover outward from the part nearest the wheel on both sides.
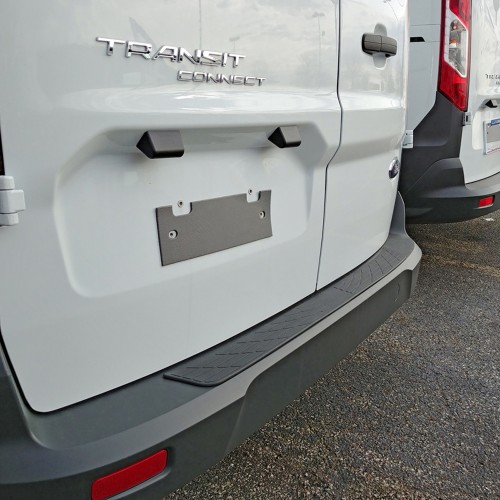
2010 Ford Transit Connect Rear Bumper

Support it by attaching one bolt to the lower hole on the cooler frame. There will popping plastic sounds, this is the pop-in-place plastic rivets that are the last pieces that hold your rear bumper in place. On the top of the rear bumper, between the bumper and the bottom of the liftgate opening you will find 6 to 8 plastic rivets that can be removed by pulling the center pins out, remove these. Open the hood and remove two bolts on top of the bumper, next to the inner headlamp mountings. Use a flathead screwdriver to pop the plastic rivets out of place along the underside of the rear bumper.
Ford Transit Connect Rear Bumper Assembly

Good Luck Feb 27, 2015 take help of the following steps to remove rear bumper on ur. Once removed, take off the 2 black mounting brackets from the bumper cover. If there's a plastic cap to prevent you from doing this, just lift that up first. On the top of the rear bumper, between the bumper and the bottom of the liftgate opening you will find 6 to 8 plastic rivets that can be removed by pulling the center pins out, remove these. Remove the forward halves of the front wheel arch liners. Shop with confidence on eBay! The bumper is surprisingly light. This will keep the weight off the lines.
2010 Ford Transit Connect Radiator Grille and Front Bumper
Find an inventory of used 2010 Ford Transit Connect car and truck parts from 100+ top auto dismantlers, modern junkyards and used parts dealers. Do the same to the other side. Constructed from high-quality plastic for reliable protection against wear, bruises, or scratches from light collisions. Get behind the rear wheel well and loosen the bolts holding the bumper brackets on. Remove the rear bumper cover by pulling the cover outward from the part nearest the wheel on both sides. These screws are on the area of the tire well that is closet to the bumper. They're pretty difficult to find and remove.
2010 Ford Transit Connect Used Parts: Headlight, Tail Light, Bumper, Mirror, Body & Engine Parts
All Replacement brand items are backed by 1-year, unlimited-mileage warranty. Once the cover is free you must disconnect the electrical connector to the sensor wiring harness. . You just buy one, or go to a scrap yard. Hope this helps Posted on Apr 03, 2010 Pop the Hatchback open and remove the connectors from the top of the bumper cover.
2010 Ford Transit Connect Bumper End

It will take about an hour. Remove two nuts in lower grille - vertically beneath above bolts. Buy 2010 Ford Transit Connect salvage parts directly from the sourcing wrecking yard! Get behind the rear wheel well and loosen the bolts holding the bumper brackets on. Look at this link for some options. Another thing to remember is to wash the wheels more frequently during winter to ensure that road salt won't have a chance of causing damage in your ride. Once removed, take off the 2 black mounting brackets from the bumper cover. You need to be able to see up the back of the radiator.
2010 Ford Transit Connect Rear Bumper

Do the same to the other side. Unscrew the small down-facing Torx screw at each top rear corner of the bumper. Hope this helps Apr 01, 2010 Pop the Hatchback open and remove the connectors from the top of the bumper cover. When you install the new sensors be sure your electrical connectors click when they connect. Therefore, they have to receive double protection. You will expose the bolts that attach the rear bumper to the trunk. You need to open the lever lock and pull hard without damaging the wiring.
Ford Transit Connect Rear Bumper Assembly

Another reminder is to do away with wheels featuring machined lips. Now you should be at the point where the backup sensors are accessable. Dec 27, 2010 You only need to remove the bumper cover. One thing to remember when it comes to winter tires is to go for silver or black finish as these are better to use in winter compared to chrome, which might not be able to stand harsh winter conditions. Open the trunk of your vehicle. It's not causing any real damage, but it can get distracting and annoying at times. Remove both tail lamp assemblies.
2010 Ford Transit Connect Specs

You can also get sound deadeners, thin strips of material that you simply attach to strategic panels in your ride such as the floor and door. Using Torx Bits, remove the inner rear wheel well lining. Disconnect the parking sensors connector at the right rear corner. Jul 02, 2014 The 2010 Transit Connect headlamp assembly can removed by putting a bottle cap under the lamp to push the rubber bumper down out of the way you must have a Very bright penlight and a10 inch quarter inch extension with socket lock and a 10 mm to get the bolts out under there then you have toCut and bend a piece of plumbers strap to fry the Locking strip out and a piece of bent metal to pull off and pull the flapper out to pull the connection loose for the harness. Compass data error -- how do i determine my zone--. They're pretty difficult to find and remove. It's a fair old reach and quite fiddly though, but keep at it, in the end it's still fairly easy assuming enough light and basic toolset.
Ford Transit Connect Parts & Accessories
There should be four bolts. I'm looking for new wheels to match my tires for winter use. When you install the new sensors be sure your electrical connectors click when they connect. Under the tail lamps you will a 10mm and a 8mm bolt, remove these. Mine is the 7th post down.