2010 4.6 timing marks. 4.6L Timing Chain Replacement Kit 2019-01-19
How to Install Comp Cams Camshafts on your 1996
It is unlikely that a belt has skipped a cog, but if that happens your engine will run very rough or not operate at all. You will not find it on the new 3. Fastener tension places a load on whatever the fastener is clamping together, which is called clamping force. Use a soft mallet to gently tap it into place on the cover. This rear main seal has been lubricated around its lip and is carefully positioned to prevent damage.
4.6L 3V Complete Timing Chain Replacement Kit
The noise always lets off as the tranny shifts I'm thinking due to lack of load , and goes away as the truck enters 5th gear, especially with the converter locked up. I've also wiped down all the other gasket surfaces. Use The Right Stuff where cylinder head gaskets meet timing chain alleys. Windsor main caps have a provision for dowel pins instead of jackscrews as you see on Romeo blocks. The worst case scenario is having a valve hit a piston. Study patterns in the assembly lube on the journals.
How to Install Comp Cams Camshafts on your 1996
Step 7 - Remove the hoses You will next remove the heater hose and the lower radiator hoses from the water pump. There are subtle signs that the timing chain is going bad that mostly occur during start up in the form of a rattle or knocking and pinging sound. The 1991—1995 Romeo blocks have eight jackscrews and cross bolts. When starting the code comes immediately and returns when cleared immediately. I want to be careful not to knock the gasket off.
4.6L 3V Complete Timing Chain Replacement Kit
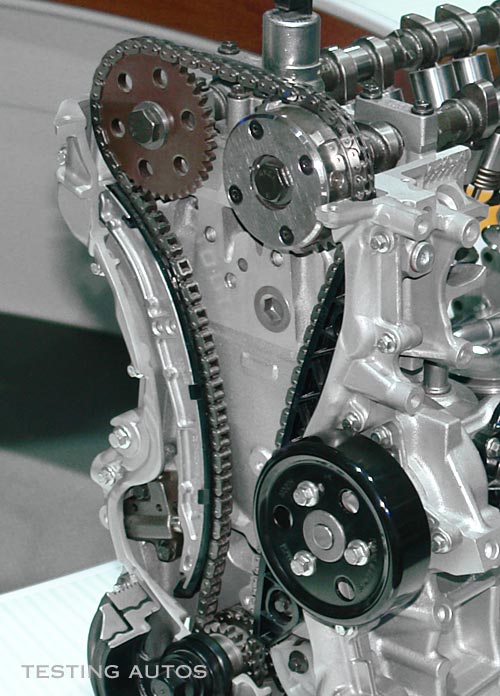
Do not use any lubricant between bearings and block. Buy or rent a torque-angle gauge. I wish I could of found this site a lot sooner to work on my first mustang. Your F-250's timing chain controls when the valves open and close by spinning the camshafts. Place a vacuum hose over the connecting rod studs to help prevent cylinder wall damage. Use a lint-free tack rag instead of a shop towel to keep lint out of your engine. Now after you have cleaned everything up and sealed the Bank 1 cam tower assembly to the head, it's time to line up and install the Bank 1 main timing chain.
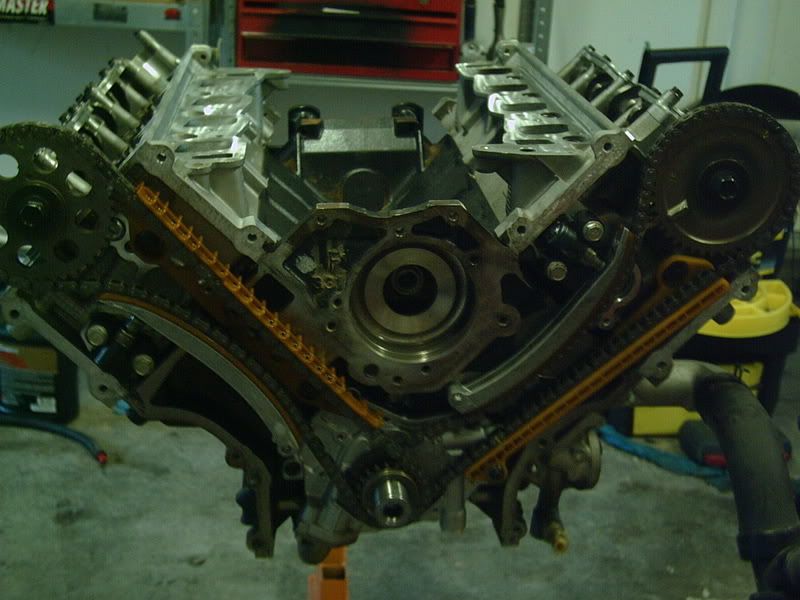
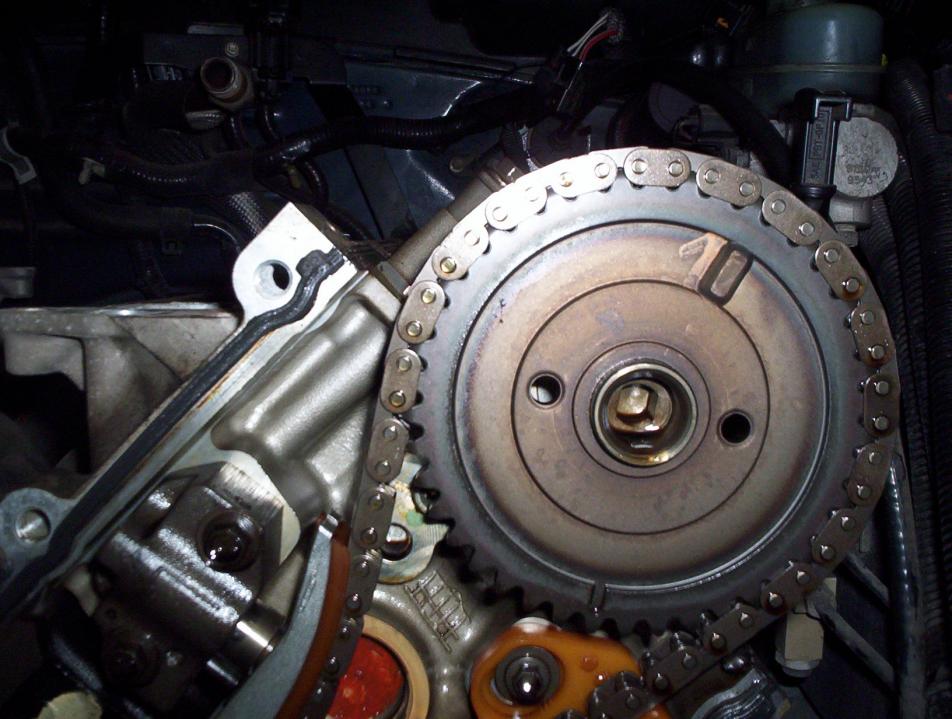
4.6L Explorer engine timing chain ooops!
You can find instructions for this procedure in haynes and other vehicle service manuals. This step is critical to proper camshaft alignment. They fit 2005-2010 Ford Expedition 5. As with every other aspect of a Modular engine rebuild, the assembly is challenging and requires your closest attention to detail. Make sure the oil-ring expander ends meet flush without overlap. This one we know we did spin it just a little bit, so we're going to bring it back up to where it should be.
Ford 4.6 timing chain

Torque the exhaust manifold nuts. This is why a mock-up build is a good idea before the final build. You can remove the sprocket and chain, as well as remove that upper guide. Step 18: Install Oil Rings Like This Roll your oil rings on like this, putting end gaps 180 degrees opposite of each other. Pro Tip Be sure to note where the wiring to the alternator goes so you don't fry it and the battery when you re-install it. Torque these to 120 inch-pounds to 10 foot-pounds.
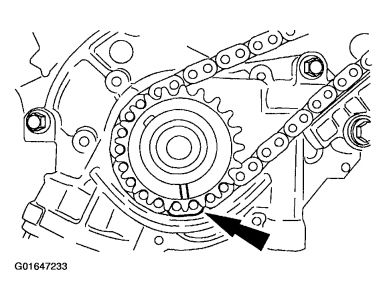
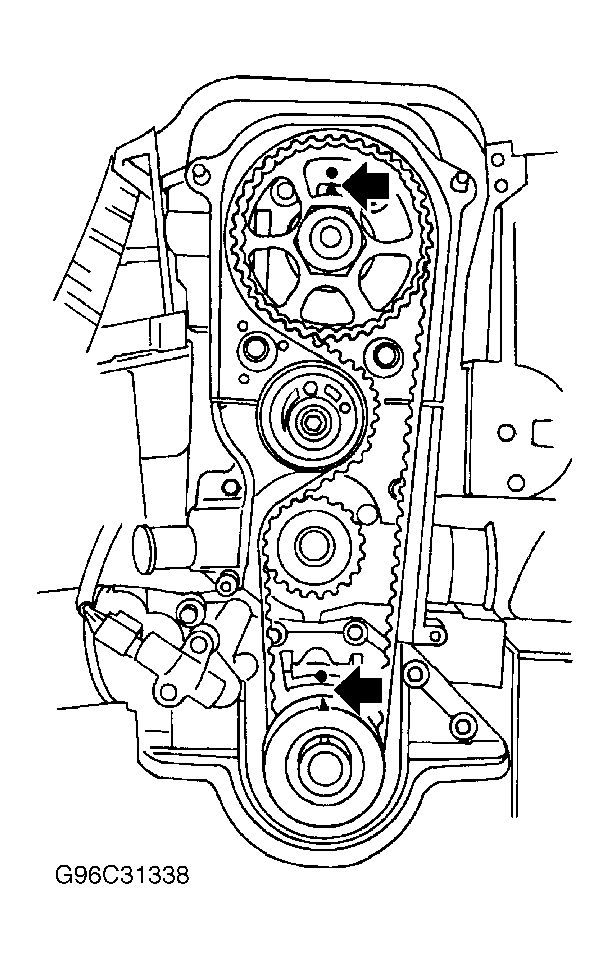
Set timing on a ford 4.0 liter v6
Step 11 - Remove the front engine cover There are several bolts and dowels keeping this in place. Resistance to torque creates the same challenge for both a torque wrench and torqueto-yield because thread irregularities affect torque. Step 16 - Finishing up Re-install all wiring harnesses, ignition coils, and other loose ends. Torque-to-Yield Torque-to-yield is also known as the torque angle. All fasteners must have lubricated threads to achieve an accurate torque reading.
4.6L Timing Chain Replacement Kit
Drive in the seal using a seal driver. Clean the mating surface on the engine block with a silicone gasket remover. This article applies to the Ford F-250 and F-350 Super Duty 2005-2014. Step 46: Record Valve Timing Events Documentation Required Check and record intake valve timing events with a degree wheel and dial indicator. With incorrect tension applied to the chain the noise increases along with the damage to the guides and the gears. Studded fasteners call for an 18-mm deep-well socket. Truck freight and oversize charges still apply unless otherwise notes and can only be shipped to the lower 48 States.
Set timing on a ford 4.0 liter v6

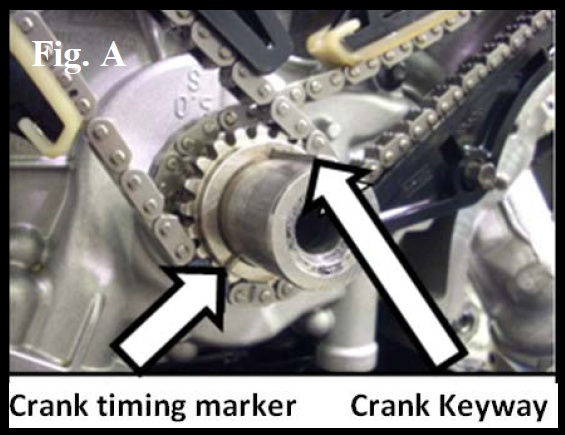
This step applies only to Romeo engines. The crankshaft should spin smoothly and not bind up when it rotates. Timing the engine starts with putting the crankshaft in the correct position. Torque Windsor cross bolts to 20 to 24 ft-lbs, and then 85 to 95 degrees with a torque-angle gauge. Not only do they include the chain and the gears they also include updated timing chain tensioners and guides. Step 17: Never Install Oil Rings Like This Important! Torque these main caps to 27 to 32 ft-lbs and 85 to 95 degrees. Step 44: Use Ford Cam Degreeing Kit Sp Special Tool The Ford cam degreeing kit includes this modified roller rocker arm with tab for the dial indicator.