2006 lexus rx400h manual pdf. Lexus RX 400 2006 Owners Manual PDF 2019-03-12
2006 Rx400h Factory Owners Manual
Use Special Tool 09950-50013 to remove the crankshaft pulley. Remove the 2 screws and assist grip. Disconnect the brake hose from the strut. Using a prytool, remove the deck trim side panel. Remove the 3 screws, bolt and front fender mudguard sub-assembly.
LEXUS SC430 2006 QUICK MANUAL Pdf Download.

Turn the camshaft pulleys back into alignment so the marks align with the notches on the inner cover 5. Left-hand cylinder head loosening sequence 15. Start the engine and check for leaks. Install the timing belt cover No. Make sure to check battery voltage before performing initialization of linear solenoid valve and calibration. Exhaust camshaft bearing cap loosening sequence 10. Install the upper oil pan as follows: A.
Lexus RX 400 2006 Owners Manual PDF
Discharge the fuel system pressure. Remove the bolt and the brake actuator bracket no. Remove left and right front door scuff plates using a prytool. Tighten to 74 inch lbs. Turn the crankshaft back so that the timing mark aligns with the notch on the oil pump. Register a Free 1 month Trial Account.
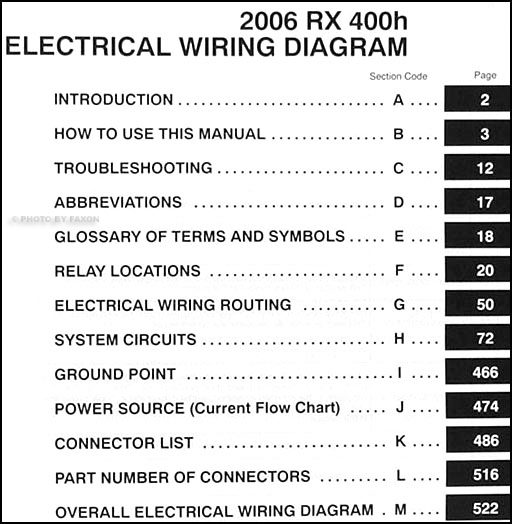
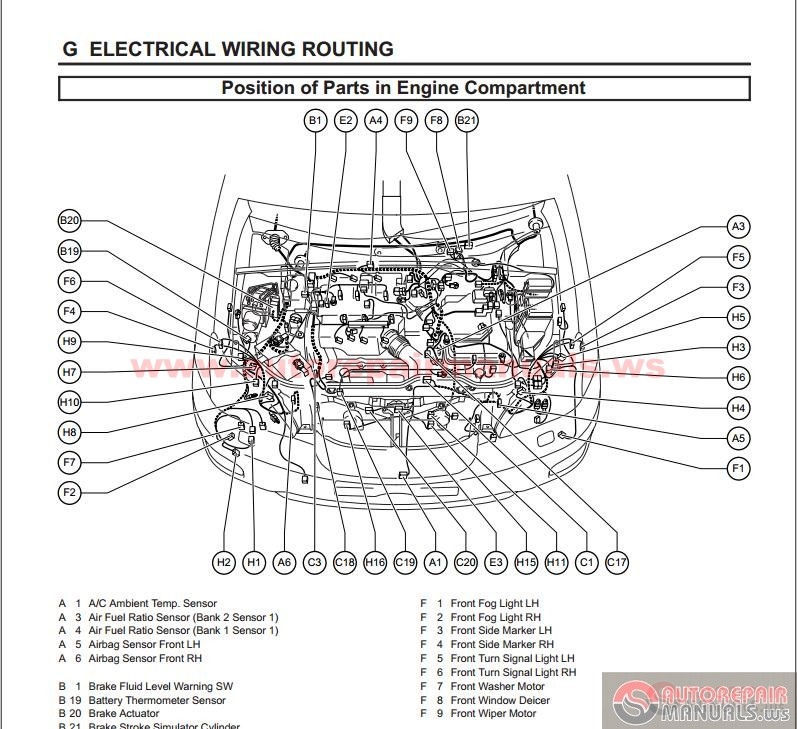
2006 LEXUS RX 400h RX400h
Clean the installation hole and the surface for the speed sensor every time the speed sensor is removed. Install power steering converter cover, as follows: A. Install the engine to a suitable engine stand. Place the camshaft on V-blocks 4. Remove the inner seal from the hub. Install the suction tube bracket with the bolt and tighten to 87 inch lbs.
LEXUS SC430 2006 QUICK MANUAL Pdf Download.

Using a knife, cut off the oil seal lip. If necessary, perform the initialization procedure, as outlined in the Chassis Electrical System. Slowly raise the rear suspension member into place. Remove the 6 nuts and 6 bolts, then remove the housing as shown in the illustration. Drain the coolant from the engine radiator and hybrid transaxle. Refill the engine oil to the correct level. Connect the speed sensor rear connector.
Lexus Service Manual

Turn Signal and Hazard Warning Light, Taillight and Stop Light 2006 Fig. The last file, Seat, does not have a page number, but is a safety message to buckle up. Power Source 2006 Page 118 Fig. Breaking down is inevitability with all cars in time. Install the remaining components in the reverse of the removal procedure. Standard resistance cold is 14-122°f -10-50°c and hot is 122-212°f 50-100°c.
2006 LEXUS RX 400h RX400h

This repair is covered under the Lexus. Install the front speed sensor, as follows: A. Piston ring positioning Page 33 Back to Top Fig. The last file, Seat, does not have a page number, but is a safety message to buckle up. Disconnect the front speed sensor connector. If the ignition switch does not turn easily Turn the ignition switch while lightly moving the.
Lexus RX400h Workshop Manual PDF

Rear manifold nut locations Page 23 Back to Top Fig. If necessary, perform the initialization procedure, as outlined in the Chassis Electrical System. View of the speed sensor connector and clamp D. Remove the metal rod from the tensioner. Apply seal packing part no.
Lexus Rx 400h Service Manual
Before servicing the vehicle, refer to the Precautions Section. The exhaust valve clearance cold is 0. Turn Signal and Hazard Warning Light, Taillight and Stop Light 2006. These recorded measurements will need to be used in conjunction with a mathematical formula to Page 46 determine the thickness of the replacement shims. Remove right and left, front and rear door opening trim weather-stripping. Use the special tool to remove the crankshaft pulley 5.
2006 Rx400h Factory Owners Manual

The intake valve clearance cold is 0. Remove the transverse engine mounting insulator. Left exhaust camshaft bearing caps must be placed in their proper locations Fig. Tighten to 74 inch lbs. Installation is the reverse of removal. Remove or disconnect the following: Negative battery cable Left-hand engine side cover No. Insert a suitable metal rod through the holes to hold the plunger in position 8.