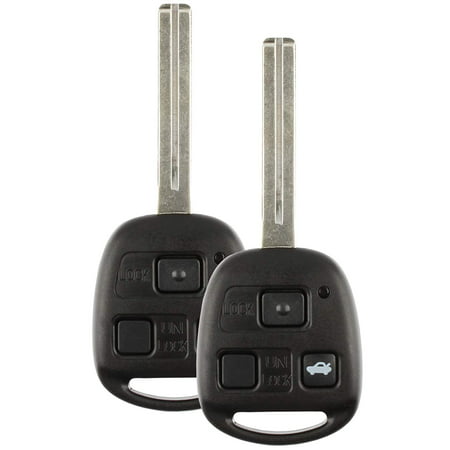
2005 lexus key fob battery size. New Keyless Entry Remote Key Fob For a 2005 Lexus ES330 w/ Programming 2019-04-13
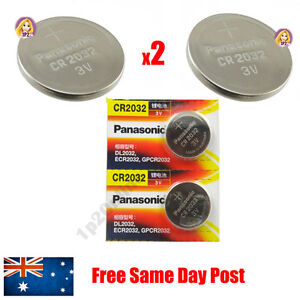
Remote Key Battery
Take it back to the dealer immediately. This how to replace the in your Toyota Key Fob guide was specifically written for owners of the 2003-2009 Toyota 4Runner. I found it easiest to put the rounded end together first before snapping the ends where the physical key goes in. First you need to read the back of the fob. Then hook the back on and use the longer screw to hold it in place.
New Keyless Entry Remote Key Fob For a 2005 Lexus ES330 w/ Programming

Replacing it is very simple and you only need a thin screwdriver and the replacement battery. If you are looking to do some international online shopping, be sure to visit. If your car pings… this work on the 2004 rx330 Make sure only the odometer display is on - ie. Line the battery up with the circular marking on the inside of the fob, then clip the other half of the fob on top. You will have to take your vehicle to a Lexus Dealership or Automotive Locksmith in order to have the key programmed to start your ignition.
What size battery for a Lexus rx330
Dear Friends My dash warning comes occasionally Red triangle indicating that the remote proximity key is not found while I am driving. Stick a slim screwdriver into this opening and twist it until the two halves separate. If the locks don't immediately respond to the remote, insert the key in the drivers door and lock the car, then try opening it with the remote. Test that the fob works correctly by unlocking and locking the car doors. They should help you - if not, let us know.
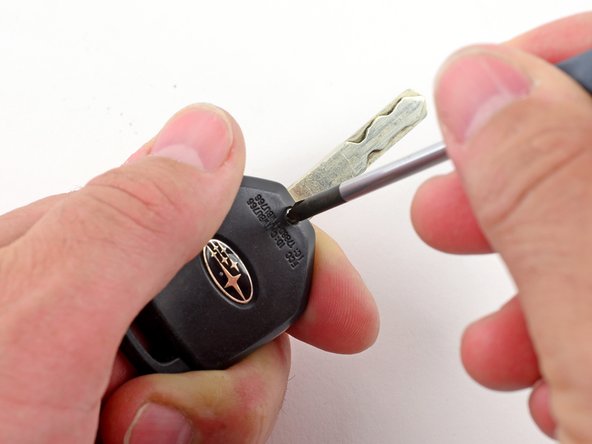
How to Replace Battery Key for Lexus GS300
Hope this works for you. I am trying to find it myself. You should not need to program the fob if you are just replacing the battery. Great service yet again from them. Perform these steps within 40 seconds. As simple as it sounds, the owner's manual is the best place to start for brake light bulb lamp replacement instructions and illustrations.
New Keyless Entry Remote Key Fob For a 2005 Lexus ES330 w/ Programming

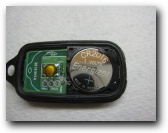
Obtain all remote transmitters for this vehicle. You are completely under warranty. Also batteries get low when cars are sitting on dealer lots. The key will open to reveal the circuit board and battery. I have a 2000 s4. It is quit stiff so a fair bit of pressure is required.
Remote Key Battery

It is a small solor cell abut 2 inch by 12 inch. It's just hard to determine from the pic you posted what it looks like exactly. I agree the smart key can cause trouble, but your post sounded like you weren't walking past the car with the key. Pop the transmitter module out by pressing the buttons. It is quit stiff so a fair bit of pressure is required. Poor connection can cause intermittent problems.
What size battery for a Lexus rx330
It also has instructions on how to clear all remotes from the vehicle. As for how to avoid geting stuck with a dead battery. When the battery in your keyless entry system dies you will not be able to unlock or lock your doors, pop open your trunk or use the vehicles panic button. As long as some sun light hits the cell. Put the inside of the key back together using the two small screws. But first i would try from in the engine compartment, the way you change your low and high beams because that would be a much easier way… oem suggests 92 octane or better, mid grade 89 can be used.
What battery goes in a 2005 lexus SC 43o key fob
Instructions on how to replace the battery in a Toyota Key Fob Is your Toyota Key Fob not working? Get a small self contaned jump start unit, and keep it charged. Make sure you have a good connection at both posts. Use a small flat blade screwdriver to lift the free edge of the battery and slide it out away from the retaining tabs. Then consult your owner's manual for the replacement procedure. In order to open the Toyota key fob you will first need to remove the fob from the key ring it is attached to. On the back, there is a slide switch that allows you to remove the metal key.
What size battery for a Lexus rx330

The lid you need to open is on the side with the Audi logo on it. In order to get the fob to work again, you must insert the key in the drivers door and lock the car while pushing down on the lock button , then try opening it with the remote. After that, you have to slowly work your way around the felt covered piece and carefully take it out. Almost all the time it is in the pocket. They routinely jump start cars on dealer lots because the batteries go dead all the time. Replace the fob back and re-insert the screw, making sure that the assembly is firmly reattached.