1997 toyota rav4 clutch replacement. 1997 Toyota RAV4 Replacement Parts 2019-04-15
Toyota RAV4 Clutch Replacement Cost

Place a trolley jack under the gear box. Basically it is Remove the battery terminal. Unbolt the center bolt and pull out the filter 14. Now re install using the reverse processes As I said a manual shows it all Dec 14, 2013 start off with the cheap possibilities and make your way threw. Do not lose the retaining bolt in case you need to reference it later. Expect a lighter clutch effort than your previous clutch, a big help when driving in high traffic urban areas or in high performance vehicles with extremely heavy clutch efforts.
SOLVED: How to replace clutch step by step on a toyota

Make sure they have put it back! Wait for engine to stop 6. You may have to pull the lower timing cover to get the mount out after you unbolt it. Now assemble the clutch disk and the clutch plate and put the bolts back in without tightening them. A less expensive alternative is to get a replacment kit. Once the retaining bolt is removed, as described in Step 1, simply pry the clutch away from the mounting surface using your hands.
SOLVED: How to replace clutch step by step on a toyota

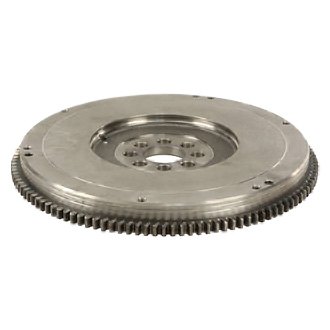
The cabin air filter is located behind the glove compartment. Any damage justifies having the flywheel machined or replaced. When tightening the flywheel, do it in a star sequence to the manufacturer's recommended torque. Other than getting the Transmission down it's not really that difficult of a job. Take all four bolts out then disconnect the bulb from behind.
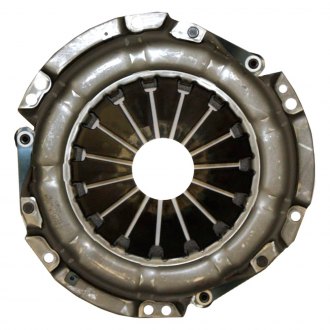
1997 Toyota RAV4 Clutch Kit
Secure the engine by placing a jack under the oil pan. Now that everything is removed from the transmission and the engine is secured place a transmission jack under the transmission and slightly lift up on it to remove pressure from it. We recommend marking everything you remove so you remember where it came from when you reinstall the items. Step 3 Secure your car in a safe position before jacking up the front end. The automatic version doe not have this ability. On the rear of the drive shaft is a universal joint u-joint. Disconnect the quick coupling on the aft part of the assembly buy lifting up on the red plastic pience and turning 13.
1997 Toyota RAV4 Replacement Parts

Some garages quote thinking the engine comes out from above - it doesn't. Air tools make a huge difference. No need to panic, just bolt in a new Centerforce Dual Friction Clutch Kit to experience a superior performing clutch. After installing a Centerforce Performance Clutch you can expect much smoother and quicker clutch-engagement than stock clutches and a longer-lasting clutch experience. Remove this bracket, then remove the remaining water pump bolts.
1997 Rav4 Clutch Problems: I Have a 1997 Rav4 with a Standard ...

To put the new one on just reverse the ste … ps, mount the new one, hook the hydraulic line back up, fill the master clutch cylinder resivoir with brake fluid and bleed it again. Adjust the clutch pedal clearance to spec and you're done. Valeo is a global company that engineers thermal, powertrain and other automotive systems with emission reduction and intuitive driving in mind. First, let me tell you that I have worked on many cars for many years and consider myself a very capable mechanic - however, this replacement was a true challenge. If the flywheel was removed, make sure to properly clean the crankshaft flange that it bolts to.
SOLVED: How to replace clutch step by step on a toyota

Step 2 Separate and remove the clutch from the shaft of the compressor. If the flywheel was removed, make sure to properly clean the crankshaft flange that it bolts to. I recommend you get the Haynes or Chiltons Repair manual on your vehicle for step by step directions and recommendations on tolls, special or otherwise. Remove, machine and reinstall the flywheel, if needed. The challenge was prim … arily due to the close proximity of the front of the engine vs. Support the engine using an engine brace or transmission jack, from the top, and disconnect the top gearbox mounting from the gearbox. Remove the front engine mount.
1997 Rav4 Clutch Problems: I Have a 1997 Rav4 with a Standard ...
This step, for me, required a propane torch to heat the crank bolt, which loosened the threads from the overflowing Locktite that was visible. Step 2 Unhook the positive battery cable, the clutch cable or hydraulic slave cylinder to get the transaxle ready for easy removal. Loved by manual-transmission drivers everywhere, Centerforce offers a variety of clutches catering to all driving requirements. It wasn't too hard, the hardest part was the three bolts holding the motor mount to the block. Step 4 Stabilize the engine with a jack below the oil pan.
1997 Toyota RAV4 Clutch Kit

Carefully, move the transmission forward until the input shaft enters the clutch disc's splined opening center. Place a trolley jack under the gear box. When you open the glove compartment it is stopped by plastic tabs on both sides. Also look for any oil leaking around the rear main engine seal. You will now be able to remove the clutch pulley from the compressor.
RAV4 Clutch Sets

Disconnect negative battery cable 8. Step 4 Reinstall any bolts or mounts that were removed to replace your car's clutch. Next, remove the bolts holding the pressure plate to the flywheel and remove both the pressure plate and the clutch disc. Once the bolts are removed, carefully move the transmission away from the engine until the input shift clears the pressure plate. Now take the clutch alignment tool and push it thru the clutch disk and into the new pilot bearing. .