1997 lexus es300 headlight bulb. How do you replace the trunk light on a 1997 Lexus ES300 2019-05-03
Lexus ES300 Headlight Bulb
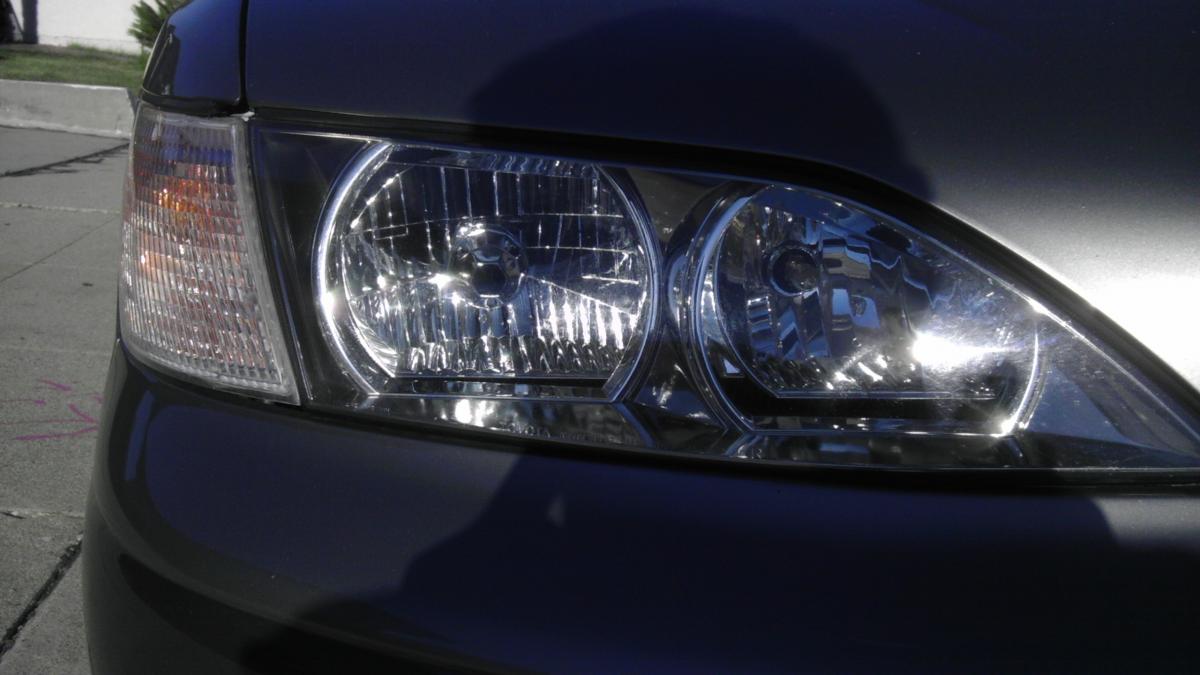
Instead, use a glove or wrap the bulb in a clean cloth as you work. Answer I had the same problem. Tools required: One small Phillips screw driver. Above the area of the turn signal there will be a piece of black plastic that extends from the left side of the front of the car to the right. I would have found this almost impossible to do without removing the headlight assembly first.
How to Change the Headlamp on a 1997 Lexus ES300

Open the vehicles hood and secure it. If you look close you will see the openining where the bulb will slip through. Just pull it up and out of the way. You need an owner's manual to know what items to service and when, and for specifications. In this case if its the driver side pull up the plastic tab holding down the pl … astic strip in front of the battery directly above the headlight and lift it up. Prepare to have your fingers hurt. Turn steering wheel opposite direction of the lamp that is burnt out.
How do you remove headlight bulb from 1997 Lexus es 300

Do not tuch the new bulb with your hands the oil will reduce the life of the bulb. On either side opf the car, there is a spring type wire that holds the bulb in place, it is located under the rubber boot undo the wire clip and the bulb assembly will fall out, or you may need to pull slightly. There is a wire clip holding in the headlight bulb. Place … the fuse back in thefuse box and reconnect the battery. Certainly - in the owners manual.
How do you replace a headlight bulb in 1997 es300 Lexus to change bulb after removing small Phillips head screw from bracket
The cover slides straight forward. From the back seat face the back window. Turn them all the way I don't remember if it's clockwise or counter-clockwise and you should see the headlight opening up. Good… The easiest way for me to do this was to remove the entire headlight assembly and then remove and replace the bulbs. Remove the bolt at the end of the headlamp housing. Its very hard to reach. Disconnect the wires from the bulb just pull connecter straight out ; 2.
How do you replace a headlight bulb in 1997 es300 Lexus to change bulb after removing small Phillips head screw from bracket

Or you can detach the wires from the socket to lift the entire cover away for easy access. After that you have to unlock the locking bracket by just pushing it out of the groove. Remove screw and carefully slide housing forward. Push down on the locking clip and remove the bulb. Remove the plastic outer housing located inside the engine compartment. The bulb bracket has notches in it. Then remove the clip on the back of thelighter and slide the metal part out the front.
Lexus ES300 Headlight Bulb

Its a all day job. Between the steering fluid compartment and the headlight, there is a very small space for you to squeeze your hand in. There are 2 pins on each headlight that go downwards to hold the headlight in place. To remove, make sure you take the headlamp bezel off 2 screws above the headlight itself. The hardest thing was getting off the harmonic balancer. The result is the unsung hero of automotive lighting and favorite of automotive enthusiasts in the know; Nokya Pro-Halogens.
How do you replace the trunk light on a 1997 Lexus ES300

The next part is tricky as the owner's manual fails to tell you how to lift out the assembly. The answer to the question for a 2004 Civic helped me - mainly by pointing me to the Owner's manual. Hold the outer part of the rivet, and pull up the center part. Unfasten the ring… Some help there is a screw located between the bumper and the vehicle you must use a long Phillips to get to it, most likely the plug is loose that is the problem I had. This clip is located in the middle of the assembly. You have to remove the battery to replace the passenger side one. The middle bolt has a bracket connecting it to the vehicle by… 1 Open the hood.
How to Change the Headlamp on a 1997 Lexus ES300

Replacethe rivet in the trunk liner. It is riveted in with plastic rivets. If you open the hood and look behind the bulb assembly you will see two sets of wires going to the back of the bulb. Next grab the outside lip of that same… I just had to replace mine. Replace the fasteners you popped out back into the shield holes. Now to the dim light.
How do you replace the trunk light on a 1997 Lexus ES300
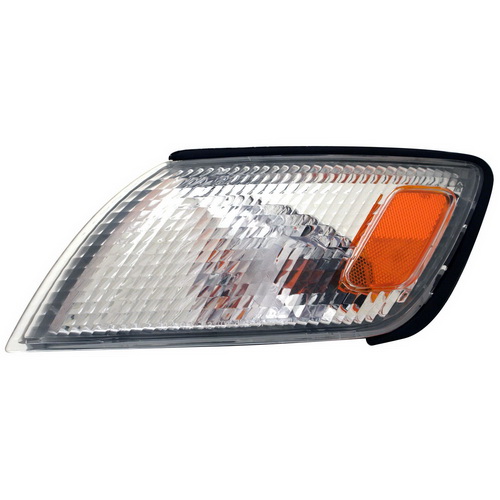
Here are the steps I followed: Raise trunk and locate and remove the two screws on the plastic taillight assembly. This is what threw me off. Established in 1997, Vision X engineers and manufactures advanced lighting products for the automotive aftermarket. First unplug the electrical connector from the bulb white plastic plug with two wires. Most Lexus owners should be able to complete this task in less than 10 minutes. Once this is done you can put the new filter in place and you are finished. You can get to the back of the light assembly holding the bulb you want to replace two ways - from below or above ….