1991 toyota previa repair manual pdf. Toyota Previa Repair Manual Online 2019-03-28
Toyota Previa Workshop & Owners Manual

Make sure the battery terminals are not loose or corroded. When the battery is being charged, it gives off explosive hydrogen gas. Uniformly tighten the head bolts to 29 ft. Do wear safety glasses or goggles when cutting, drilling, grinding or prying, even if you have 20-20 vision. Check that the air passes freely through the sides of the air filter. Hold the camshaft with a wrench and tighten the bolt to 54 ft. Disconnect the negative battery cable and remove the electrical connector from the injector to be tested.
Toyota Previa Workshop Manual PDF 1/225

Install the fan clutch with the fan to the engine. If the gaps are not as specified, adjust the position of the insulator. Paint matchmarks on the rear flexible coupling, flange and crankshaft pulley. Refill the engine with oil. Slide on the chain case over the dowels.
0 x Toyota Previa Workshop & Owners Manual PDF's 1991

Remove the thermostat and gasket. Check that air flows from port E to the air filter. Pull the cylinder head from the dowels on the cylinder block. If the ammeter is less than standard, replace the alternator. Place the cylinder head in position on the gasket. There are ground straps between the equipment drive housing and body, and between the alternator and negative battery terminal.
Toyota Previa Workshop & Owners Manual
Drain the engine cooling system. Install and tighten the two bolts to 14 ft. Mark the front of the cylinder head bolt with paint. Place matchmarks on the timing sprocket and chain. Get access to our 1991 Toyota Previa repair information right now, online. Be sure to disconnect the negative battery cable first.
Toyota Previa Owners Manual
Unlike many other retailers, there is no minimum purchase requirement! When you have finished working, reset the audio systems and adjust the clock. Disconnect the negative battery cable. Disconnect the equipment driveshaft from the ground strap. The resistance cold should be 37-44 ohms. If the camshaft is not being lifted out straight and level, retighten the 2 No. Rasie and support the vehicle and install the No. Install the remaining components and check for leaks.
Toyota repair manual free download
Fill the cooling system and fill the engine with oil. For phone sales or help with product fitment questions, our U. Also be sure that no activated carbon comes out of the canister during the cleaning process. Raise the engine and remove the motor mounts. Place the camshafts on the cylinder head. Oil the bolts and using the proper sequence, tighten the bolts in 3 steps. Jacks are for raising vehicles; jackstands are for making sure the vehicle stays raised until you want it to come down.
Toyota repair manual free download

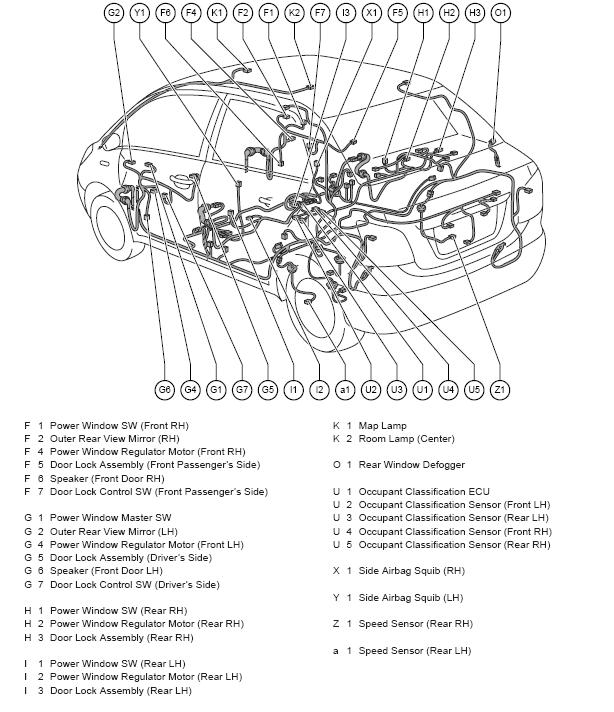
Complete coverage for your 1997 1996 1995 1994 1993 1992 1991 Toyota Previa including routine maintenance, tune-up procedures, engine repair, cooling and heating, air conditioning, fuel and exhaust, emissions control, ignition, brakes, suspension and steering, electrical systems, and wiring diagrams. Remove the three bolts from the rear of the timing chain cover. Disconnect the cold start injector wiring. Disxconnect the supercharger by-pass valve wiring. Likewise, keep your tools clean; a greasy wrench can slip off a bolt head, ruining the bolt and often harming your knuckles in the process.
Previa

In 1998 the Previa was discontinued and replaced by the Sienna in North America, although it's still sold in Europe. Any doubts perform the following test. Slowly remove the union bolt and two gaskets, the disconnect the fuel pipe. Disconnect the radiator hoses and coolant reservoir hose from the radiator. Remove the cam sprocket and chain from the camshaft and leave on the slipper and damper. If equipped with an automatic transmission, connect the transmission cooler lines. Install the bearing caps and tighten to 12 ft.
Toyota Previa (1991
Find your 1991 Toyota Previa repair manual right now at Chilton. Sixity Auto has partnered with Trustpilot, the industry leader in tracking customer loyalty and feedback, to bring genuine product and customer service reviews. Disconnect the power steering reservoir. Oil the bolts and using the proper sequence, tighten the bolts in 3 steps. Remove the exhaust manifold and heat insulator. Install the crankcase baffle plate, oil pan, No.