1977 toyota pickup wiring diagram. Dec 1977 Wiring Diagram help 2019-01-23
1977 Toyota Pickup Service Manual Online Download
I'm not completely sure of the '77 has it, but my '86 has an emission control unit that I suspect to be the culprit of my charge light problem. I'll confirm it tomorrow, I'm almost certain my bottom was the headlight cause it burnt up. However make sure to use new head bolts when buying and replacing a head gasket and find some litterature on the correct lbs of torch and sequence for your head bolts. The Fuel Pump relay is in the cab to the right and above the steering column. So if anybody can help me, that'd be just wonderful.
79 Fuel Pump relay diagram
When I change out of reverse, the light dims. To make things worse - I think I've got the wrong fuse box cover, it came with the truck. . Under system click on engine , then under subsystem click on fuel controls. If you didn't install an immobilizer circuit, then you don't need the bypass. You will also need a torch wrench for proper torch. And this is where it all began.
Dec 1977 Wiring Diagram help

It's got to be their fault all of this happened. Staring back at me like a red trapezoidal demon from beyond the physical plain. I hope my solution helps you. I knew there was a reason I should have had a child! This almost certianly means that A is the connection to the fuel pump. I'd rather not start tearing things apart if I don't have to. So I took it apart to understand if it was working correctly. High resistance can cause problems.
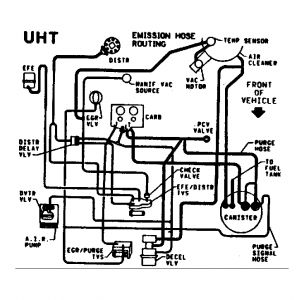
20r vacuum hose diagram for a 1977 Toyota 2wd pick up

Also, if you're having trouble finding it, follow the gas lines from the tank towards the front of the truck, don't ignore the bits hidden by undercarriage framing as they may also hide the filter. It's the minumin required, to power those cheap, … paper speakers, installed at the factory. Most relays have a diagram on them showing which terminals are power in and power out. Aparently the scews were run in at the factory by a tab that breaks off when they are tight. It is affiliated with autozone There are a lot of diagrams in the diy section Just read through it and answer the questions It will show you spec and info on how to do it yourself. Have a helper pump the clutch several times and hold it down reservoir needs to be full loosen the… The method used, to see how your fuel filter is performing, is the same one, used to test how well, the oil filter is performing.
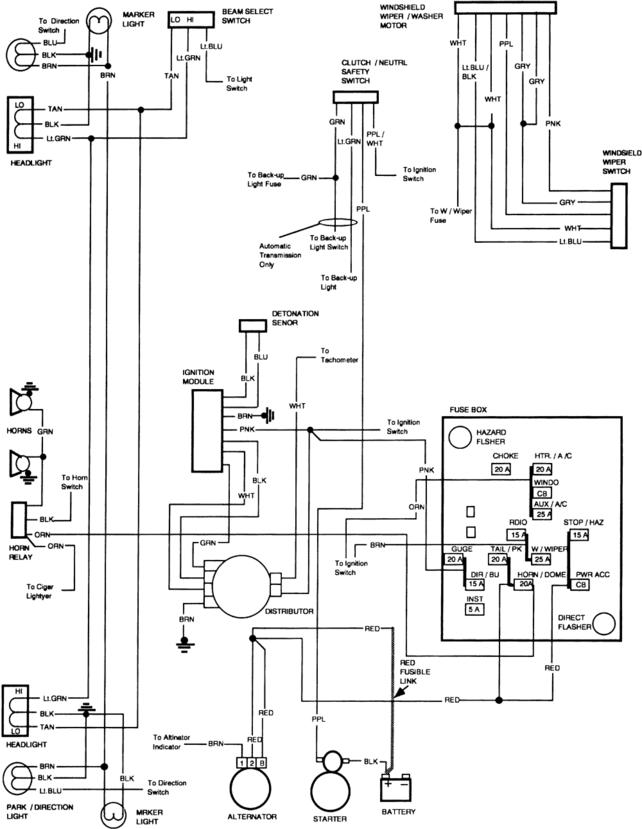
1977 Toyota Pickup Truck Electrical Wiring Diagram Original

Radio - with shorter style fuse. I Assumed the order on this diagram matched the fuse box, but my fuse box is different. Weird, the buzz doesn't sound. Same holds true, for the +12 volt pwr, going to the factory radio. I would love to test between A and the top of the fuel pump, but I can not do this without lowering the gas tank this weeks plan as my head is too large.
20r vacuum hose diagram for a 1977 Toyota 2wd pick up

If I go searching, do I have to check every confounded wire? The fuel system is under pressure. And a weird fizzling sound. Maybe help will come of this. Usually the contents are reddish brown in color, that being the rust in the fuel system, normal that the filter traps. Thought maybe a diode or brushes in the alternator were going bad, so I purchase a remanufactured part from Autozone Duralast part 14153.
Charge Light ON 1977 Hilux

A week later the light came on. You can also find other images like chevrolet wiring diagram, chevrolet parts diagram, chevrolet replacement parts, chevrolet electrical diagram, chevrolet repair manuals, chevrolet engine diagram, chevrolet engine scheme, chevrolet wiring harness, chevrolet fuse box, chevrolet vacuum diagram, chevrolet timing belt, chevrolet timing chain, chevrolet brakes diagram, chevrolet transmission diagram, and chevrolet engine problems. Then I replace the alternator with the Duralast one. Remove the old alternator and while I have it out, I do some cleaning of the engine bay. Have a new filter on hand, because the test destroys it. This is the same but different. It is very easy to suck air up into the slave cylinder so I suggest that you put a piece of tubing on the bleeder valve and run it into a small bottle of brake fluid so if it does suck it will get fluid and not air.
1977 Chevrolet Truck Wiring Diagram

They can be a small factor to consider if you want to maximize your load without over filling it. So learn how to test an not guess. This Information about 1977 chevrolet truck wiring diagram has been published by Maria Rodriquez in this category section. Click the search button then the blue link. Then back it off the the next…. I think the key is necessary to do it this way.
Reading : 1977 Toyota Pickup Wiring Diagram
That light is the bane of my existence. This 1977 Toyota Pickup Service Repair manual has the step-by-step instructions and detailed diagrams for all workshop procedures. Thats the reason we are showing this topic at the moment. In Nov the washer bottle changed and no telling what else. I have a Jun77 and can't say until tomorrow.
79 Fuel Pump relay diagram

In fact I don't even think I needed an alternator to begin with. Use the Web browser and just type what you are looking for. Hook up connections and put the key in. As far as I know the fuse cover is original, almost everything is on mine. Often times other circuits share a space. Now back to what I was doing. It's a white plastic piece.